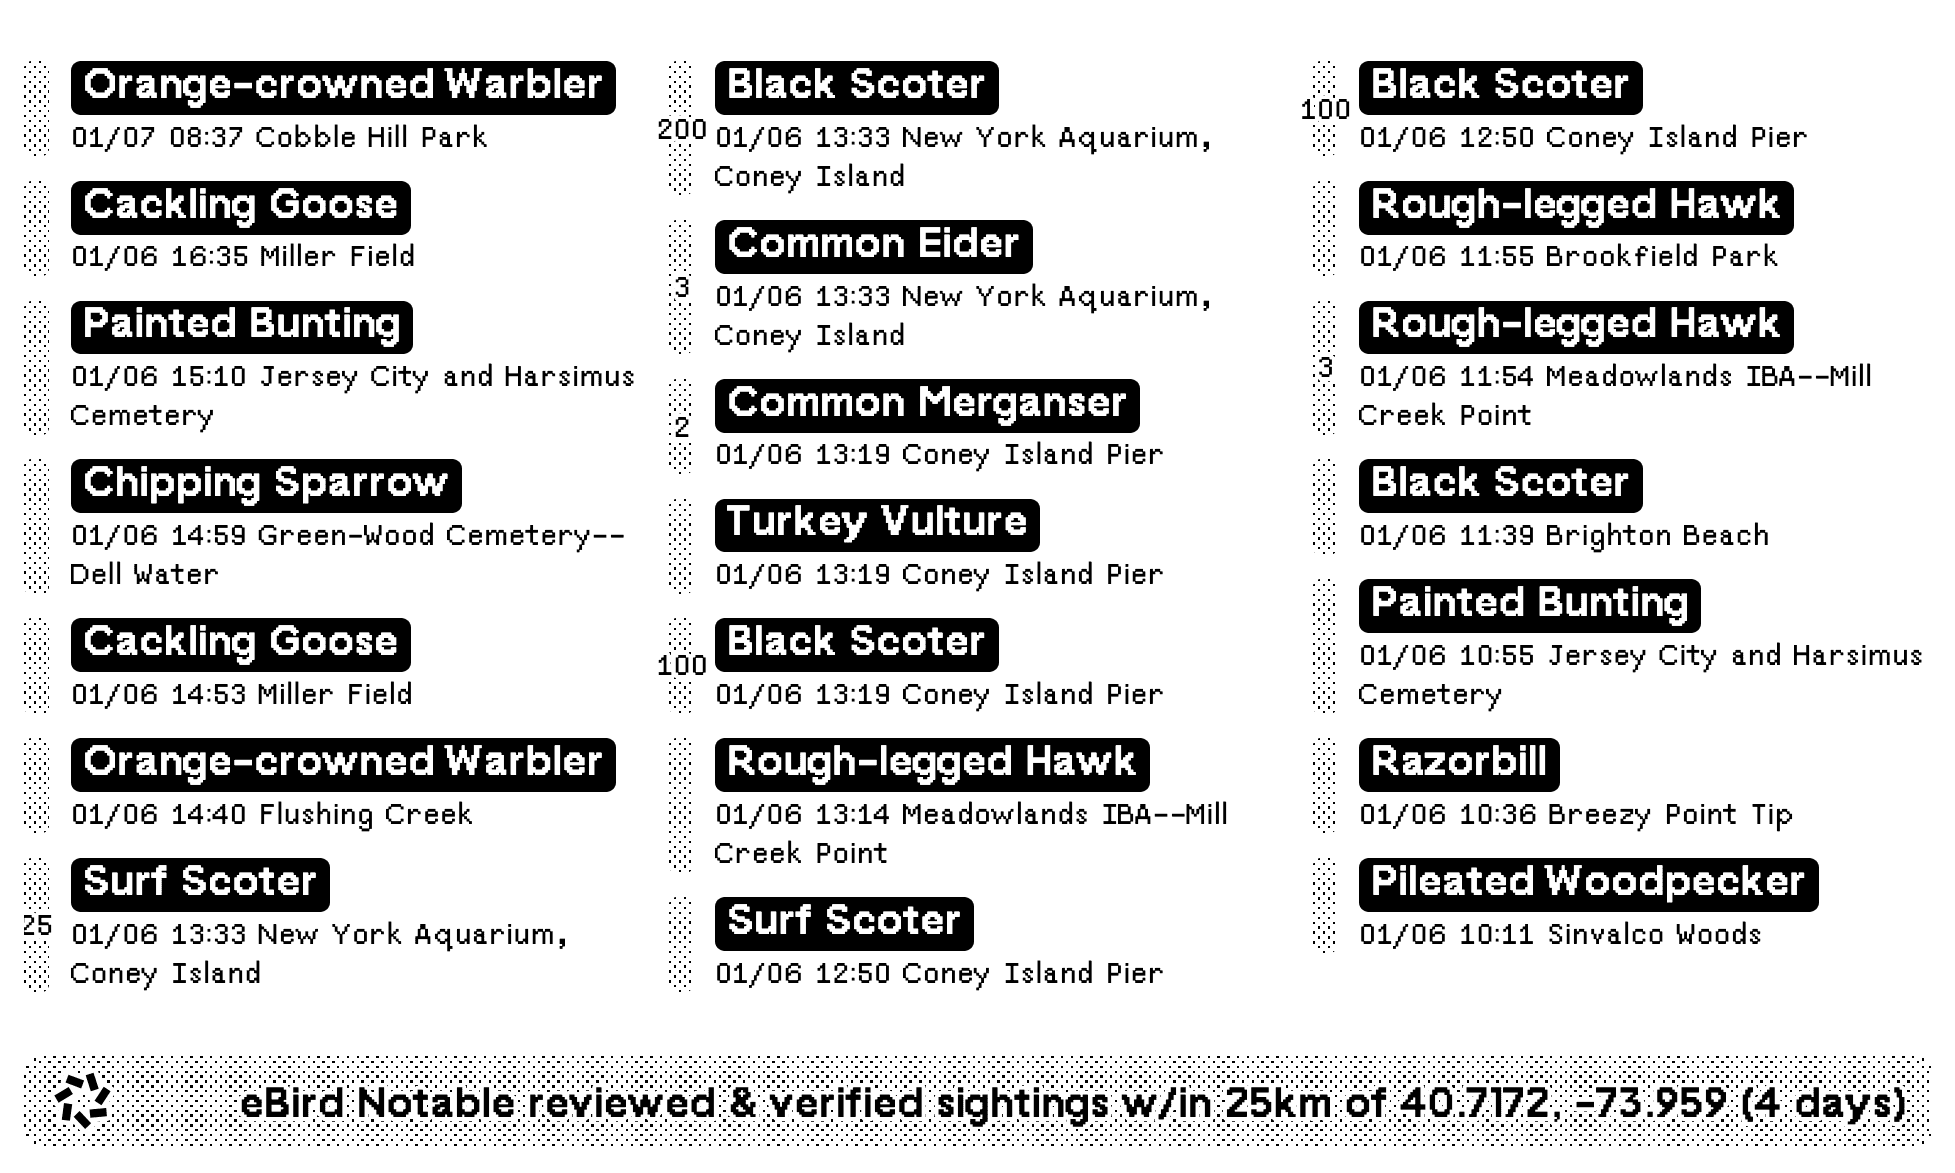
NY State Renn Faire 2025
Lossless Cut. When I have an hour of video and I need to extract 5 minutes I reach for Lossless Cut instead of Final Cut. It’s a cross platform GUI built on top of ffmpeg. It can merge clips from the same camera in to a single file and extract pieces of a file, both without reencoding. It compliments the commands documented here. I like that I can watch through a video, mark multiple sections for export, and then export them all at once. Since it doesn’t reencode the video it’s much faster than using conventional video editing software.
A few caveats:
My go to commands for processing GoPro footage (or really any video) with ffmpeg:
Merge all mp4 files in to a single file without reencoding:
This is very useful on computers without powerful GPUs (older computers or in my case my Synology NAS)!
ffmpeg -f concat -safe 0 -i <(for f in GX*.MP4; do echo "file '$PWD/$f'"; done) -c copy output.mp4
for i in GX*.MP4; do ffmpeg -i "$i" -c:a copy -c:v h264 -crf 22 "${i%.}_lowres.mp4"; done
ffmpeg -i $1 -vn -acodec copy "${1%.*}.aac"

TRMNL Earthquake Recipe I’m having fun building TRMNL recipes! Here’s one that shows recent earthquakes (pulled from USGS’ public API) and plots them on a map.

NYC Subway Alerts plugin for TRMNL Trmnl is proving to be the internet connected eink screen I always wanted to build but never wanted to maintain. It lives in my kitchen and predominantely shows my calendar but I decided to try building a recipe of my own. It was pretty easy and I’m pretty happy with the result!
Uploading an entire directory to the Internet Archive: I had a collection of files around ~50 GB in size that I wanted to upload to a single item in the Internet Archive directly from my NAS. There is a cli that could work but didn’t have a trivial way to upload all the files in a directory. I tried the S3-compatible endpoint with Cyberduck but that also didn’t work as expected.
I ended up leaving running the Python library in a detached tmux session
# In Bash:
python3 -m venv venv;
source venv/bin/activate;
pip install internetarchive;
# In Python:
from internetarchive import upload
upload('DESTINATION_ITEM_ON_INTERNET_ARCHIVE', 'LOCAL_FOLDER/', access_key='YOUR_ACCESS_KEY', secret_key='YOUR_SECRET_KEY')
Note: Remember, uploading things to the Internet Archive makes the email address associated with your account publicily visible
Whiteface Mountain and Mount Esther
Grandpa hiked Mount Marcy in 1955. After hiking Mount Marcy twice myself I recognized where one of the pictures was taken.


Marcy Dam was damaged by Hurricane Irene in 2011 and the dam has since been removed (Wikipedia).
The same view in 2019:

SSH to server via Tailscale if possible: If Tailscale is not running fall back to a different IP
Requirements:
Replace the following values:
{SERVER_NAME}: These configuration options will be used when you type ssh {SERVER_NAME}
{SERVER_USERNAME}: The username you use to connect to the server
{SERVER_TAILSCALE_IP}: IP Address or DNS name
{SERVER_NON_TAILSCALE_IP}: I said “IP” but “hostname” will also work here
{SERVER_PRIVATE_KEY_FILENAME}: Private key to log in with
# If Tailscale is running connect via this:
Match originalhost {SERVER_NAME} exec "[ $(/Applications/Tailscale.app/Contents/MacOS/Tailscale status --json | jq -r .BackendState) != Stopped ]"
HostName {SERVER_TAILSCALE_IP}
User {SERVER_USERNAME}
IdentityFile ~/.ssh/{SERVER_PRIVATE_KEY_FILENAME}
# If Tailscale is not running connect via this:
Host {SERVER_NAME}
HostName {SERVER_NON_TAILSCALE_IP}
User {SERVER_USERNAME}
IdentityFile ~/.ssh/{SERVER_PRIVATE_KEY_FILENAME}
Opening Signal Desktop Database on MacOS: I’ve seen some conflicting processes out there, here’s what worked for me in May, 2020:
Download and install DB Browser for SQLite but note that YOU MUST download the version specifically built with SQLCipher support. This version is not obviously available on their website, but you can find it in the nightly build folder here
When I tried to open the database with the default version of DB Browser it asked for a key or passphrase but it was never successful in decrypting the database. (This was what you might call infuriating)
You can find those builds here: nightlies.sqlitebrowser.org/latest
Open the folder in Finder by pressing Shift + Command ⌘ + g (or open the Window menu and click Go to Folder) and enter the following path:
/Users/{USERNAME}/Library/Application Support/Signal
Open the file config.json in your favorite text editor and copy the value of key, for if you saw the following you would copy A_VERY_LONG_STRING_OF_LETTERS_AND_NUMBERS without the quotation marks.
{
"window": null,
"key": "A_VERY_LONG_STRING_OF_LETTERS_AND_NUMBERS",
"mediaPermissions": true
}
Back in Finder open the folder sql
Open the file db.sqlite (by right clicking on the file and pressing open as, dragging the database to the application, etc.) in your newly installed version of DB Browser for SQLite.
Switch the decryption method from passphrase to raw key in the dropdown menu
Ensure that SQLCipher 4 Defaults is checked. SQLCipher 3 Defaults did not work for me.
Type 0x in the password box and then paste the key you copied from config.json.
0xA_VERY_LONG_STRING_OF_LETTERS_AND_NUMBERSOKYou should be in, the rest is up to you!