Daniel's Weblog
Posts Tags Colophon
About

Tags / Posts

My Job Explained (with Pictures!)

Jan 25, 2021


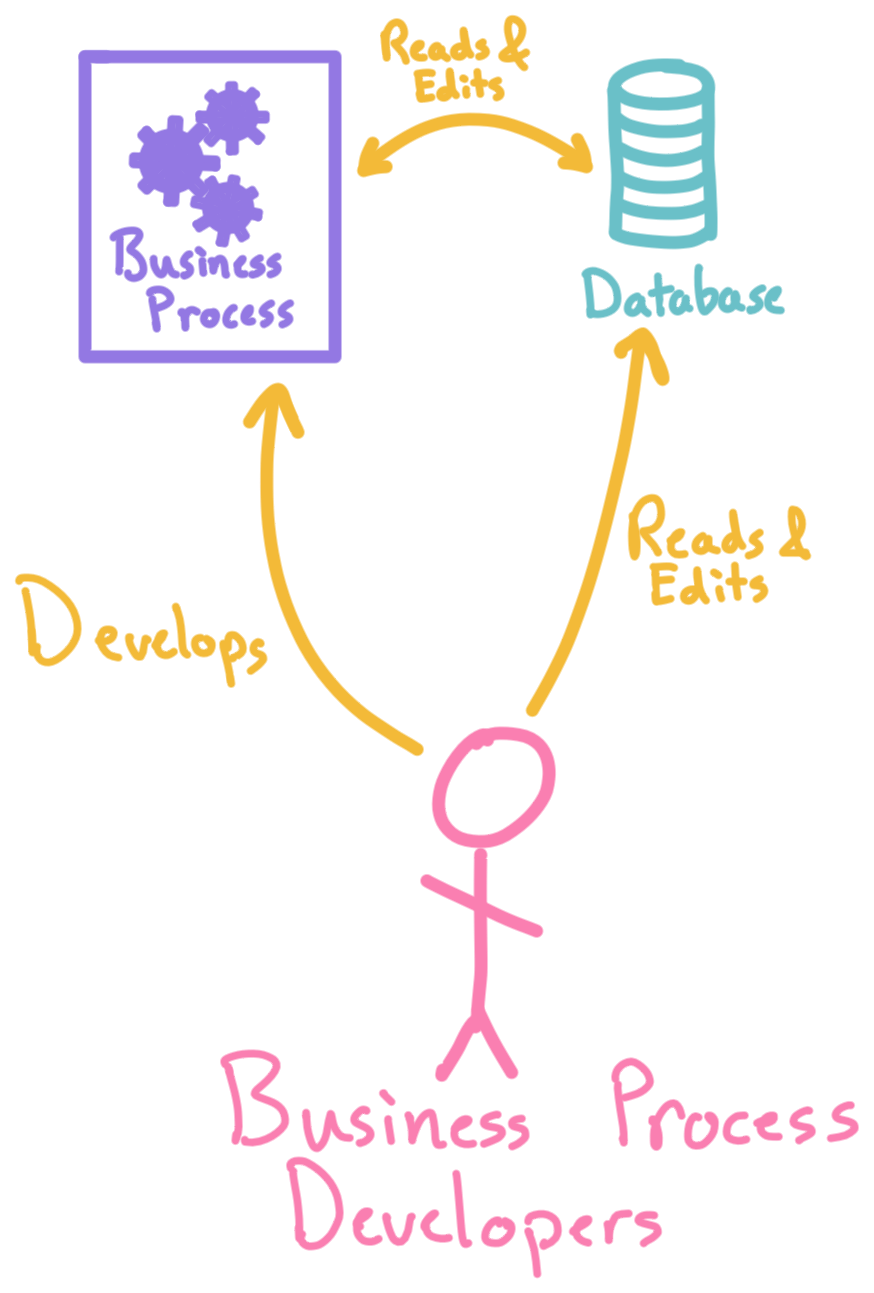
In the beginning there was nothing except a business process (some piece of software that made money) and a database for logs and a few configurable values.

The process developers who built and managed the business process read the logs in the database and occasionally modified the configurable values by hand.

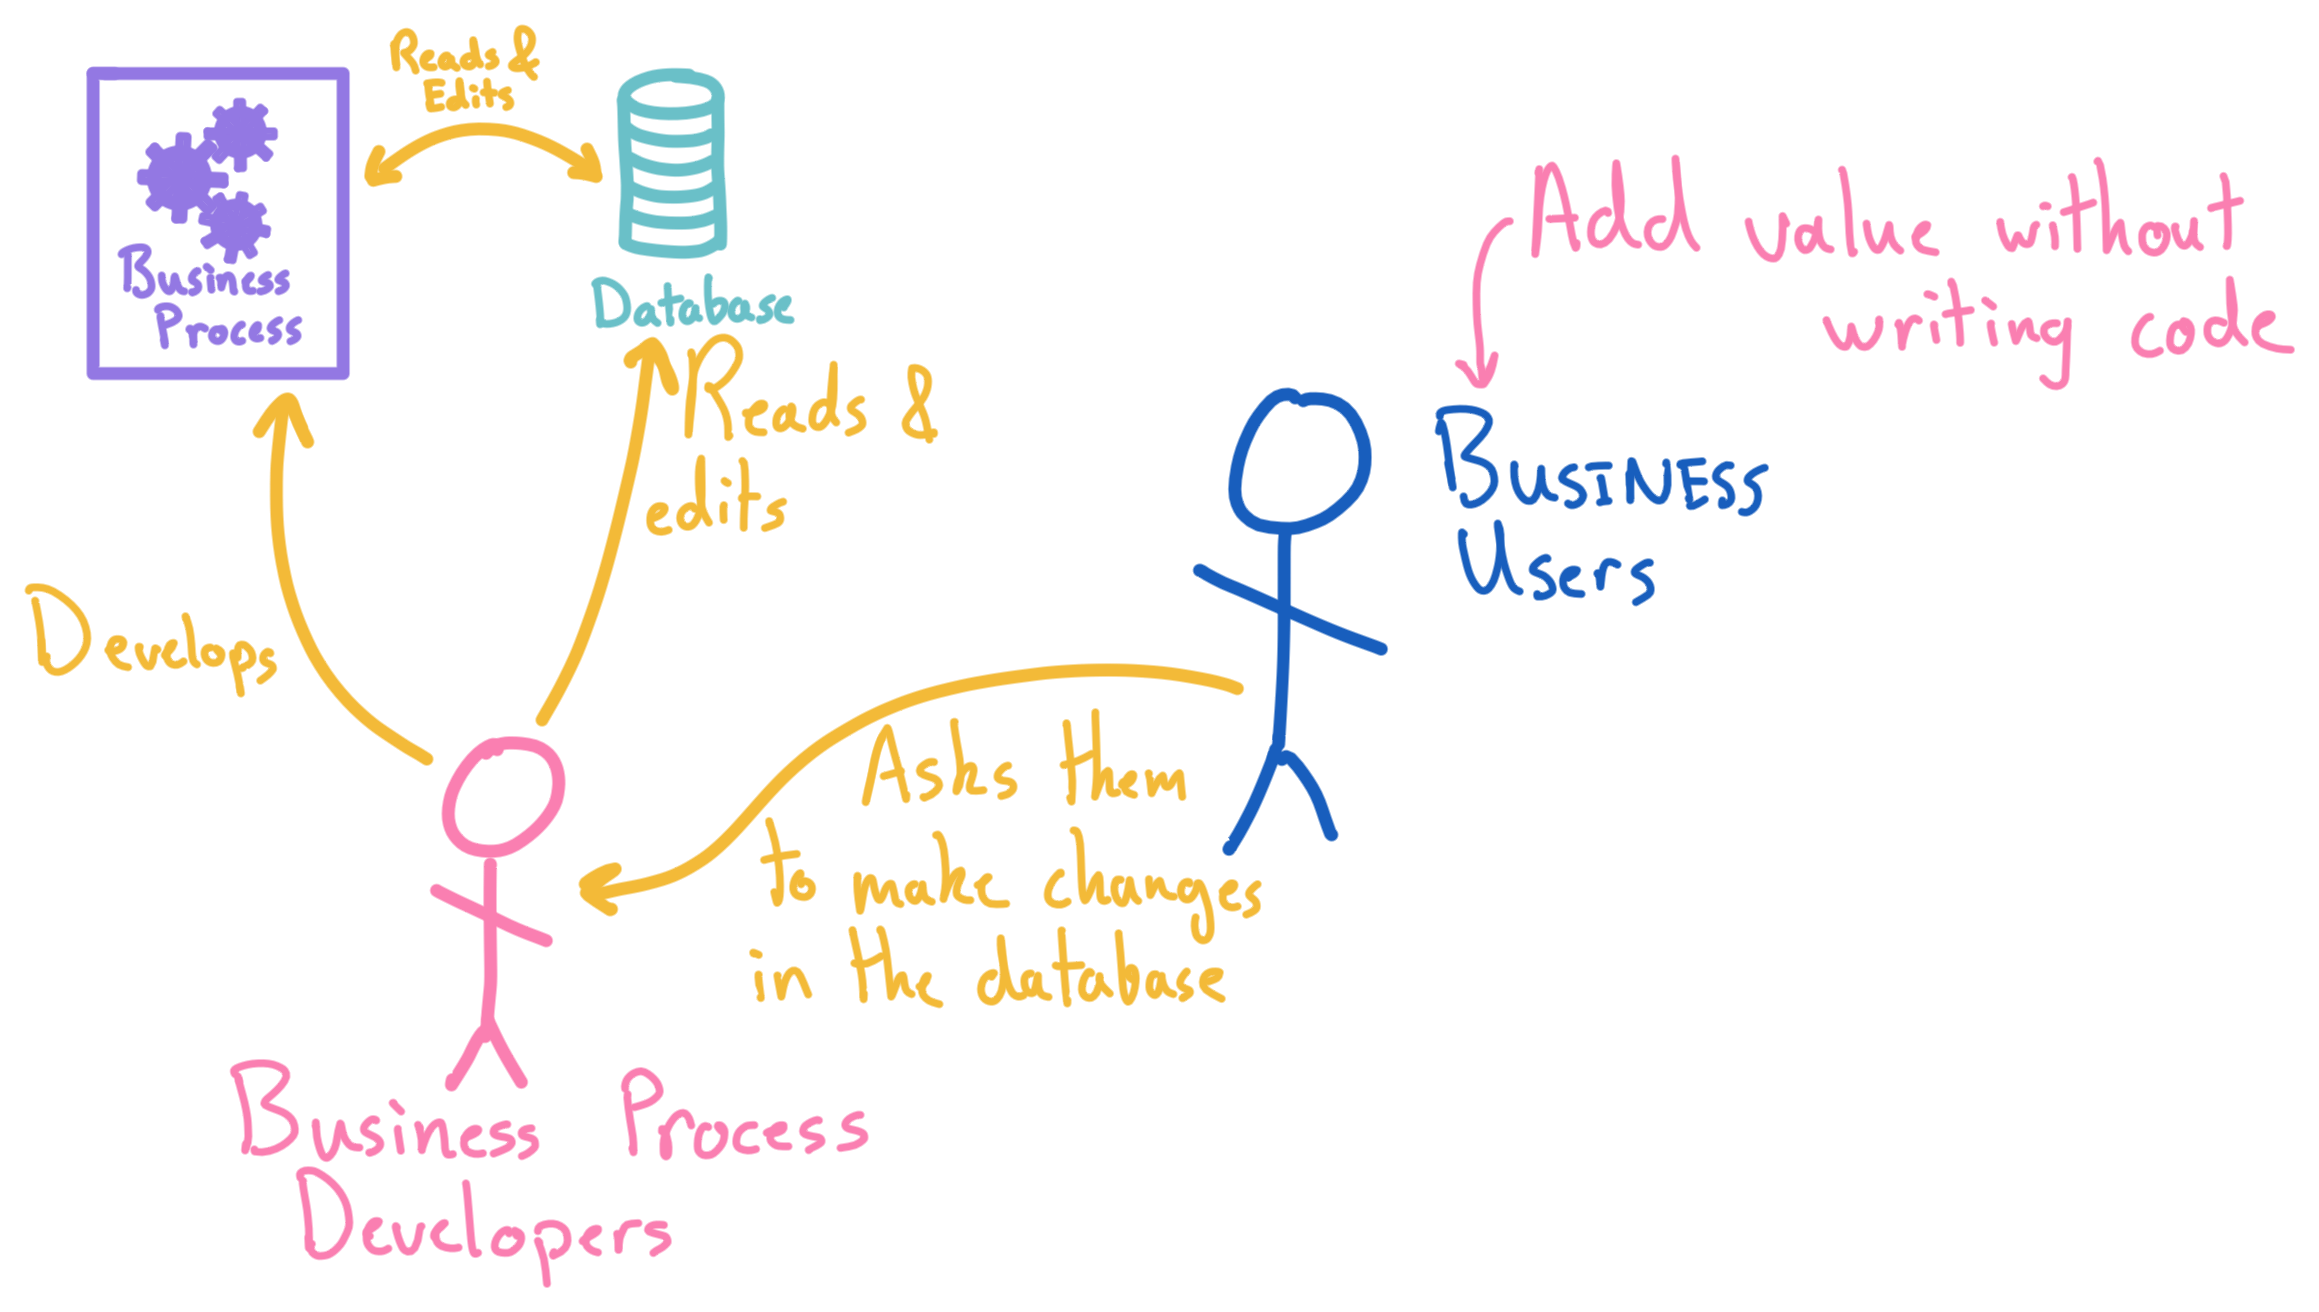
As the business grew subject matter experts were brought onboard. I’m going to call these people who need to make changes to the database but whose job description does not include writing code business users. For a short while they sent their requests to the process developers who made the changes on their behalf.

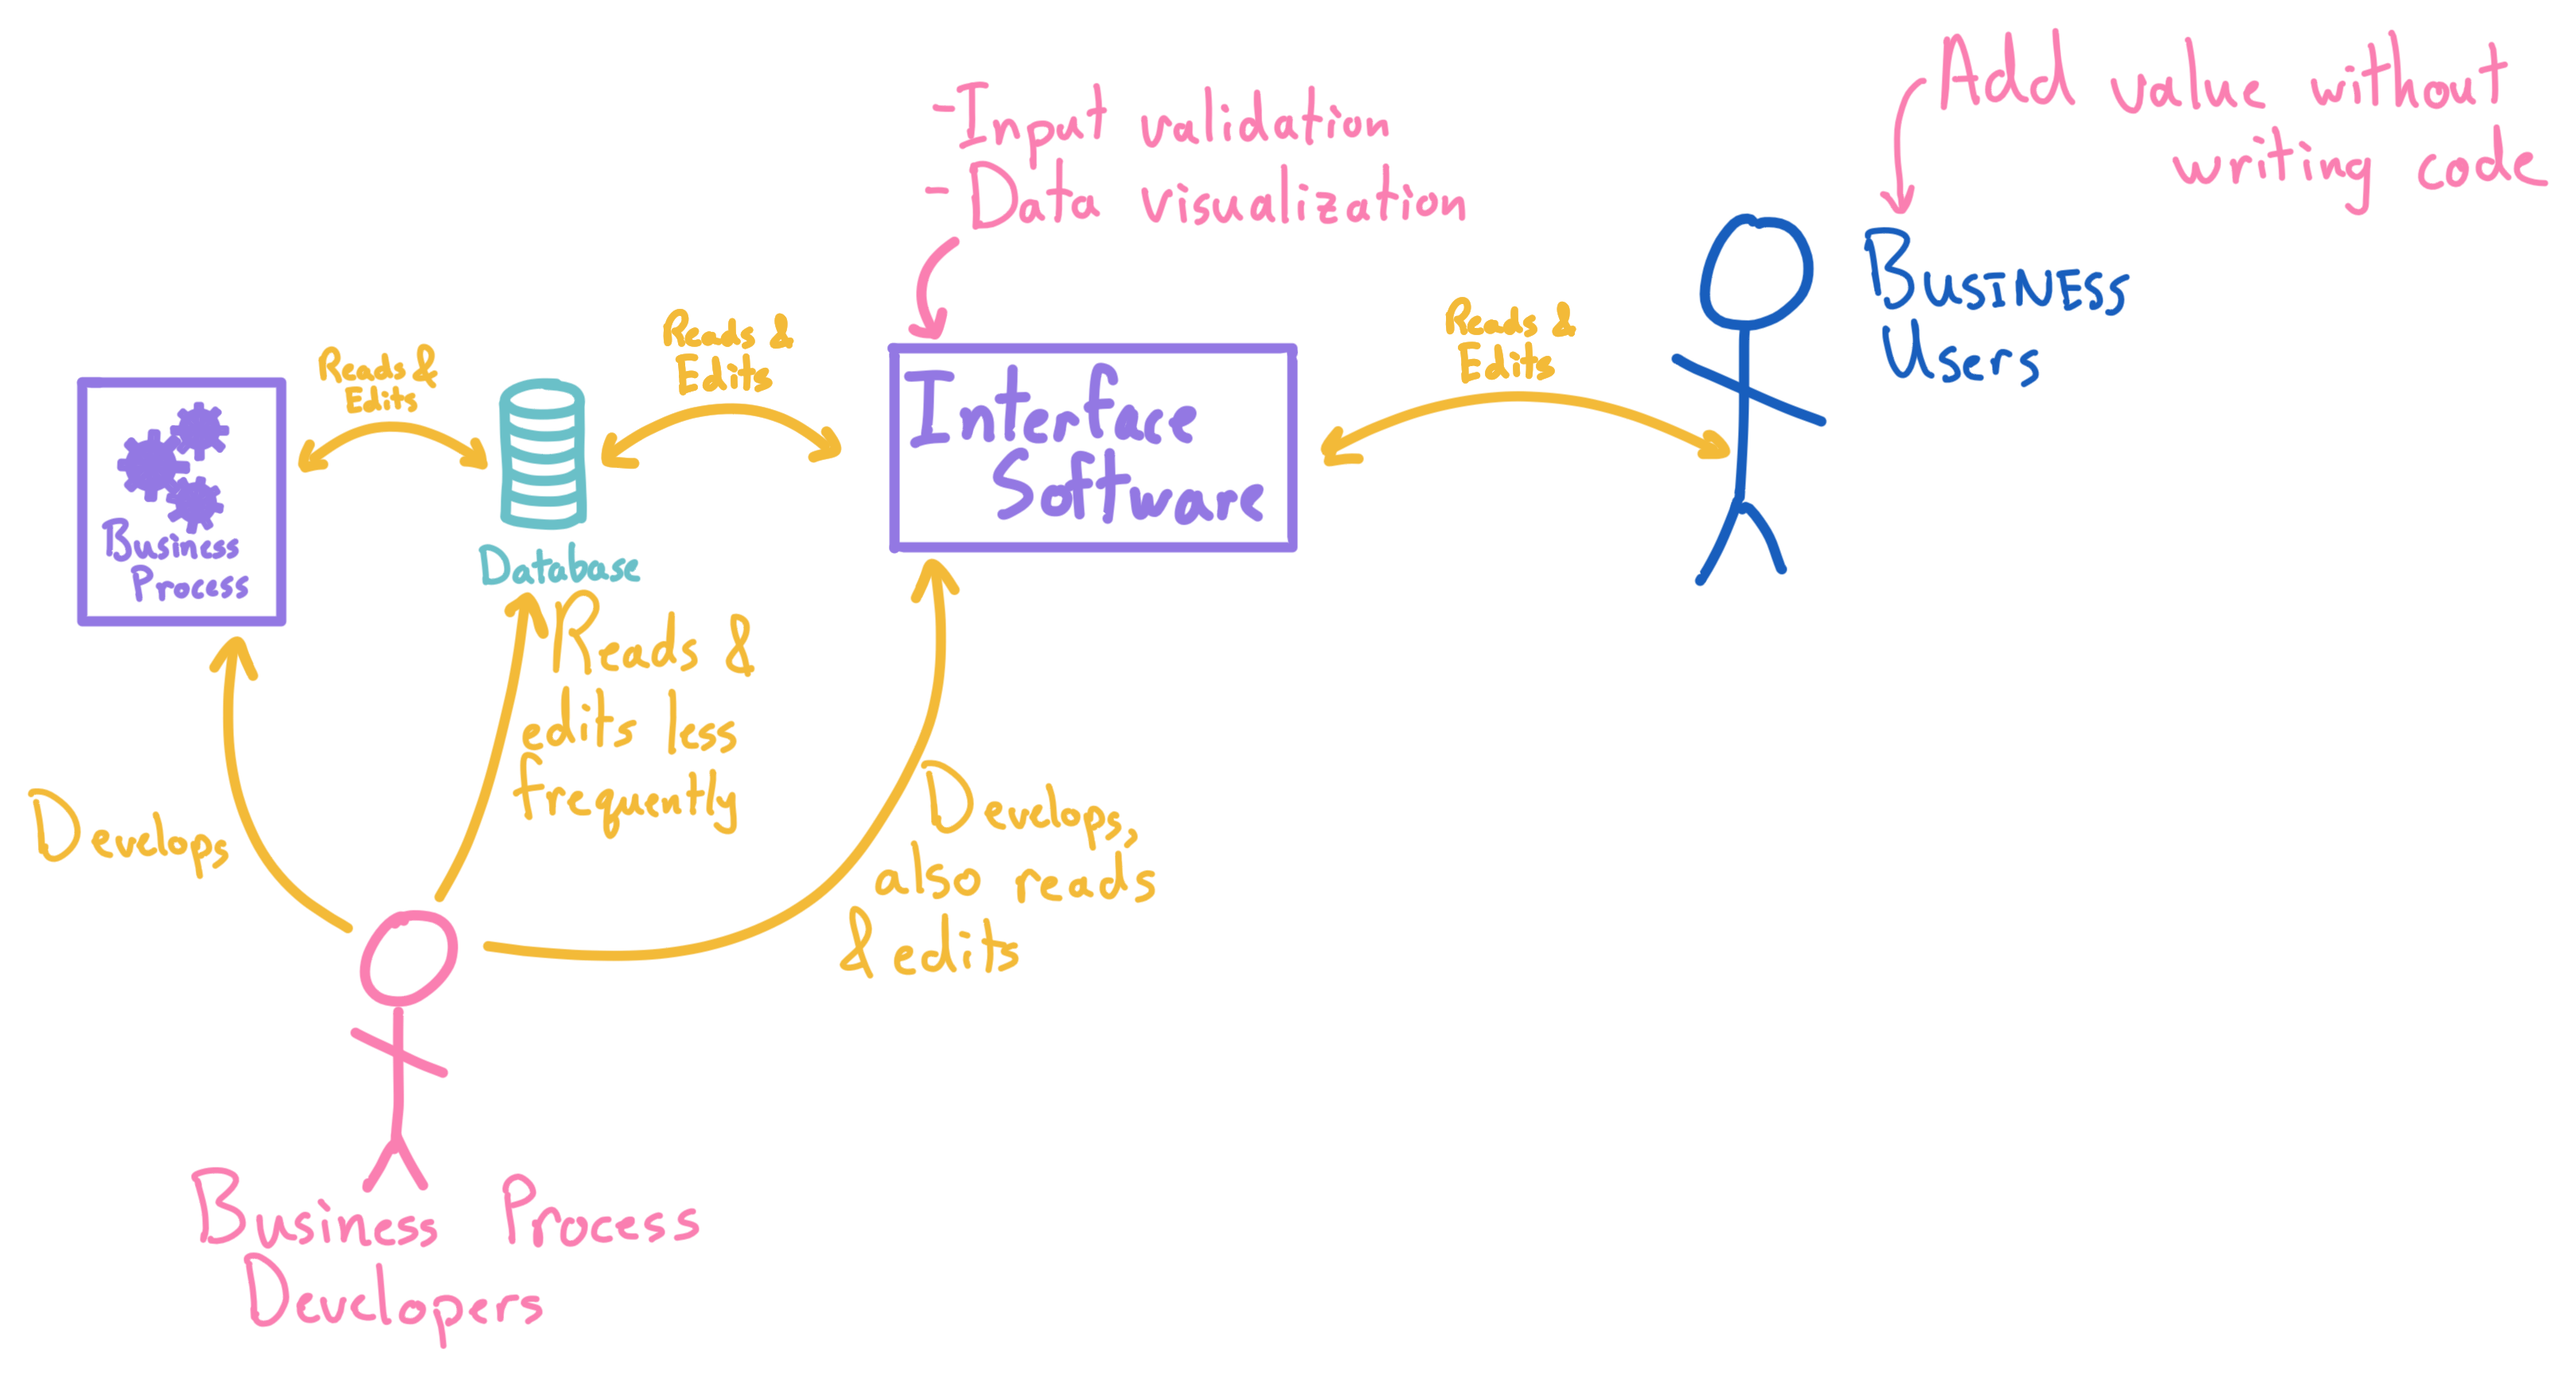
Of course if a process developer is spending time editing the database by hand they can’t be working on new features. And if the business users understand the business process and know what they want to change why not let them do so directly? So someone whips up a piece of interface software giving the business users a way to access the database without going through the process developers.

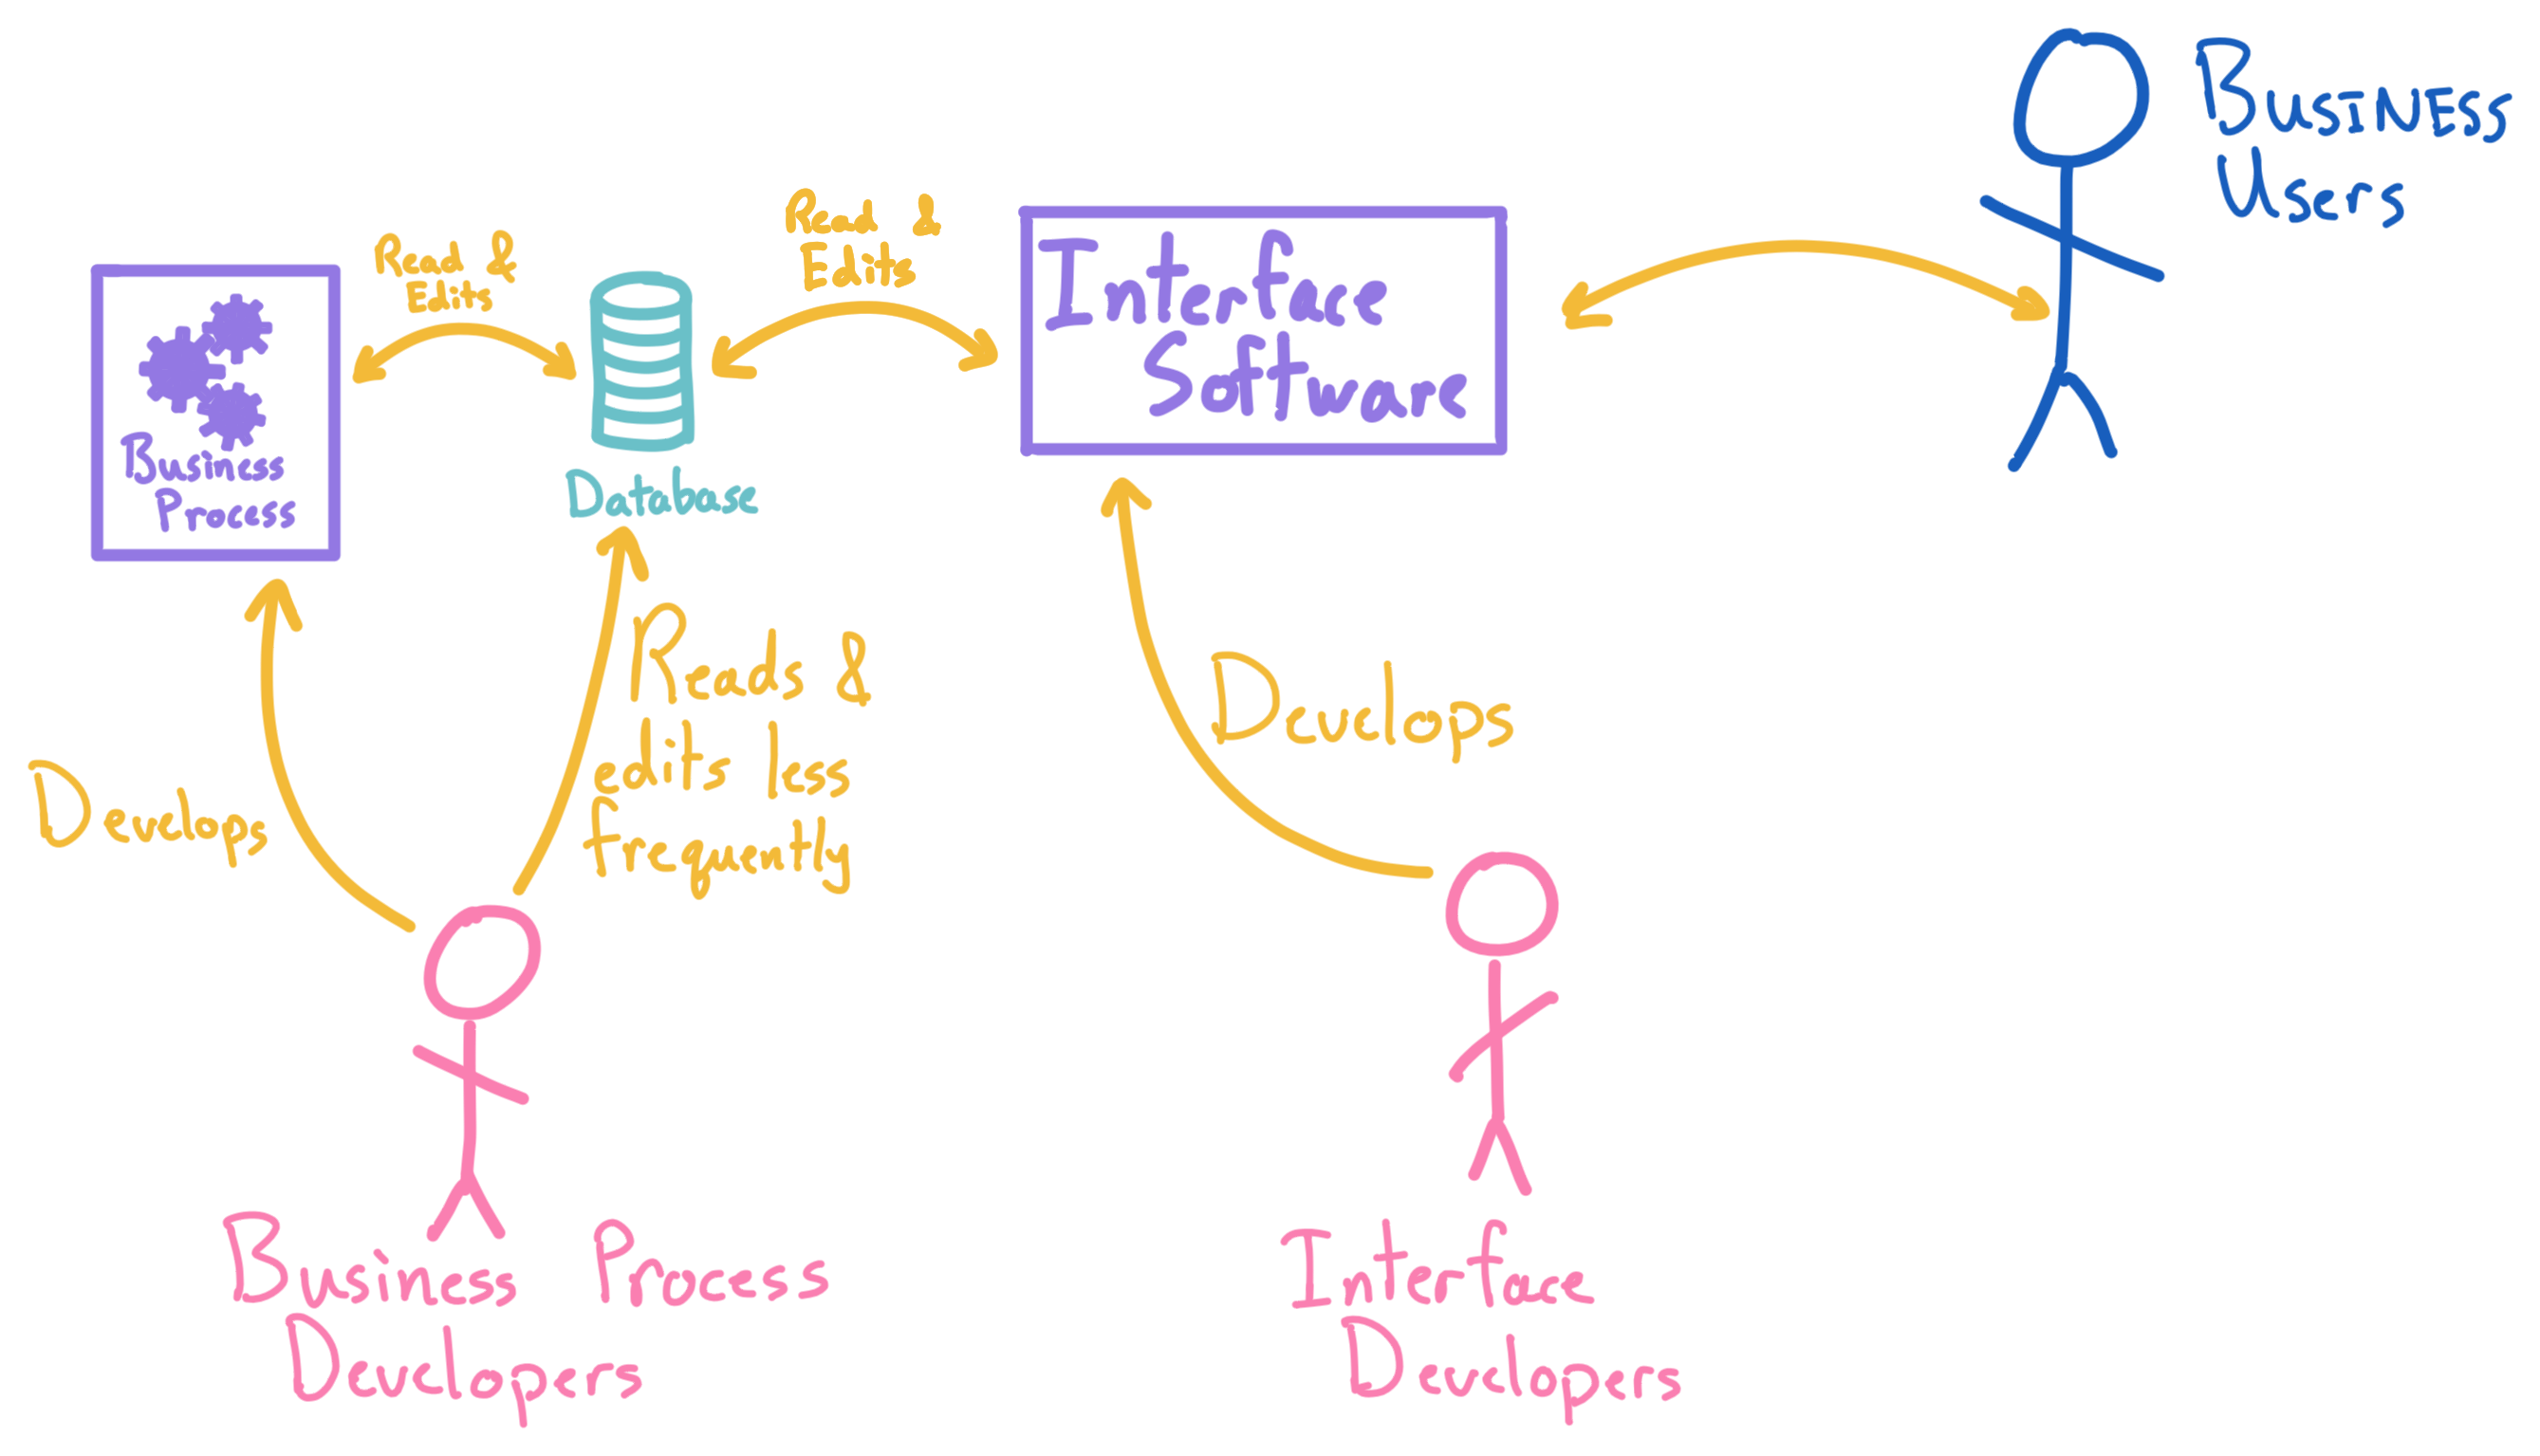
Since in this case there are limited advantages to understanding both how the business process functions and how to make a good human interface eventually the development team fractures in to two disparate groups, the existing business process developers and the new interface developers (aka “frontend developers”).

The interface developers spend all day writing software that translates questions and commands from the business users in to something the database can understand. The two ways they add value are by

  1. Allowing business users who do not know how to directly query a database to ask data-driven questions
  2. Providing the same users a safe way to modify the database.

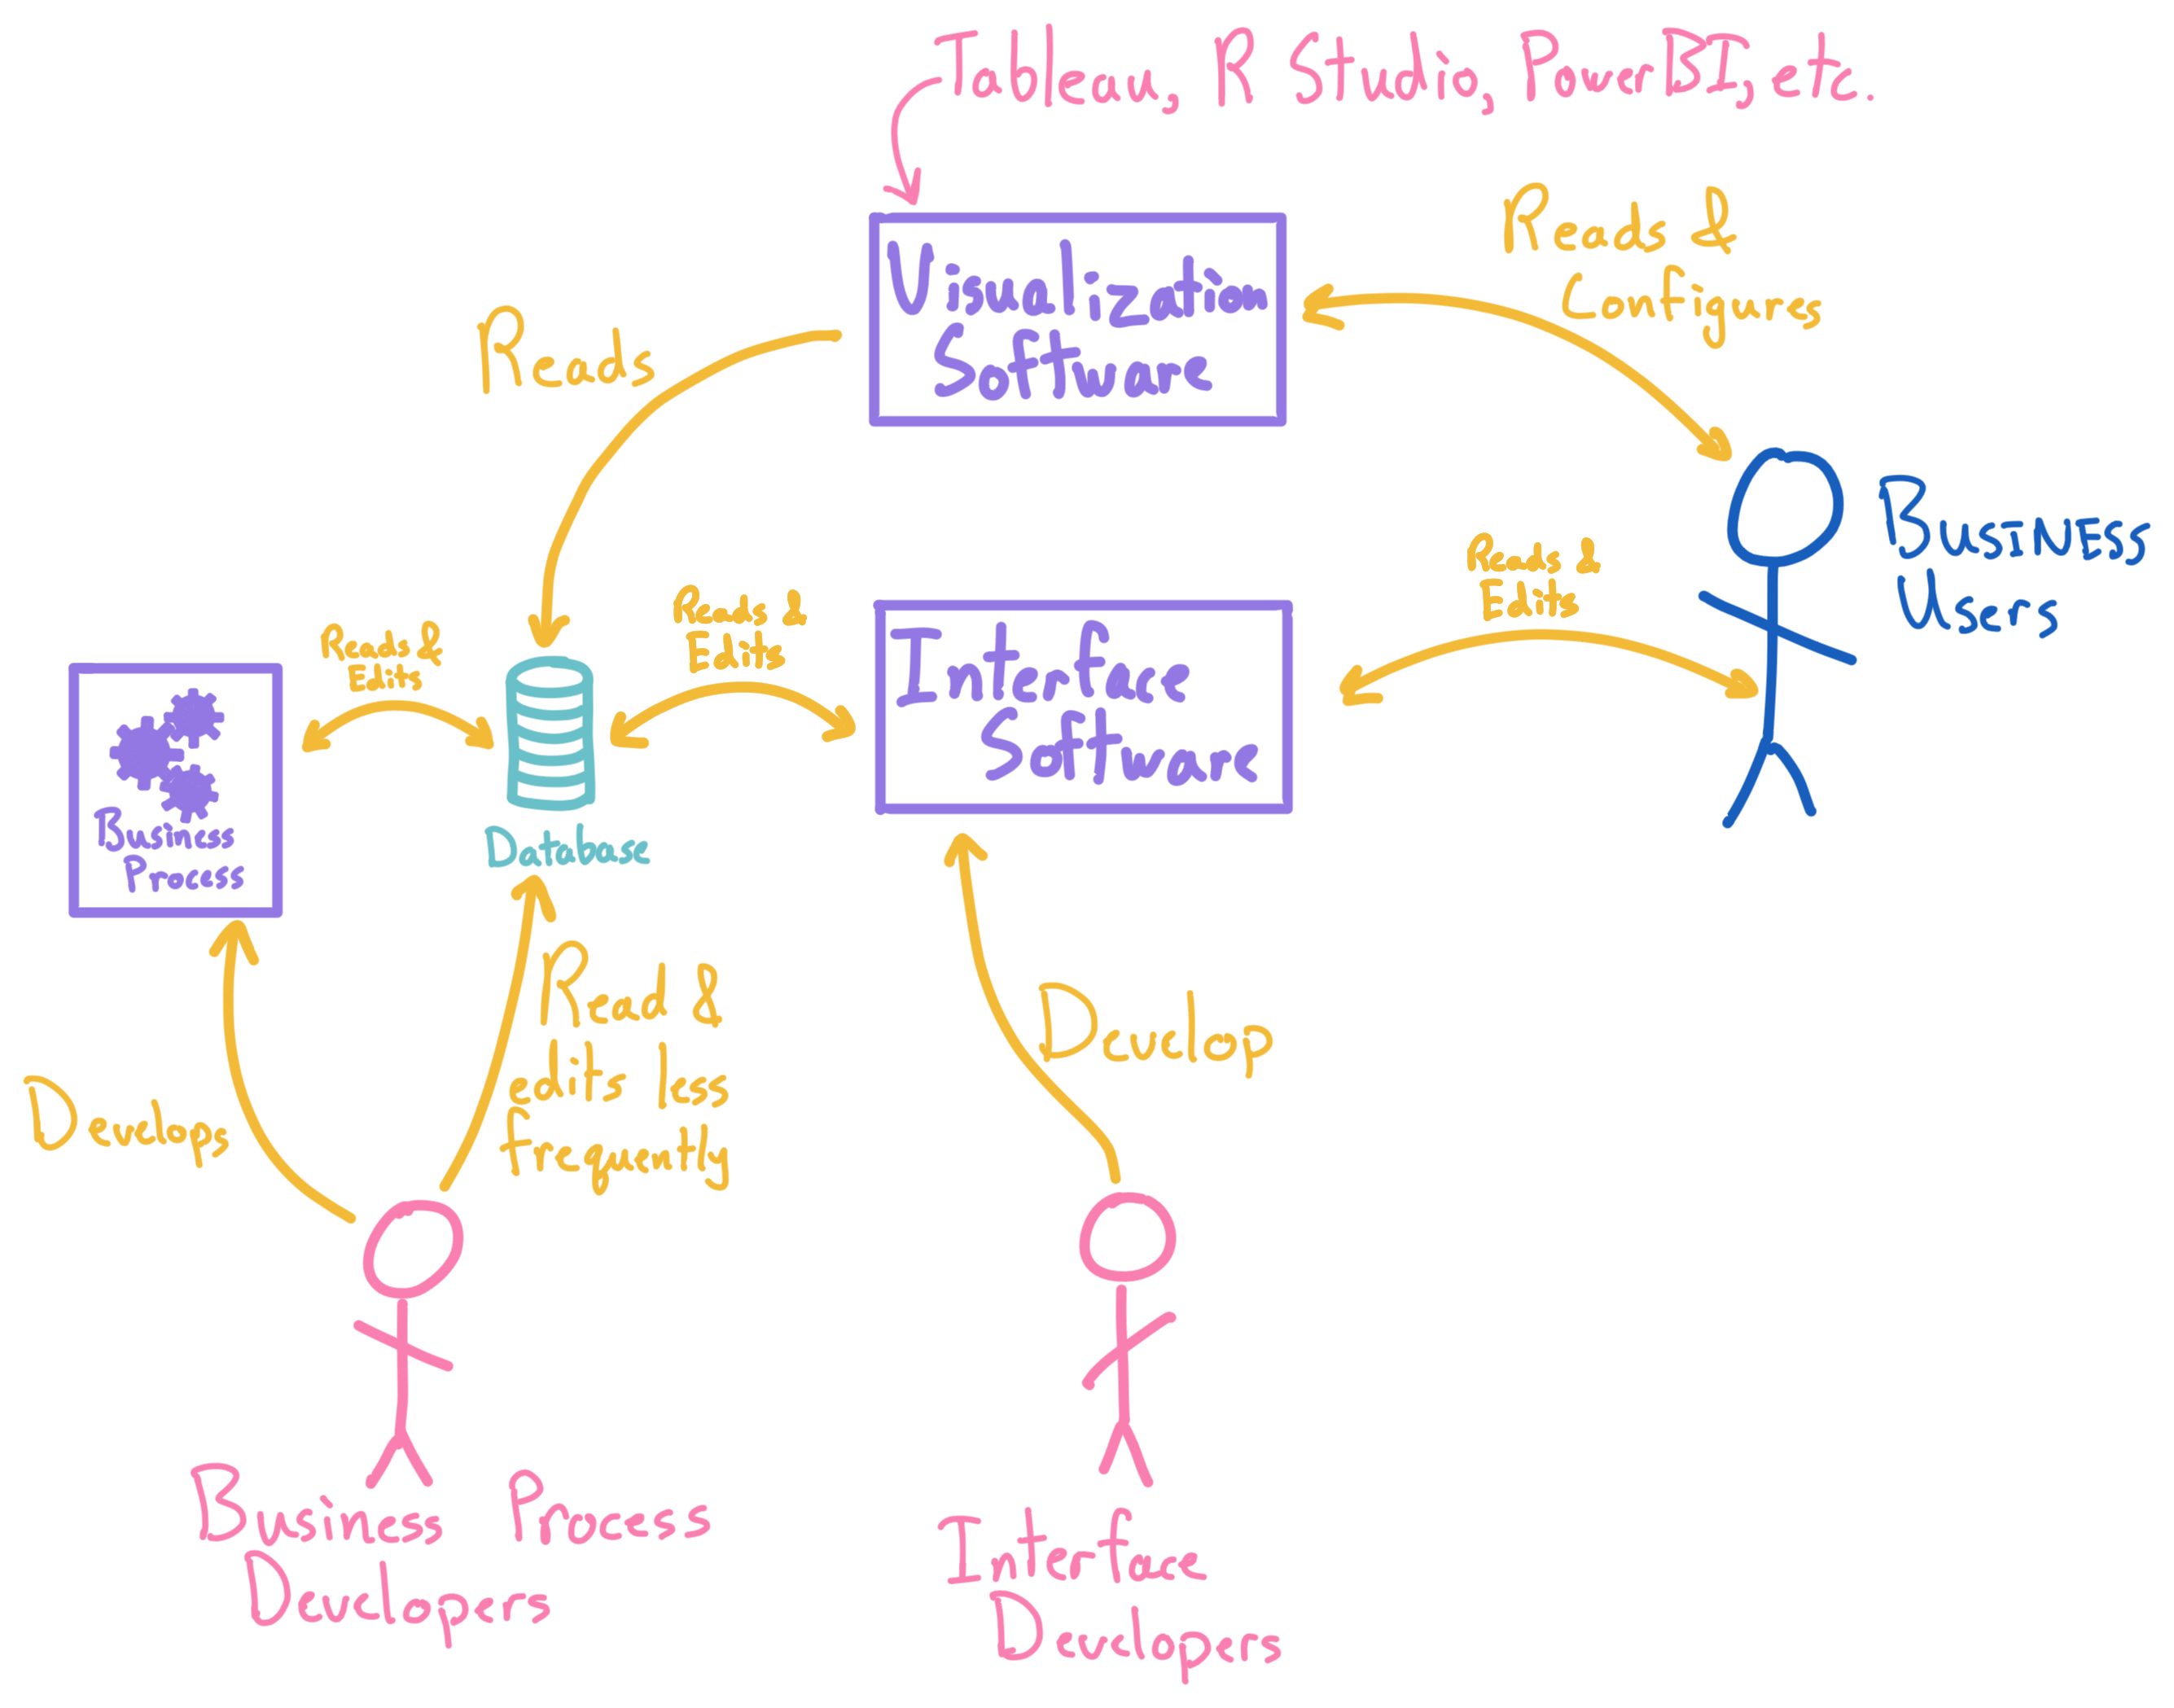
Eventually a business user is hired who says “I’d really like to use SOME VISUALIZATION TOOL” to help analyze this data—this could be Tableau, PowerBI, R, or even Python. This gets plugged in to the database bypassing the interface software and reduces the first way the interface developers create business value (allowing business users to read the database).

This creates an interesting bubble for the interface developers. The business user’s are responsible for the care and feeding of the business process and the process developers have to understand the intricacies of the business process to improve and expand it. But the interface developers are stuck in the middle. Understanding the details of the business process does not make one better at creating a text box that prevents a business user from accidentally entering garbage input.

Afterthought

This section exists to help me explain what my job is to my family (hi mom!).

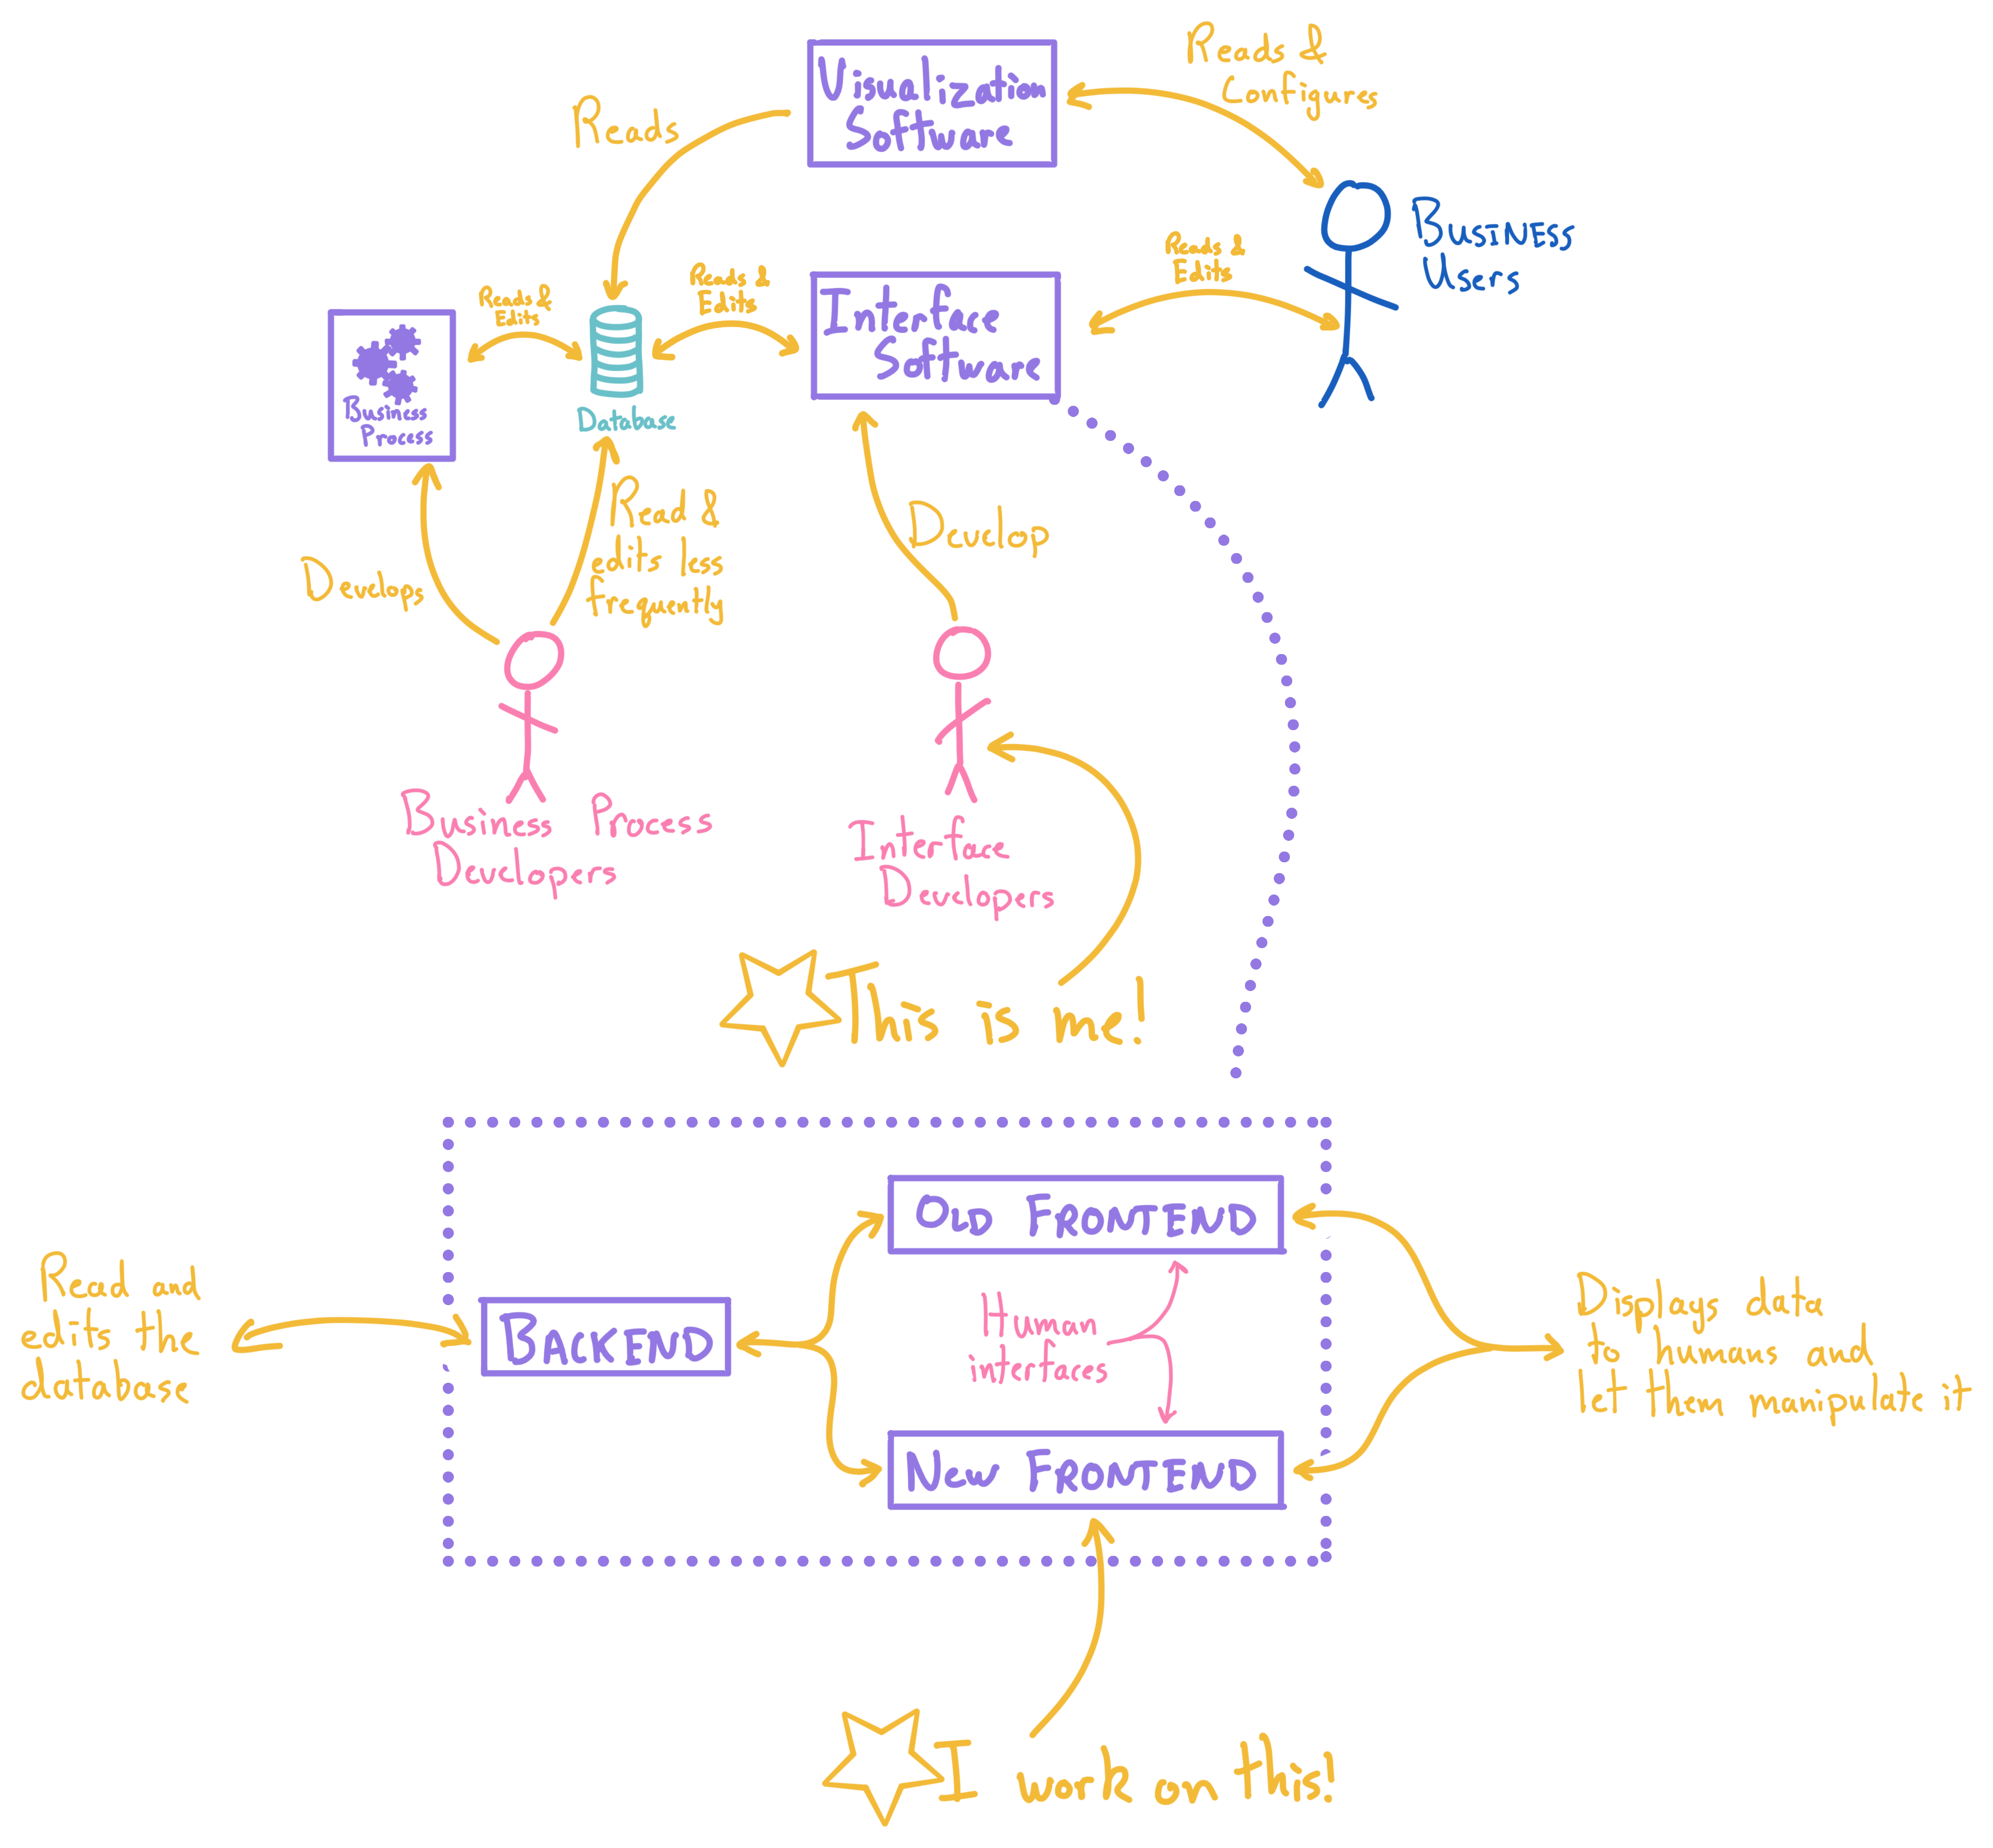
I’m an interface developer! The interface software is made up of three parts: the backend, an old frontend (AngularJS), and a new frontend (React). The frontends present data in a human-readable format and validates their commands while the backend understands how to communicate with the database.

The old frontend is not going to break tomorrow but is built with aging technology and we can’t keep it around forever. The new frontend runs in parallel and users will bounce back and forth between the two while we slowly migrate the functionality over piecemeal. The most difficult part is ensuring that the switch between frontends is a pleasant, smooth experience. They shouldn’t be the same (the old frontend is indeed old) but they must be similar enough and must load quickly enough to not break a train of thought as the business users navigate between them.

GaiaGPS Custom Maps

Jan 4, 2021


GaiaGPS is my my app of choice when hiking, kayaking, and exploring the outdoors in general. I will look at AllTrails for trail descriptions and reviews but on the trail I am always on Gaia.

Two built-in maps that I recommend are the 1900 and 1940 USGS Topo Maps! It’s very cool to look back in time wherever you are.

  1. This useful list of free map servers from Tim Smith at TrailNotes.org. Check out his other cool mapping software while you’re there.

  2. Bing Maps can be added with a free Bing Maps developer key using this free tool by Nathan Cahill

  3. This is a large list of free map sources courtsey of Brendan on the Rokslide forums:

    Data Sources:
    
    ESRI Worldview:
    https://server.arcgisonline.com/ArcGIS/rest/services/World_Imagery/MapServer/tile/{z}/{y}/{x}
    
    Stamen Terrain:
    https://tile.stamen.com/terrain/{z}/{x}/{y}.png
    
    Stamen Watercolor:
    https://tile.stamen.com/watercolor/{z}/{x}/{y}.jpg
    
    Strava All:
    https://heatmap-external-b.strava.com/tiles/all/bluered/{z}/{x}/{y}.png
    
    ESRI National Geographic:
    https://services.arcgisonline.com/ArcGIS/rest/services/NatGeo_World_Map/MapServer/tile/{z}/{y}/{x}
    
    Google Maps:
    https://mt1.google.com/vt/lyrs=m&x={x}&y={y}&z={z}
    
    Google Terrain:
    https://mt1.google.com/vt/lyrics=t&x={x}&y={y}&z={z}
    
    Google Terrain Hybrid:
    https://mt1.google.com/vt/lyrs=p&x={x}&y={y}&z={z}
    
    Google Satellite Hybrid:
    https://mt1.google.com/vt/lyrs=y&x={x}&y={y}&z={z}
    
iOS Tricks and Solvable Problems

Dec 30, 2020


Things that should be simple.

There’s no escape key on my iPad keyboard!!

CMD + . acts very similarly to the escape key on iOS, you can use it to close out of many menus.

If you are using vim through SSH (via Blink, Termius) or vi (on iSH) the command CMD + [ serves the same purpose as the escape key.

Automatically convert and upload workouts from Apple Watch

HealthFit ($3.99) generates nice visualizations and statistics from your workouts. Its automatic synchronization feature is also very slick and can liberate your Apple Watch GPS tracks from the default Fitness app by converting them to the standard .gpx format (.fit is also supported, or both can be exported at once) to a folder in iCloud.

Real world example:

I rely on this workflow for geotagging photos from my DSLR. When I’m out and about I start an “outdoor walk” in the Workout app on my watch, shoot to my heart’s content, and end the workout when I’m done. HealthFit automatically detects the finished workout, converts the GPS track to a .gpx file, and uploads it to iCloud. When I sit down at my Mac to edit photos I can easily import the .gpx file in to Lightroom which matches the photo’s timestamp to the proper location in the .gpx file.

If I just want to glance at a .gpx track I recommend GPXSee.

I have GPX tracks from multiple different applications and I want to standardize the file names

Use the venerable exiftool.

How do I put a DRM-free audio book that I purchased somewhere else in to Apple Books on my iPhone?

Apple Books doesn’t sync custom audio books even if you have Apple Drive enabled.

Solution: AirDrop’ing .mp3s doesn’t work, they go straight in to Music. The share menu on .mp3 or .m4b files in Files doesn’t provide an option to copy add to Books like what happens with .pdf and .epub.

The only option I’ve found is to transfer .m4b files with Waltr2. From here you can use your Apple Watch as an audio book remote BUT you still can’t transfer the book to the watch this way.

There’s a discussion on the MacRumors forum describing a couple different apps you can use to play audiobook files on your Apple Watch including the popular Castro podcast app as well as iCatcher, and MixTape Audio Sync. I can’t speak about any of them, my solution was to import the book in to Apple Music, right click on the album, navigate to the options tab, and select Remember playback position.

I want DRM free audio book files like those I can purchase from Downpour.com but jeez, this process is miserable.

Git on iOS

Working Copy by Anders Borum is your first and last app for working with the contents of Git repositories. There is an official app for GitHub called Github Mobile which allows viewing code in repositories and managing GitHub issues and pull requests but lacks any sort of editing functionality. GitHub Mobile has eclipsed GitHawk, an older, third-party GitHub management app.

List Files in Directory with their Git Create Date

Sep 16, 2020


Extending ls to display the date each output file was created in a git repository.

The Command:

ls | xargs -t -I % git log --diff-filter=A -- % 2>&1 | grep "Date\|log"

Sample Output:

Produces a result like

git log --diff-filter=A -- 2018-10-31-sensor-hardware.md
Date:   Wed Oct 31 16:18:12 2018 -0400
git log --diff-filter=A -- 2018-11-05-Railroad-logos.md
Date:   Thu Nov 8 05:51:50 2018 +0000
git log --diff-filter=A -- 2018-11-09-ADSB-Guide.md
Date:   Thu Jan 24 15:00:06 2019 -0500

Breaking it down:

ls

List the files in the current directory

xargs

xargs reads items from the standard input, delimited by blanks (which can be protected with double or single quotes or a backslash) or newlines, and executes the command (default is /bin/echo) one or more times with any initial-arguments followed by items read from standard input. Blank lines on the standard input are ignored.

https://linux.die.net/man/1/xargs

xargs -t -I % git log --diff-filter=A -- % 2>&1
       |                |                   |-> Combine stderr and stdout
       |                |                       Needed because -t prints to stderr
       |                |            
       |                |-> Filter commits based on what happened to the file,
       |                    "A" means only display commits where the file
       |                    was added
       |                        
       |-> Print the command that will be executed to stderr before executing it
           (This is where grep extracts the filename)

diff-filter documentation. Other useful options include C for copied and R for renamed, these options can also be combined!

If we exclude 2>&1 and grep for a moment and just run ls | xargs -t -I % git log --diff-filter=A -- % this is what we see:

git log --diff-filter=A -- 2018-10-31-sensor-hardware.md
commit 1e273670ee661839e813c859007fda2cacb670d9
Author: djbeadle <████████@█████.com>
Date:   Wed Oct 31 16:18:12 2018 -0400

    Temp Sensor Part III
git log --diff-filter=A -- 2018-11-05-Railroad-logos.md
commit e25fb5135645a2f241a1bbea003f71c09126dc8a
Author: djbeadle <████████@█████.com>
Date:   Thu Nov 8 05:51:50 2018 +0000

    Made it a markdown file
git log --diff-filter=A -- 2018-11-09-ADSB-Guide.md
commit 5ece46b85b8b7fed20ccc3b67ced29d7e5aeb0f8
Author: djbeadle <████████@█████.com>
Date:   Thu Jan 24 15:00:06 2019 -0500

    Rename ADSB post, create new post on FlaskWTF and QuillJS

(Email censored by hand to make things a little harder on the bots)

This output is useful, but it’s a little more wordy than what we would like. Also it’s split in to stderr and stdout as follows:

STDERR: git log --diff-filter=A -- 2018-10-31-sensor-hardware.md
STDOUT: commit 1e273670ee661839e813c859007fda2cacb670d9
        Author: djbeadle <████████@█████.com>
        Date:   Wed Oct 31 16:18:12 2018 -0400

            Temp Sensor Part III

We can merge that with 2>&1| and send it to the next step

grep

Nothing fancy going on here, grep "Date\|log" searches for “Date” or “log” and exports lines that contain either of them.

This finally leaves us with the following:

git log --diff-filter=A -- 2018-10-31-sensor-hardware.md
Date:   Wed Oct 31 16:18:12 2018 -0400

Further Processing

We could do something fancy to parse our output in to CSV format, but since I only need to do this for one or two files right now I just copy and paste the output in to Notepad++ and use the super userful macro feature to wrangle the text in to the exact format I need. If you haven’t used Notepad++’s macro feature you’re missing out, find it under the Macro menu!

Implementing this in bash is left as an exercise to the reader. 😉


May 19, 2020


Opening Signal Desktop Database on MacOS: I’ve seen some conflicting processes out there, here’s what worked for me in May, 2020:

  1. Download and install DB Browser for SQLite but note that YOU MUST download the version specifically built with SQLCipher support. This version is not obviously available on their website, but you can find it in the nightly build folder here

    When I tried to open the database with the default version of DB Browser it asked for a key or passphrase but it was never successful in decrypting the database. (This was what you might call infuriating)

    You can find those builds here: nightlies.sqlitebrowser.org/latest

  2. Open the folder in Finder by pressing Shift + Command ⌘ + g (or open the Window menu and click Go to Folder) and enter the following path:

    /Users/{USERNAME}/Library/Application Support/Signal

  3. Open the file config.json in your favorite text editor and copy the value of key, for if you saw the following you would copy A_VERY_LONG_STRING_OF_LETTERS_AND_NUMBERS without the quotation marks.

    {
      "window": null,
      "key": "A_VERY_LONG_STRING_OF_LETTERS_AND_NUMBERS",
      "mediaPermissions": true
    }
    
  4. Back in Finder open the folder sql

  5. Open the file db.sqlite (by right clicking on the file and pressing open as, dragging the database to the application, etc.) in your newly installed version of DB Browser for SQLite.

  6. Switch the decryption method from passphrase to raw key in the dropdown menu

  7. Ensure that SQLCipher 4 Defaults is checked. SQLCipher 3 Defaults did not work for me.

  8. Type 0x in the password box and then paste the key you copied from config.json.

  • With our previous example you would enter 0xA_VERY_LONG_STRING_OF_LETTERS_AND_NUMBERS
  1. Press OK

You should be in, the rest is up to you!

COVID-19 Signs on Instagram

Apr 3, 2020


It turns out that I wasn’t the only one who created an Instagram account for pictures of COVID-19 related signs.

My account is @covid_19_signs_nyc.

Other people have made accounts such as @covid19signslimerick, @duetocovid19, @signs_of_covid, and @signs_ofcovid. There’s even a website aggregating signs from multiple sources at duetocovid19.com.

PyCharm Quick Documentation Sphinx Support

Dec 24, 2019


A list of the Restructured Text Syntax and Sphinx roles that PyCharm supports in docstrings.

Be sure to set “Docstring format” to “reStructuredText” in setttings.

Function Parameters:

def do_the_thing(the_thing, another_thing=None):
    """
    :param int the_thing: The thing's primary key
    :param another_thing: A second thing to also do specified by an int or a string
    :type another_thing: Union(int, string)

    :returns: A string with the outpu text form running the thing
    :rtype: str
    """

PyCharm will reorder the params in the documentation based on the order of the params in the function definition.

:param TYPE PARAM_NAME: DESCRIPTION

is a syntactic sugar for

:param PARAM_NAME: DESCRIPTION
:type PARAM_NAME: TYPE

and is functionally equivalent. The only exception is that in the shortcut the type can only be a single word. There is no syntactic sugar for specifying the return type and description on the same line.

Notes:

  1. Multiple Supported Types

    :type PARAM_NAME: TYPE_ONE or TYPE_TWO
    :rtype: TYPE_ONE or TYPE_TWO
    

    Can be used to list multiple types for a single parameter or return value. PyCharm will render this as Union(TYPE_ONE, TYPE_TWO)

  2. List types

    List types can be specified by list[str].

Default Role

The default restructured text role `surrounded by backticks` has no meaning in restructured text and can be used for anything. It can be a nice way to indicate that you are referring to a python variable, method, or parameter. PyCharm will italicize any text surrounded by backticks.

Transitions

PyCharm will render a horizontal line based on any four or more repeated punctuation characters

Lists:

Bullet list

- This is a bullet list entry
- This is another bullet list entry
* Stars also work for bullet lists

Enumerated List

Enumerated lists do not work. The following:

1. This is an enumerated list item
2. This is another
#. This item should be auto enumerated with the number '3'

renders as follows:

. This is an enumerated list item
. This is another
. This item should be auto enumerated with the number '3'

Something is happening because item is placed on a new line, but it does not render as a numbered list

Definition List

doe
    A deer, a female deer
ray
    A drop of golden sun
me
    A name I call myself

will render properly.

Option List

Useful for listing command line arguments. Must be at least two spaces between the definition and the description.

-a           this flag sets the variable a
-b filename  sets the variable b to the provided filename
--input=other  this will also render correctly
/V           even DOS/VMS-style options will work
-c           long descriptions can be
             broken over multiple lines

Linking:

Sphinx defines several roles for the Python domain:

  1. :py:mod: for modules
  2. :py:func: for functions
  3. :py:data: for a module-level variable

The full list is available in the Sphinx docs

PyCharm supports a small selection with a slightly different syntax as listed below.

Linking to a class

:class:`SomeClassName`

This does not work inside of :param:, :type:, :return: descriptions.

Linking to an Exception

:exc:`SomeExceptionName`

This does not work inside of :param:, :type:, :return: descriptions.

Linking to a URL

http://someurl.com
`Link Name <http://someurl.com>`_

This does not work inside of :param:, :type:, :return: descriptions.

Math

Inline Math Formatting

PyCharm will italicize the following and make the powers into superscripts.

:math:`a^2 + b^2 = c^2

Other Semantic Markup

Sphinx has a selection of other miscellaneous roles documented here. The ones PyCharm supports in docstrings are listed below.

Linking to a PEP

:pep:`8`

Linking to an RFC

:rfc:`1462`

Other supported Restructured Text features

  1. Headers
  2. Sections
  3. Literal blocks
  4. Images

Restructured Text features that aren’t supported:

As of Dec 2019

  1. Line blocks
  2. Block quotes
  3. Doctest blocks
  4. Tables
    • They kind of work because of the headers, but they’re not great.
  5. Field lists
  6. Footnotes
    • PyCharm tries to make them into external links which fails.
  7. Sidebars
  8. Line Block
Notes on using Python Flask in 2019

May 20, 2019


Flask is a microframework for Python based on Werkzeug, Jinja 2 and good intentions.

Learning

Miguel Grinberg’s Flask Mega-Tutorial is the undisputable place to start and reference. I also strongly recommend his book, Flask Web Development. Be sure to get version 2.

Project Template

I maintain a reasonably well-documented skeleton of a Flask app built with the application factory and multiple configs.

Visual Studio Code

I don’t need to extole the virtues of VS Code.

Useful plugins:

Debugging:

Initial configuration:

  1. Enable the python interpreter by opening any Python file *.py. In the bottom left corner of the screen you should see which interpreter you’re using
  2. Switch to the debug module
  3. Select “Add Configuration” from the configuration dropdown
  4. Select “Flask” from the menu that appears
  5. Set the application path. If you’re using my project template the enterance file is myapp.py
  6. VSCode will now show you the file launch.json that it generated. If you want to set or change any environment variables you can do so here.

To run your code switch to the debug module and press the green arrow!

Bootstrap

Use Bootstrap-Flask, not Flask Bootstrap which hasn’t been updated since May, 2017 and doesn’t support Bootstrap 4.

The render_field() and render_form() macros are particurarly useful.

OpenID Connect (oidc)

I have had the most luck with Flask PYOIDC

Background tasks

RQ with Redis

Supervisord is an easy way to run the RQ workers. It’s written in Python2, but can run Python3 applications / scripts without any issues.

Deploying to Azure

Deploying a Flask app to Azure is remarkably easy–props to the team responsible for the wizardry that happens under the hood.

  1. Log in to <portal.azure.com>

  2. Select “Create a Resource” from the top left.

  3. Search for, select, and create a “Web App”.

  4. Fill in the web app details

    • Choose your subscription and resource group.
    • Give your application a name
    • Choose “Code” as your publish method
    • Choose the proper version of python for your runtime stack
    • Linux as your operating system
    • Choose the location most applicapable to you
  5. When the deployment is done open your new resource. The deployment process usually takes 20-30 seconds.

  6. Select the “Deployment Center” blade and the “Local Git” option.

  7. Select “App Service build service” and complete the process.

  8. The contents of the Deployment Center section has now changed. Azure has set up and empty git repository that we can push code to which it will build, host, and run. Copy the “Git Clone Uri” and add it to your local repository with the command

    git add remote [remote name] [remote uri]
    

    I like to call my deployment hosts “deploy” so for example:

    git add remote deploy https://daniel-flask.scm.azurewebsites.net:443/daniel-flask.git
    
  9. To actually deploy your code to this repository run:

    git push deploy master
    

    You will be prompted for a username and password which can be found by clicking on the key icon labled “Deployment Credentials” at the top of the Deployment Center.

  10. Almost done! If the startup file isn’t named “application.py” and/or isn’t located in the repository’s root folder Azure won’t find it. Open the “Configuration” blade and then to the “General Settings” tab. Fill in the “Startup Command” field as follows:

    gunicorn --bind=0.0.0.0 --timeout 600 [startup file minus extension]:[app object in that file]
    

    For example, using my my project template

    gunicorn --bind=0.0.0.0 --timeout 600 myapp:app
    

    You can find the full reference here

  11. To set environment variables navigate to the “Configuration” blade and add the “Application Settings” tab. You can reference them in your application with os.environ.get('Environment Variable Name')

  12. To restart your application to make the changes take effect navigate to the “Overview” blade and press the “Restart” button. Or push new code!

And that’s it! You can find the URL of you application on the “Overview” tab.


Jan 24, 2019


A small recipe for combining WTForms and the Quill text editor: I’m using Flask-WTF so this isn’t exactly the same as a pure WTForms implementation, but it should get anyone else on the right track.

The Quill text editor defines its contents as a delta object.

“Don’t be confused by its name Delta—Deltas represents both documents and changes to documents.”

When a user submits the “save changes” button we can use the Quill API to access the contents of the text editor, serialize it with JSON.stringify(), put that string in a WTForm field, which then gets submitted to the backend. In order to keep the form nice and clean we can hide that field from the user.

forms.py

  • The first hidden field is called “delta”, which holds the serialized contents of the delta object.
  • The second hidden field is called “length” which holds the length of the actual content in the delta object.
from flask_wtf import FlaskForm
from wtforms import SubmitField, HiddenField, IntegerField
from wtforms.validators import Length, NumberRange
from wtforms.widgets import HiddenInput

class CreatePost(FlaskForm):
    delta = HiddenField(
        'delta',
        validators=[Length(0, 255)],
    )
    
    content_length = IntegerField(
        label='',
        validators=[
            NumberRange(2, 255, "Blank posts aren't very interesting.")
        ],
        widget=HiddenInput()
     )
     
    submit = SubmitField('Create Post')

template.html

This flask template takes an argument named “form” containing a CreatePost object (defind in the example code above).

{% block page_content %}
<div class="row justify-content-center">
  <div class="my-sm-2">
    <div class="page-header">
      <h1>Read a Post</h1>
    </div>
    <!-- Create the editor container -->
    <div id="editor">
      <p>Hello World!</p>
      <p>Some initial <strong>bold</strong> text</p>
      <p><br></p>
    </div>

    <!-- 
    Form submission is handled by FlaskWTF. It has a hidden field, which
    is updated with the contents of quill.getContents() when the submit
    button is pressed
    -->
    {{ render_form(form) }}

    <!-- Include the Quill library -->
    <script src="https://cdn.quilljs.com/1.3.6/quill.js"></script>

    <script>
	   // Initialize the Quill editor
      var quill = new Quill('#editor', {
        theme: 'snow'
      });

      // When the submit button is pressed, retrieve several pieces of info
      // from the QuillJS API (https://quilljs.com/docs/api/#content), copy
      // them into to WTForms hidden fields, and submit the form
      var submit_entry = function () {
      
        // Get the contents of the text editor
        var hidden_text_field = document.getElementById('delta');
        hidden_text_field.value = JSON.stringify(quill.getContents());
        
        // Get the length of the contents of the text editor
        var hidden_length_field = document.getElementById('length');
        hidden_length_field.value = quill.getLength();
      }

      // Attach the onclick function to the submit button Flask-WTF creates
      var new_post_form = document.getElementsByClassName('form')[0];
      new_post_form.onsubmit = submit_entry;

    </script>
  </div>
</div>
{% endblock %}

Dec 13, 2018


Temperature Sensors Part 5: Assembling PCBs & Future Plans

I finally received my printed circuit boards in the mail, time to assemble them.

This is post number 5 in a series describing my DIY temperature and humidity sensors.

Printed Circuit Boards

OSH Park’s packaging is not subtle.

The boards are indeed a dark purple, which my camera didn’t properly capture. Here’s what they look like unpopulated and populated:

On the top right there’s a little bit of what I can only assume is someone else’s screen printing that overlapped on to my board. No harm done, and it adds character. The little points that held the panel together during production are rather sharp, I ended up cutting off the points so I wouldn’t stab myself.

It’s not perfect, though. The empty space between components is smaller than it seemed on the computer screen and I didn’t leave enough space between the components. I had to tilt headers connecting to the temperature sensor so it would fit along side the ESP8266.

Despite that, it’s definitely an improvement over the hand-made version.

Future Plans

So where to go from here? I’ve been using this for temperature sensors, but in reality I’ve created a 3.3V based I²C base for the ESP8266. I could replace the temperature sensor with…

  • Another atmospheric monitoring sensor with barometric pressure as well
  • An infrared array to determine if a human (or dog, maybe?) is present
  • A 16x2 LCD Display that could easily update over Wi-Fi
  • A Sparkfun Qwicc Adapter so I can daisy-chain many I²C sensors together (An external power supply may be required, depending on how crazy you want to get)

But it doesn’t have to be limitted to I²C interfaces!

  • I’ve been thinking about using a non-invasive current sensor so I don’t have to walk all the way to the basement to check on the washer and dryer
  • A particulate matter sensor so I can detect air polution hazards (like if my housemate is cooking extremely spicy chicken)
  • Or even something as simple as a reed switch to tell if a door is open