Grandpa hiked Mount Marcy in 1955. After hiking Mount Marcy twice myself I recognized where one of the pictures was taken.
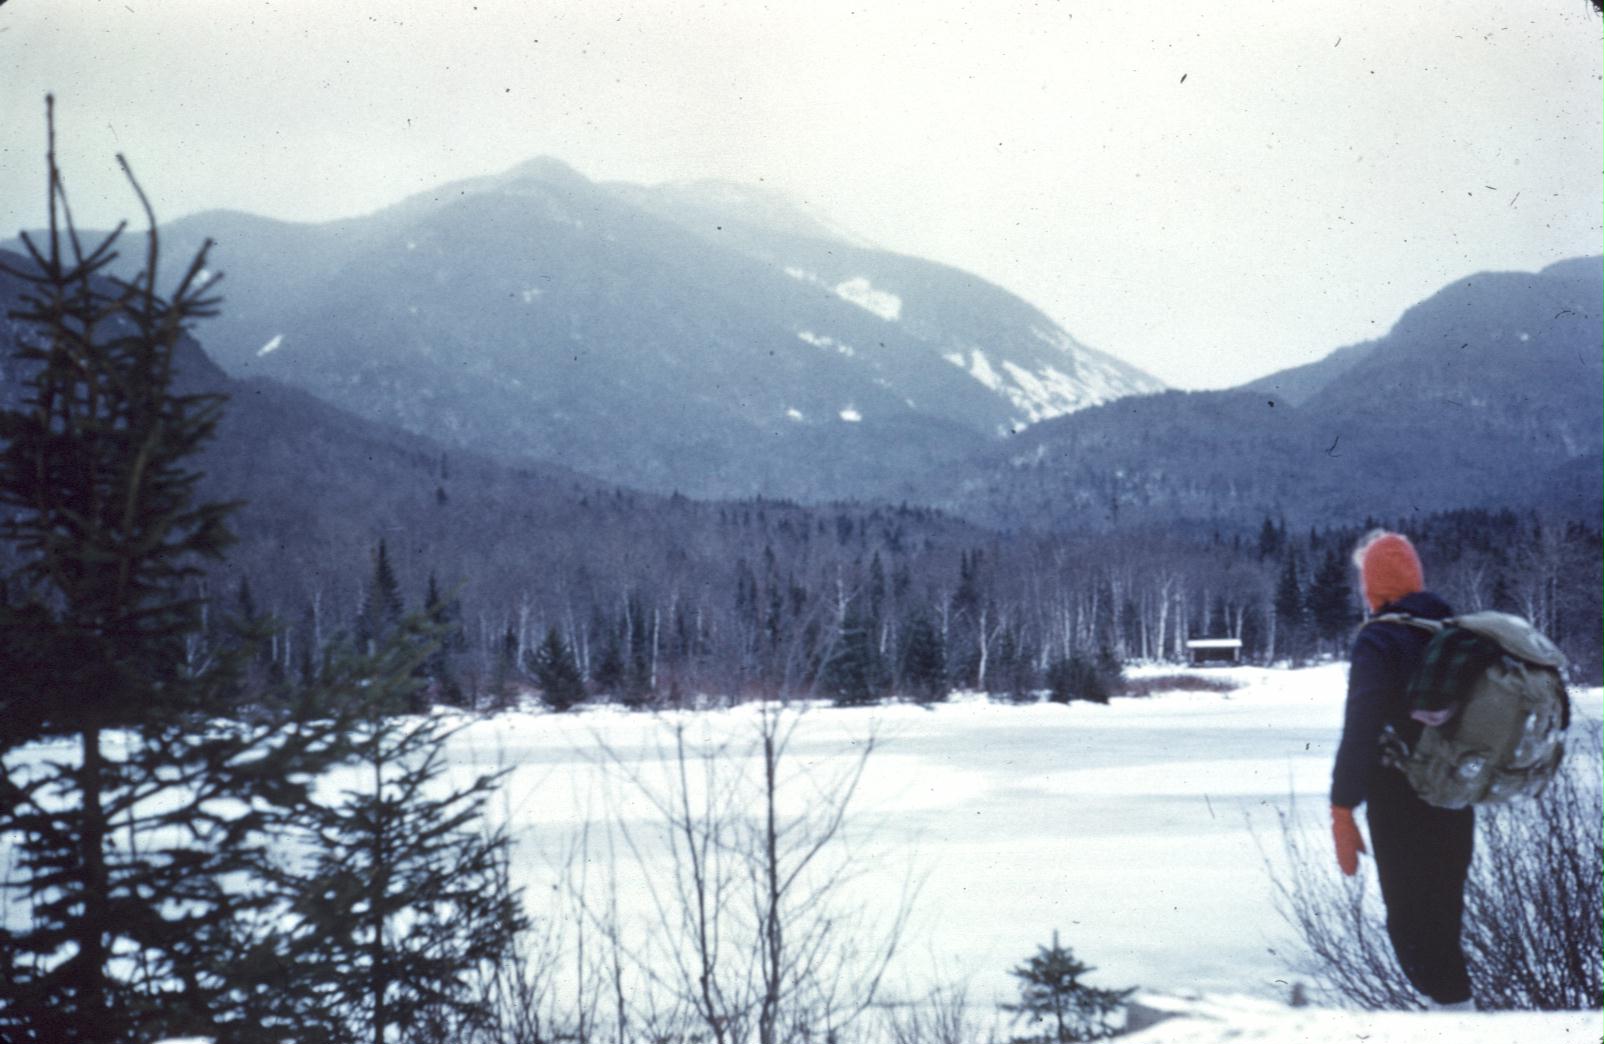
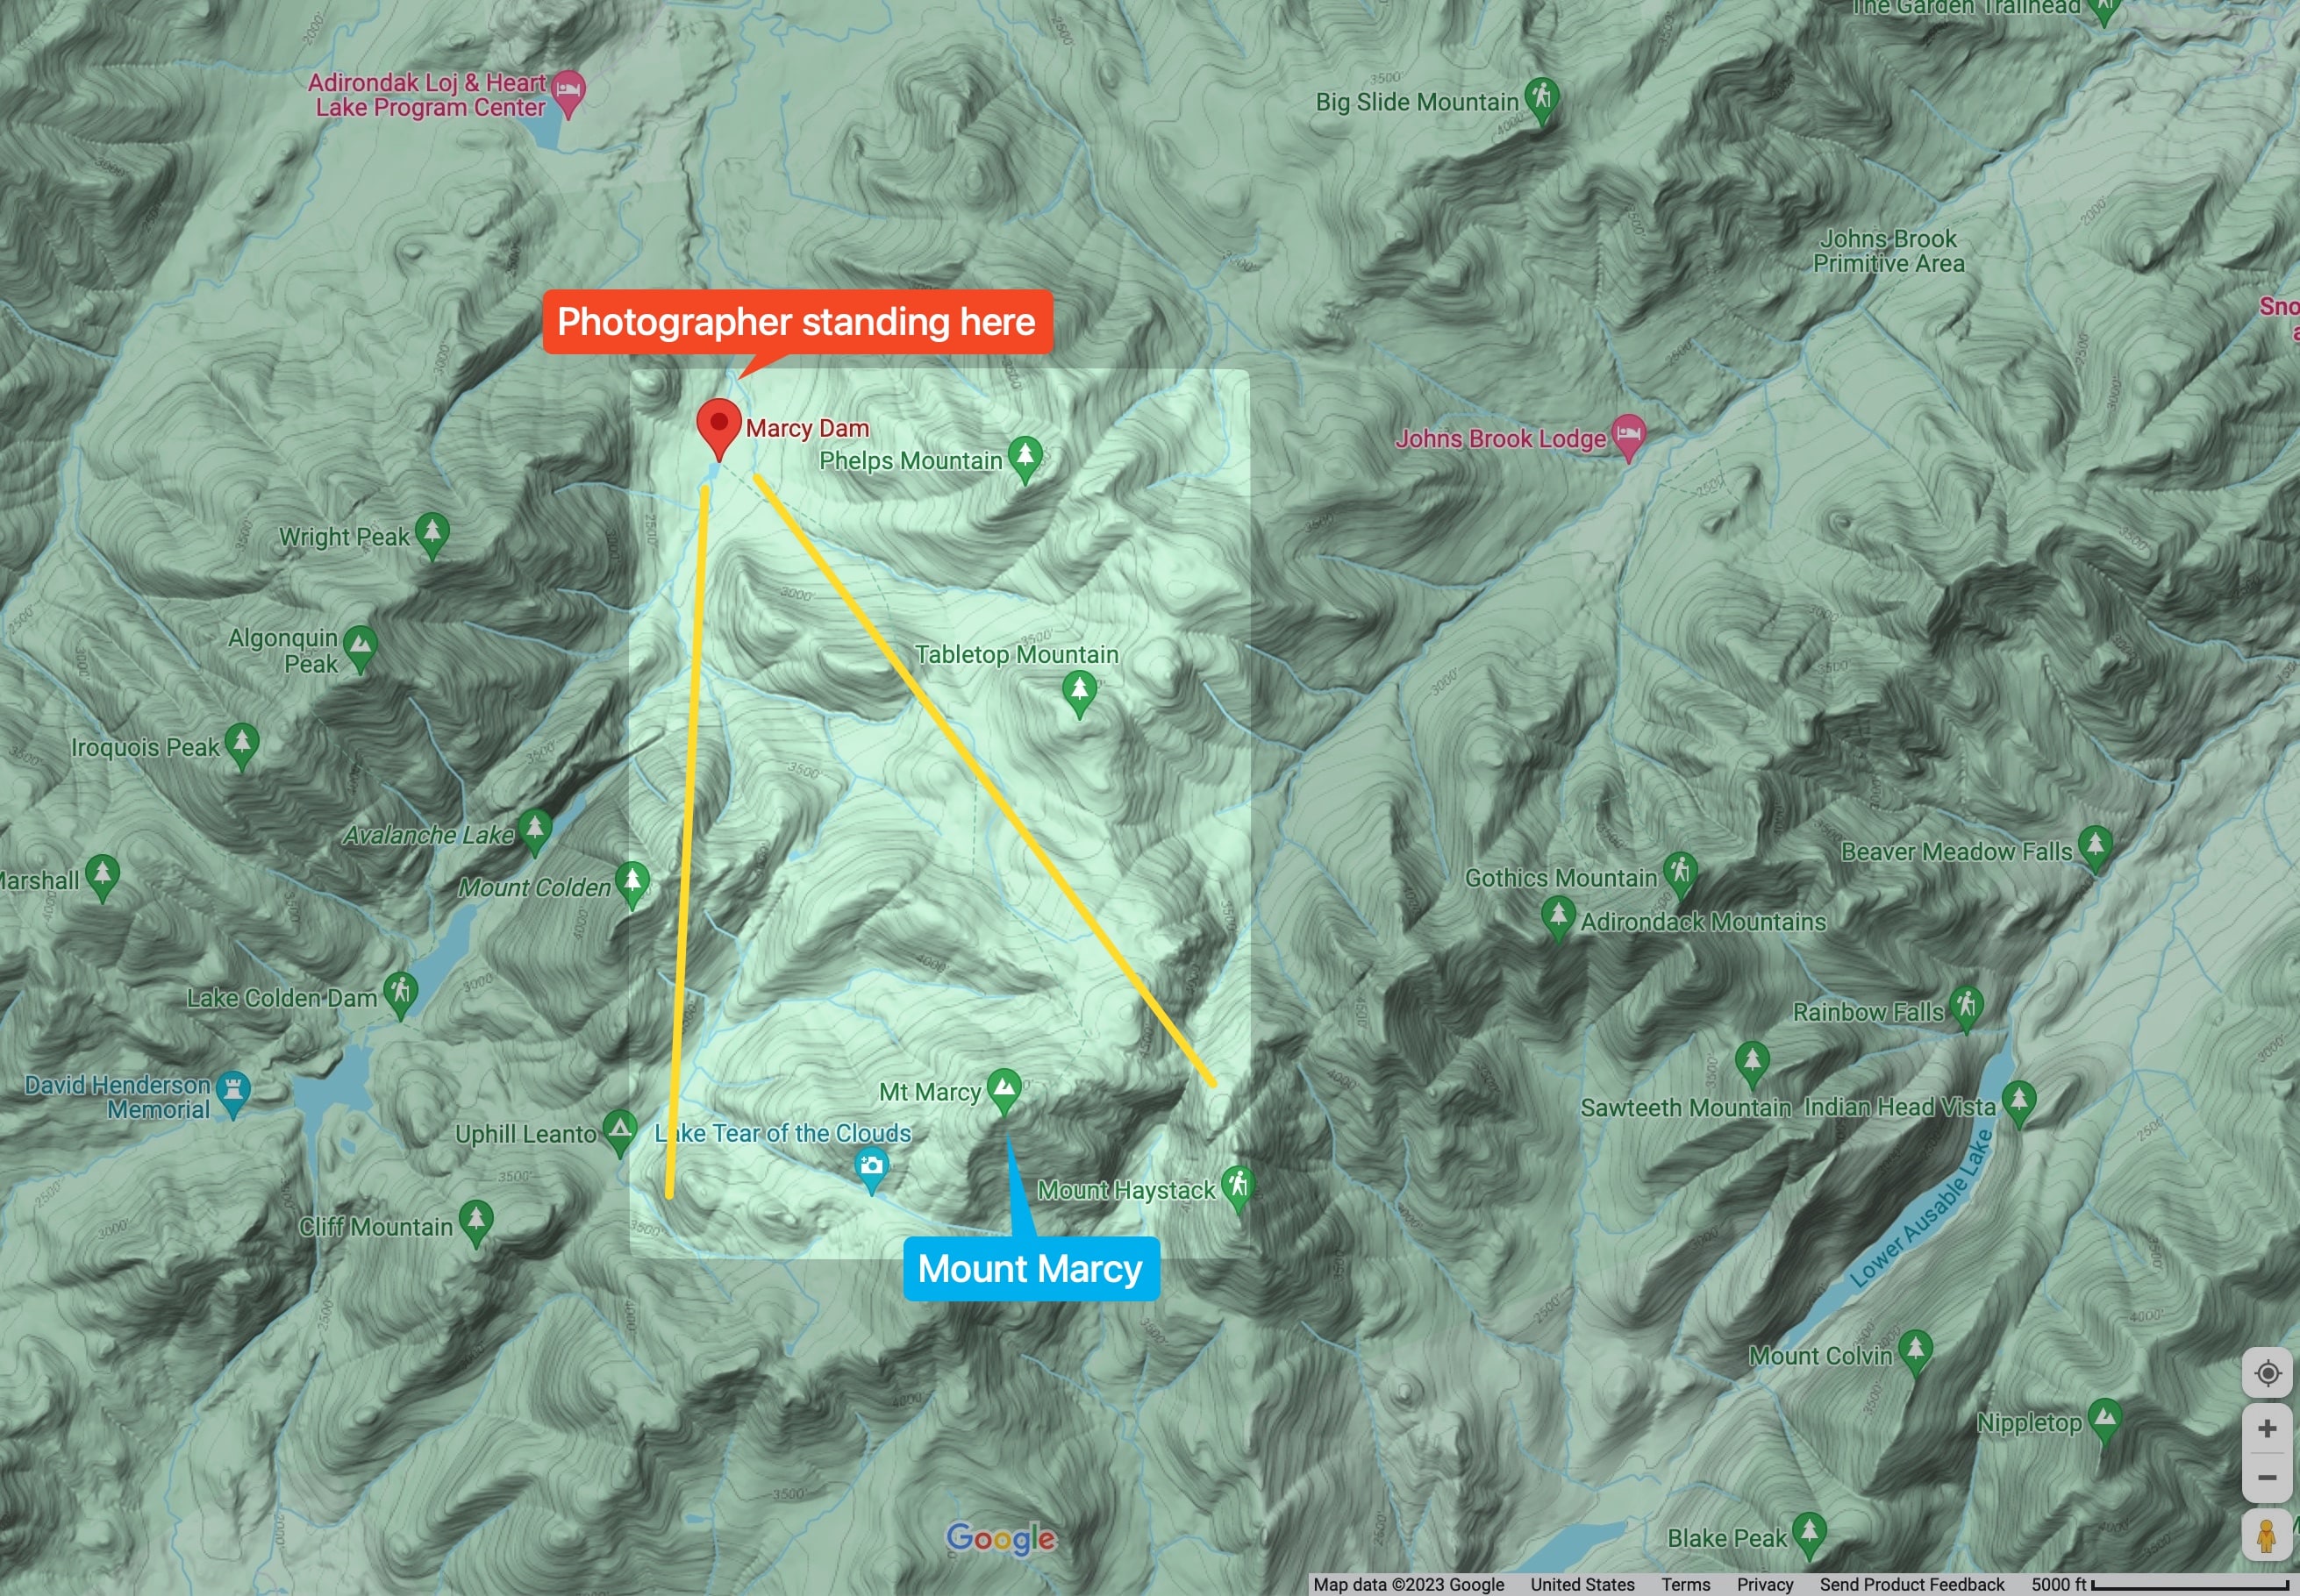
Marcy Dam was damaged by Hurricane Irene in 2011 and the dam has since been removed (Wikipedia).
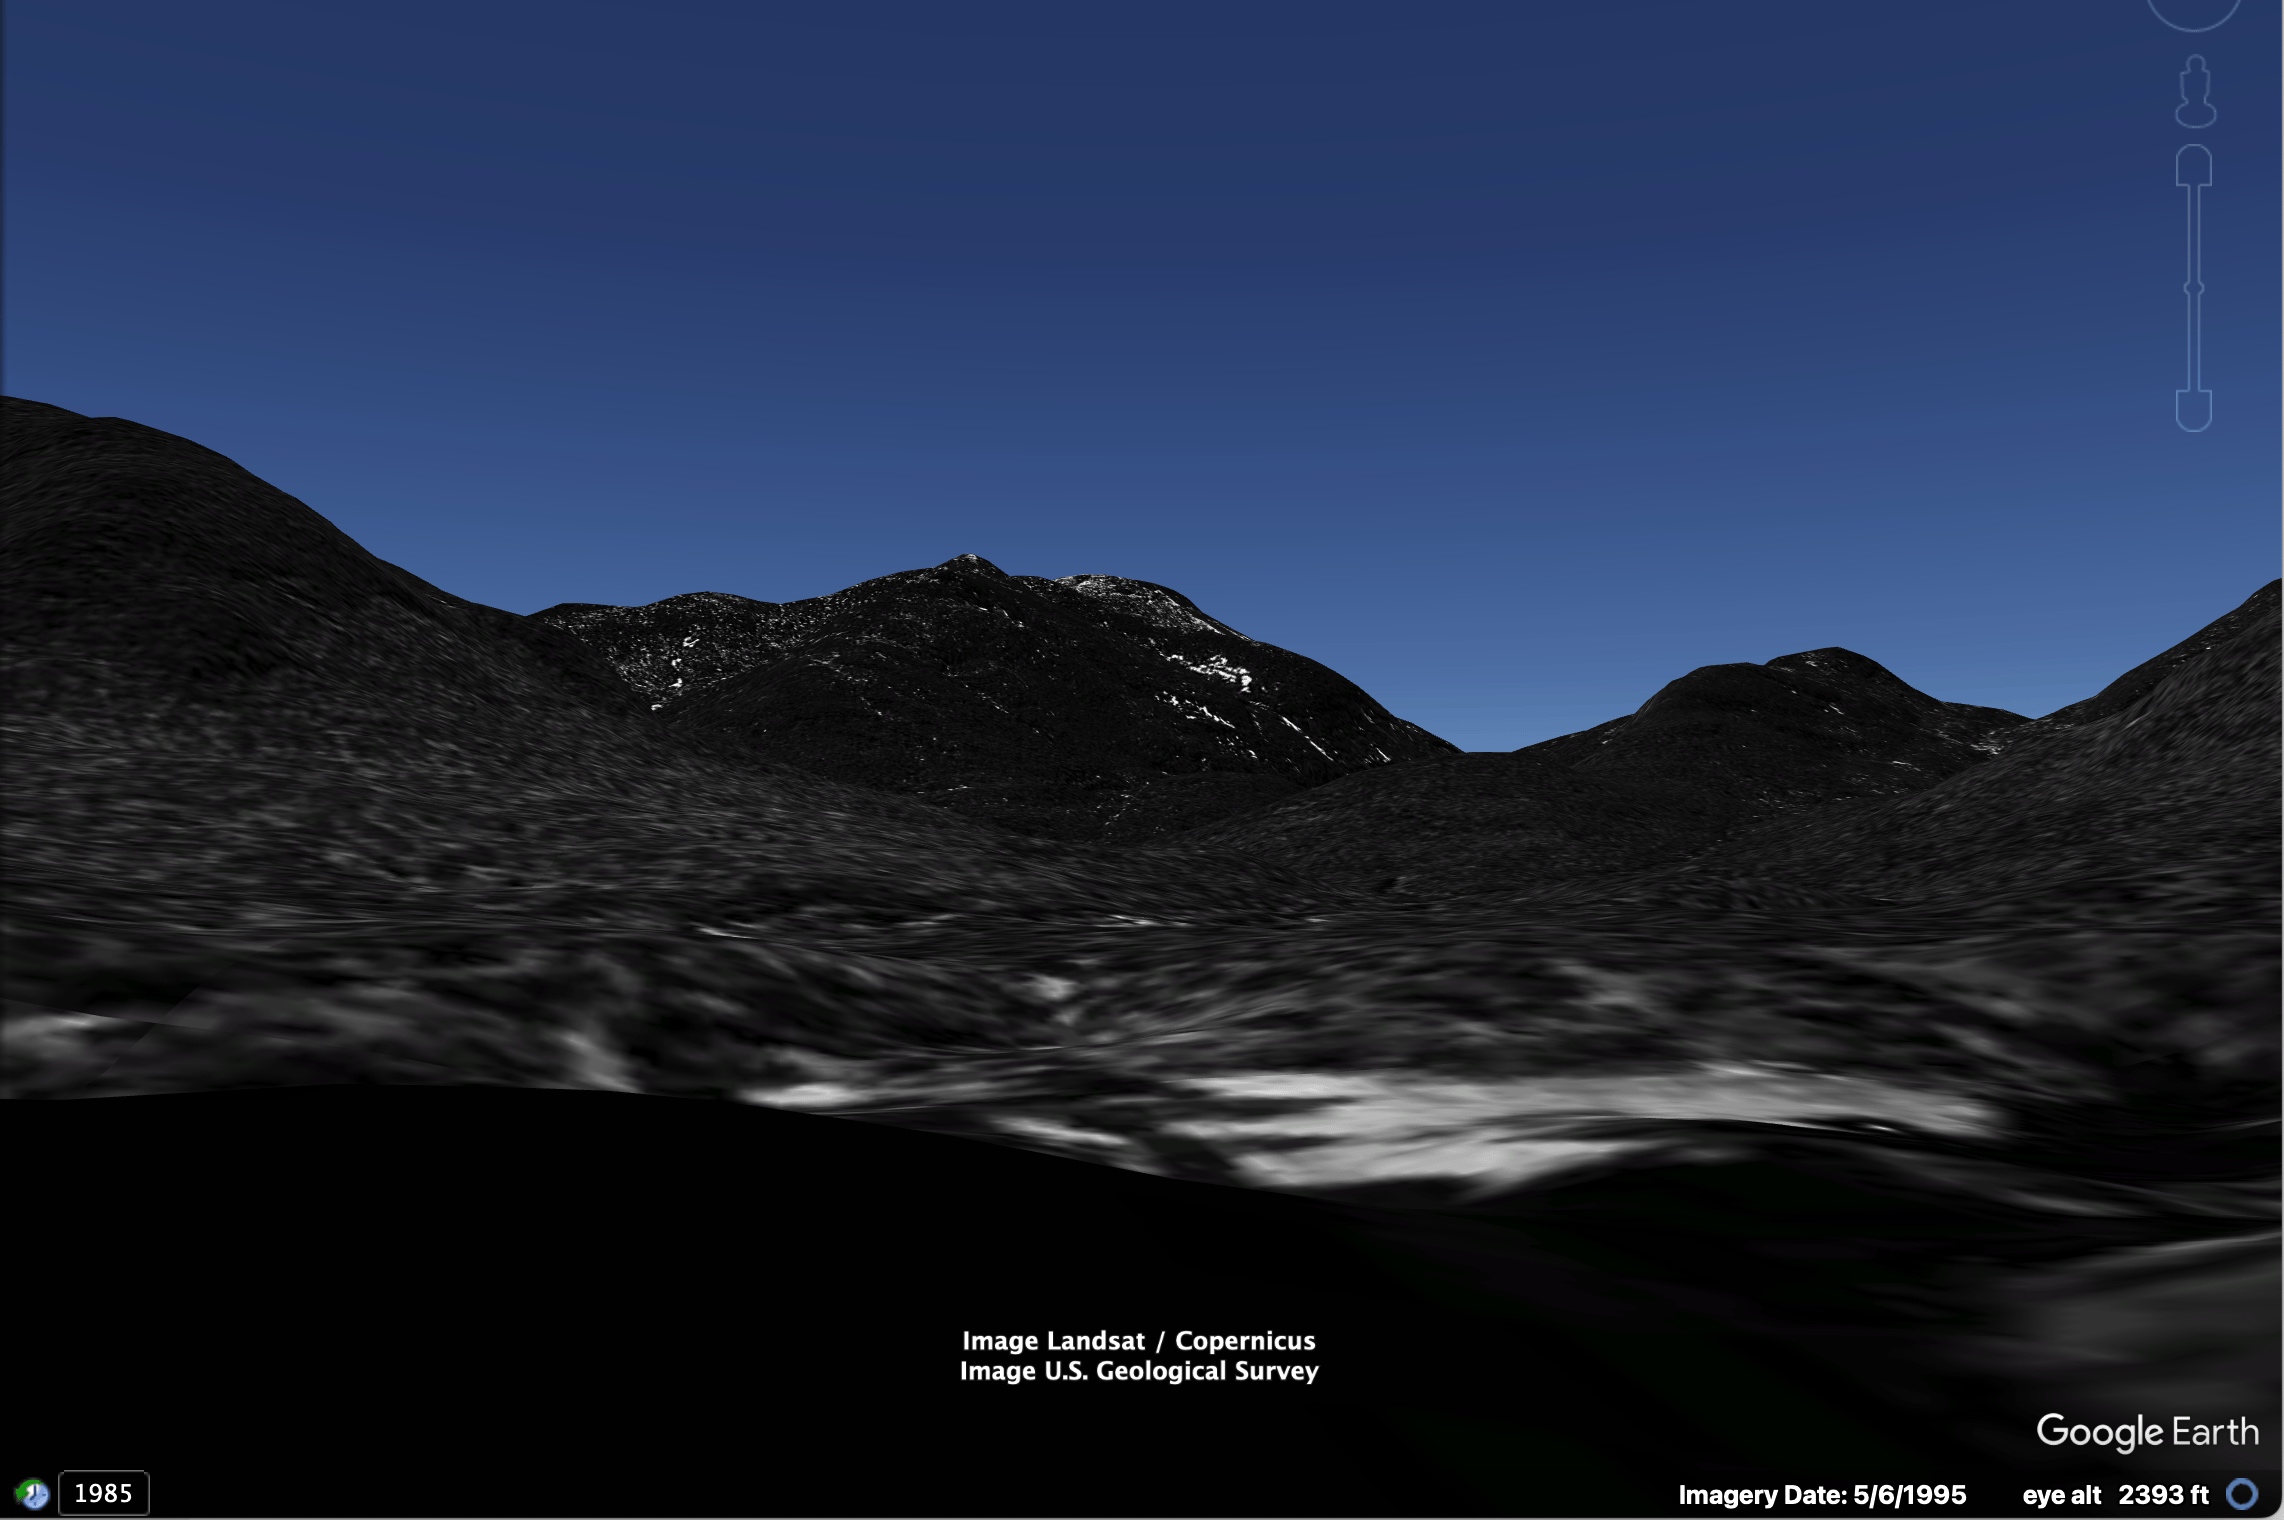
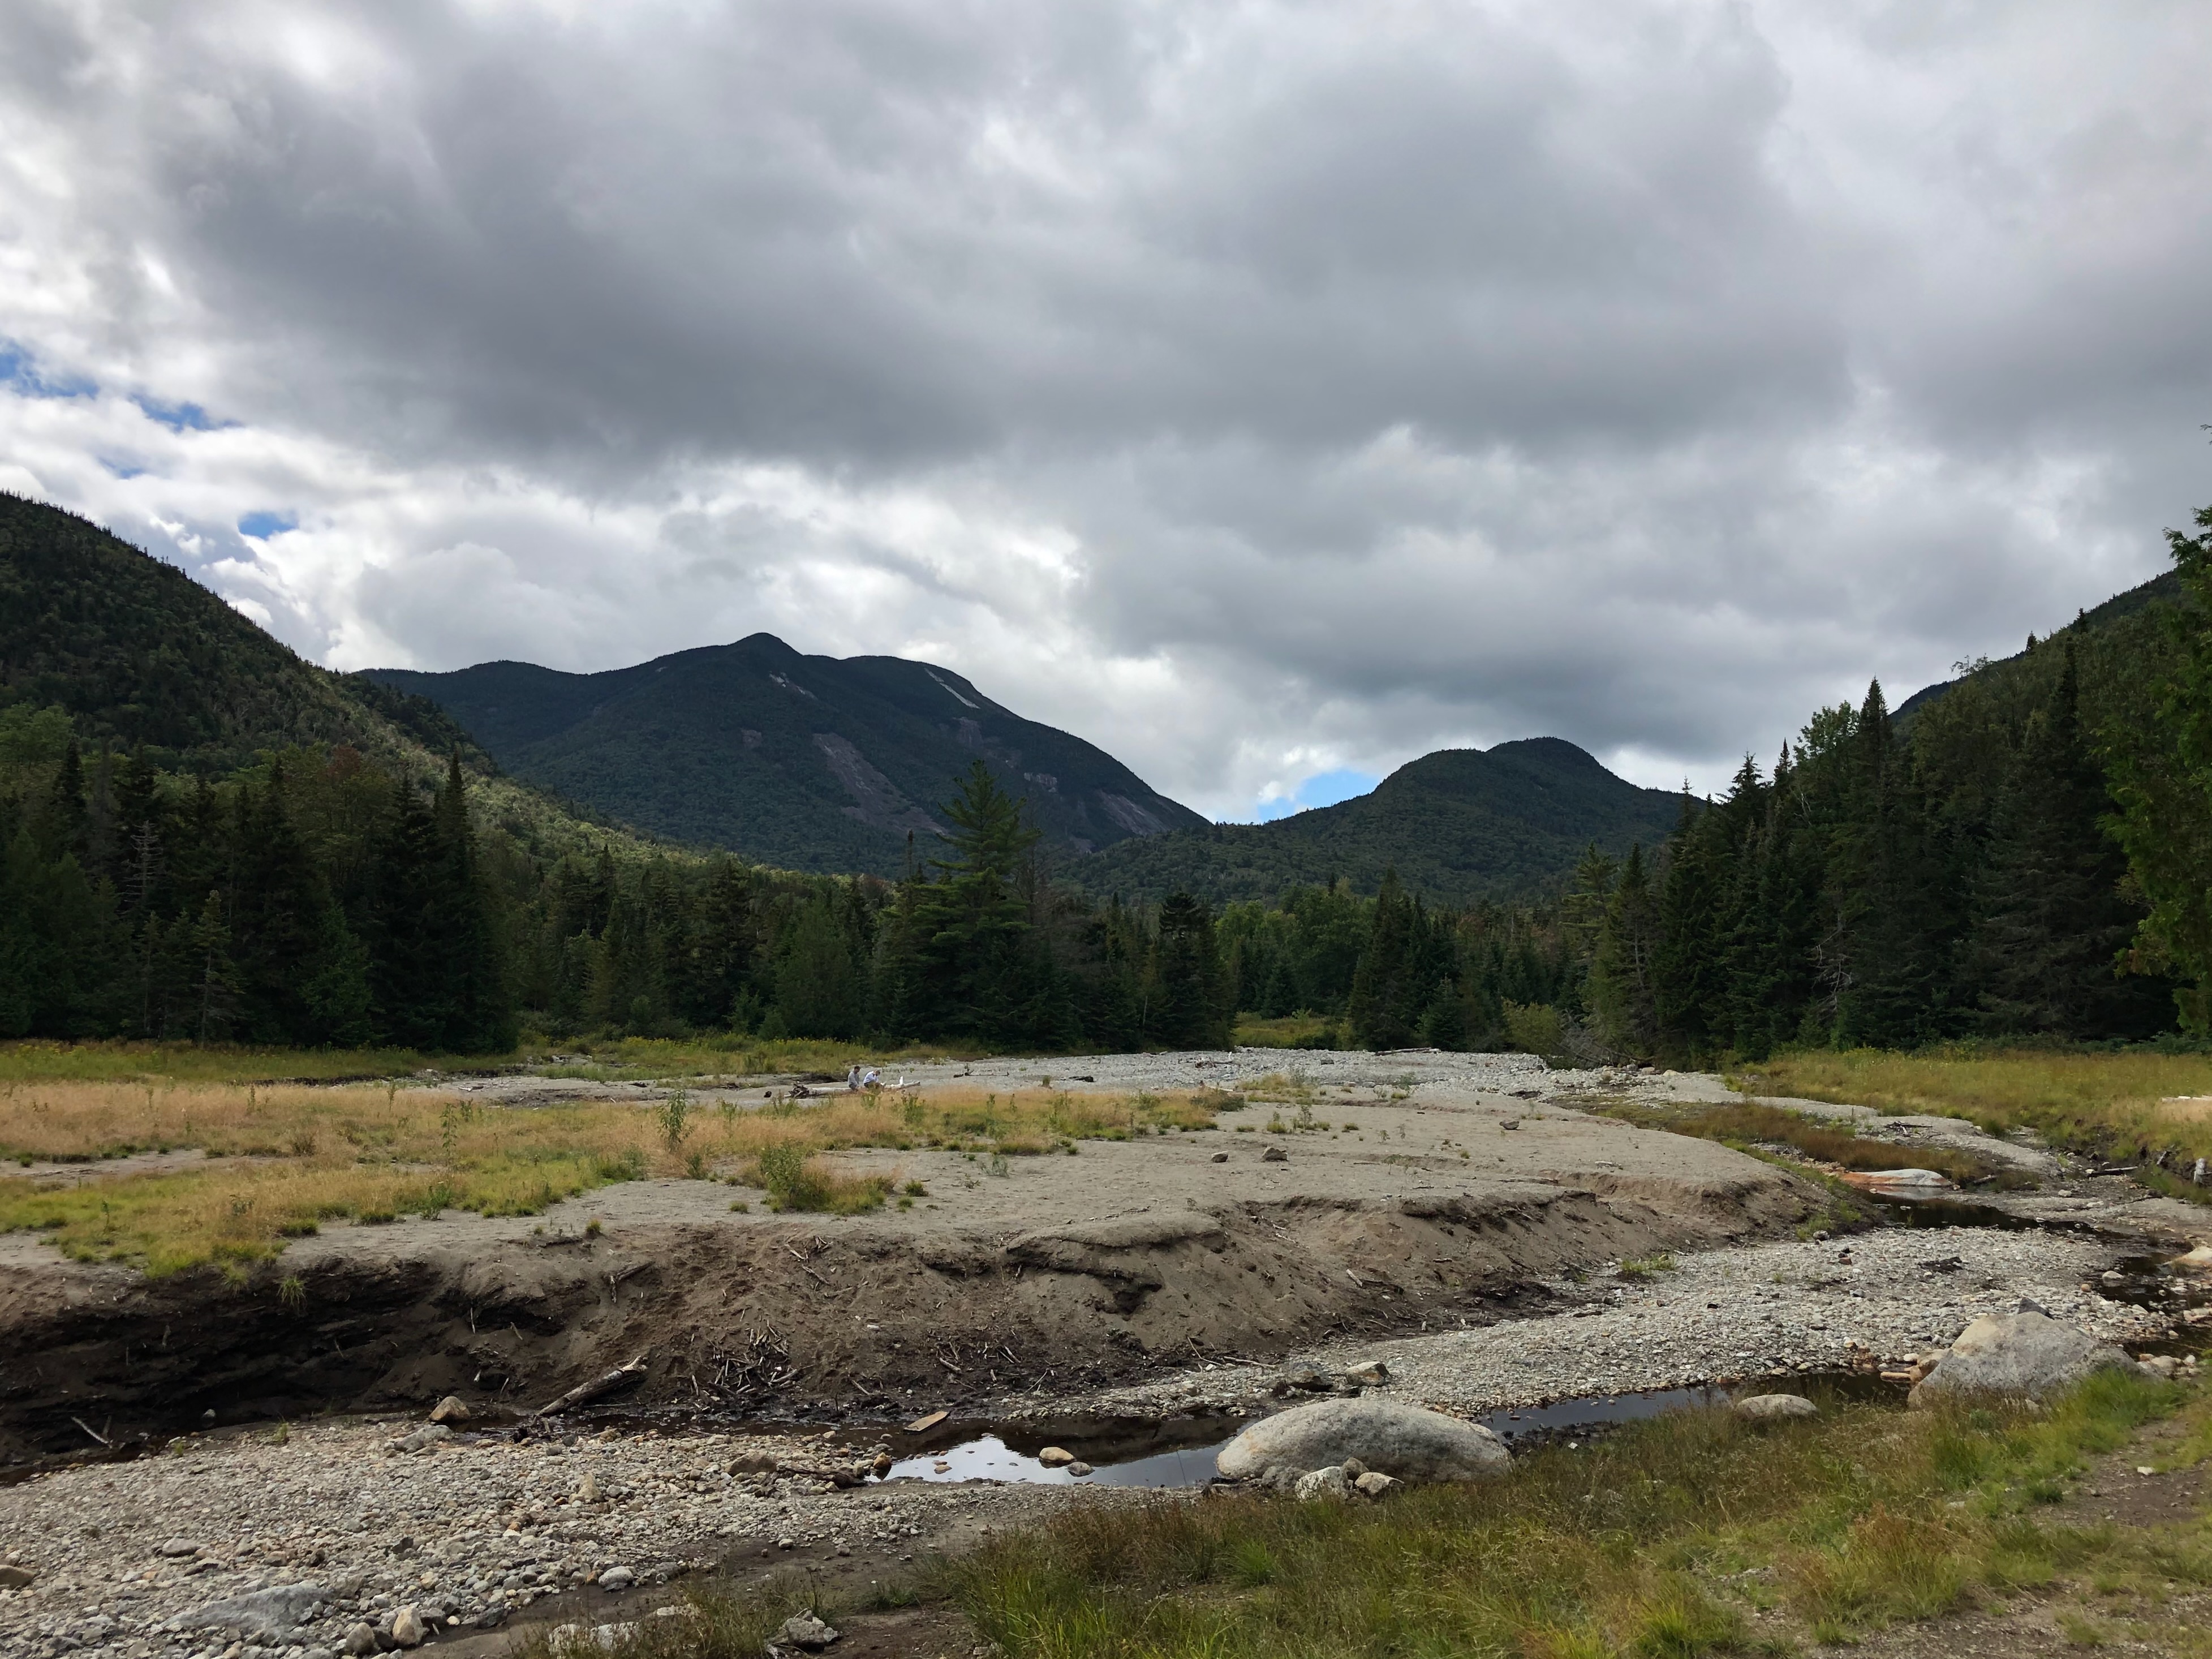
The same view in 2019:
Grandpa hiked Mount Marcy in 1955. After hiking Mount Marcy twice myself I recognized where one of the pictures was taken.
Marcy Dam was damaged by Hurricane Irene in 2011 and the dam has since been removed (Wikipedia).
The same view in 2019:
SSH to server via Tailscale if possible: If Tailscale is not running fall back to a different IP
Requirements:
Replace the following values:
{SERVER_NAME}: These configuration options will be used when you type ssh {SERVER_NAME}
{SERVER_USERNAME}: The username you use to connect to the server
{SERVER_TAILSCALE_IP}: IP Address or DNS name
{SERVER_NON_TAILSCALE_IP}: I said “IP” but “hostname” will also work here
{SERVER_PRIVATE_KEY_FILENAME}: Private key to log in with
# If Tailscale is running connect via this:
Match originalhost {SERVER_NAME} exec "[ $(/Applications/Tailscale.app/Contents/MacOS/Tailscale status --json | jq -r .BackendState) != Stopped ]"
    HostName {SERVER_TAILSCALE_IP}
    User {SERVER_USERNAME}
    IdentityFile ~/.ssh/{SERVER_PRIVATE_KEY_FILENAME}

# If Tailscale is not running connect via this:
Host {SERVER_NAME}
    HostName {SERVER_NON_TAILSCALE_IP}
    User {SERVER_USERNAME}
    IdentityFile ~/.ssh/{SERVER_PRIVATE_KEY_FILENAME}

Pops by the Lehigh University Band Another Lehigh vinyl acquired and now available on Archive.org. From discussion in the Marching 97 alumni band Facebook group we’ve learned the following:
This is a part of a series where I digitize vinyl records. More Lehigh records / all records!
My crowd has been enjoying the app BeReal recently. The world is split up geographically in to zones; every user in each zone recieves a notification at the same time which is randomly chosen each day.
I’ve started keeping track of those times. US data is the best but hopefully I can record the others too going forward:
Edit: The BeReal API changed and this is no longer functional. Most of the data I collected is available in other data sets or here on Archive.org.
The L Train Brass Band is a community brass band from Brooklyn open to all.
We try to have as much music as possible memorized for parades (it’s more fun that way!) but for some low-key gigs and rehearsals we read music off the page. Many of us like to use our phones to read our music.
Neither I, nor the L Train Brass Band have any association with any of the products linked or mentioned here.
Many band members with smaller phones find that PopSockets fit well in standard lyres.
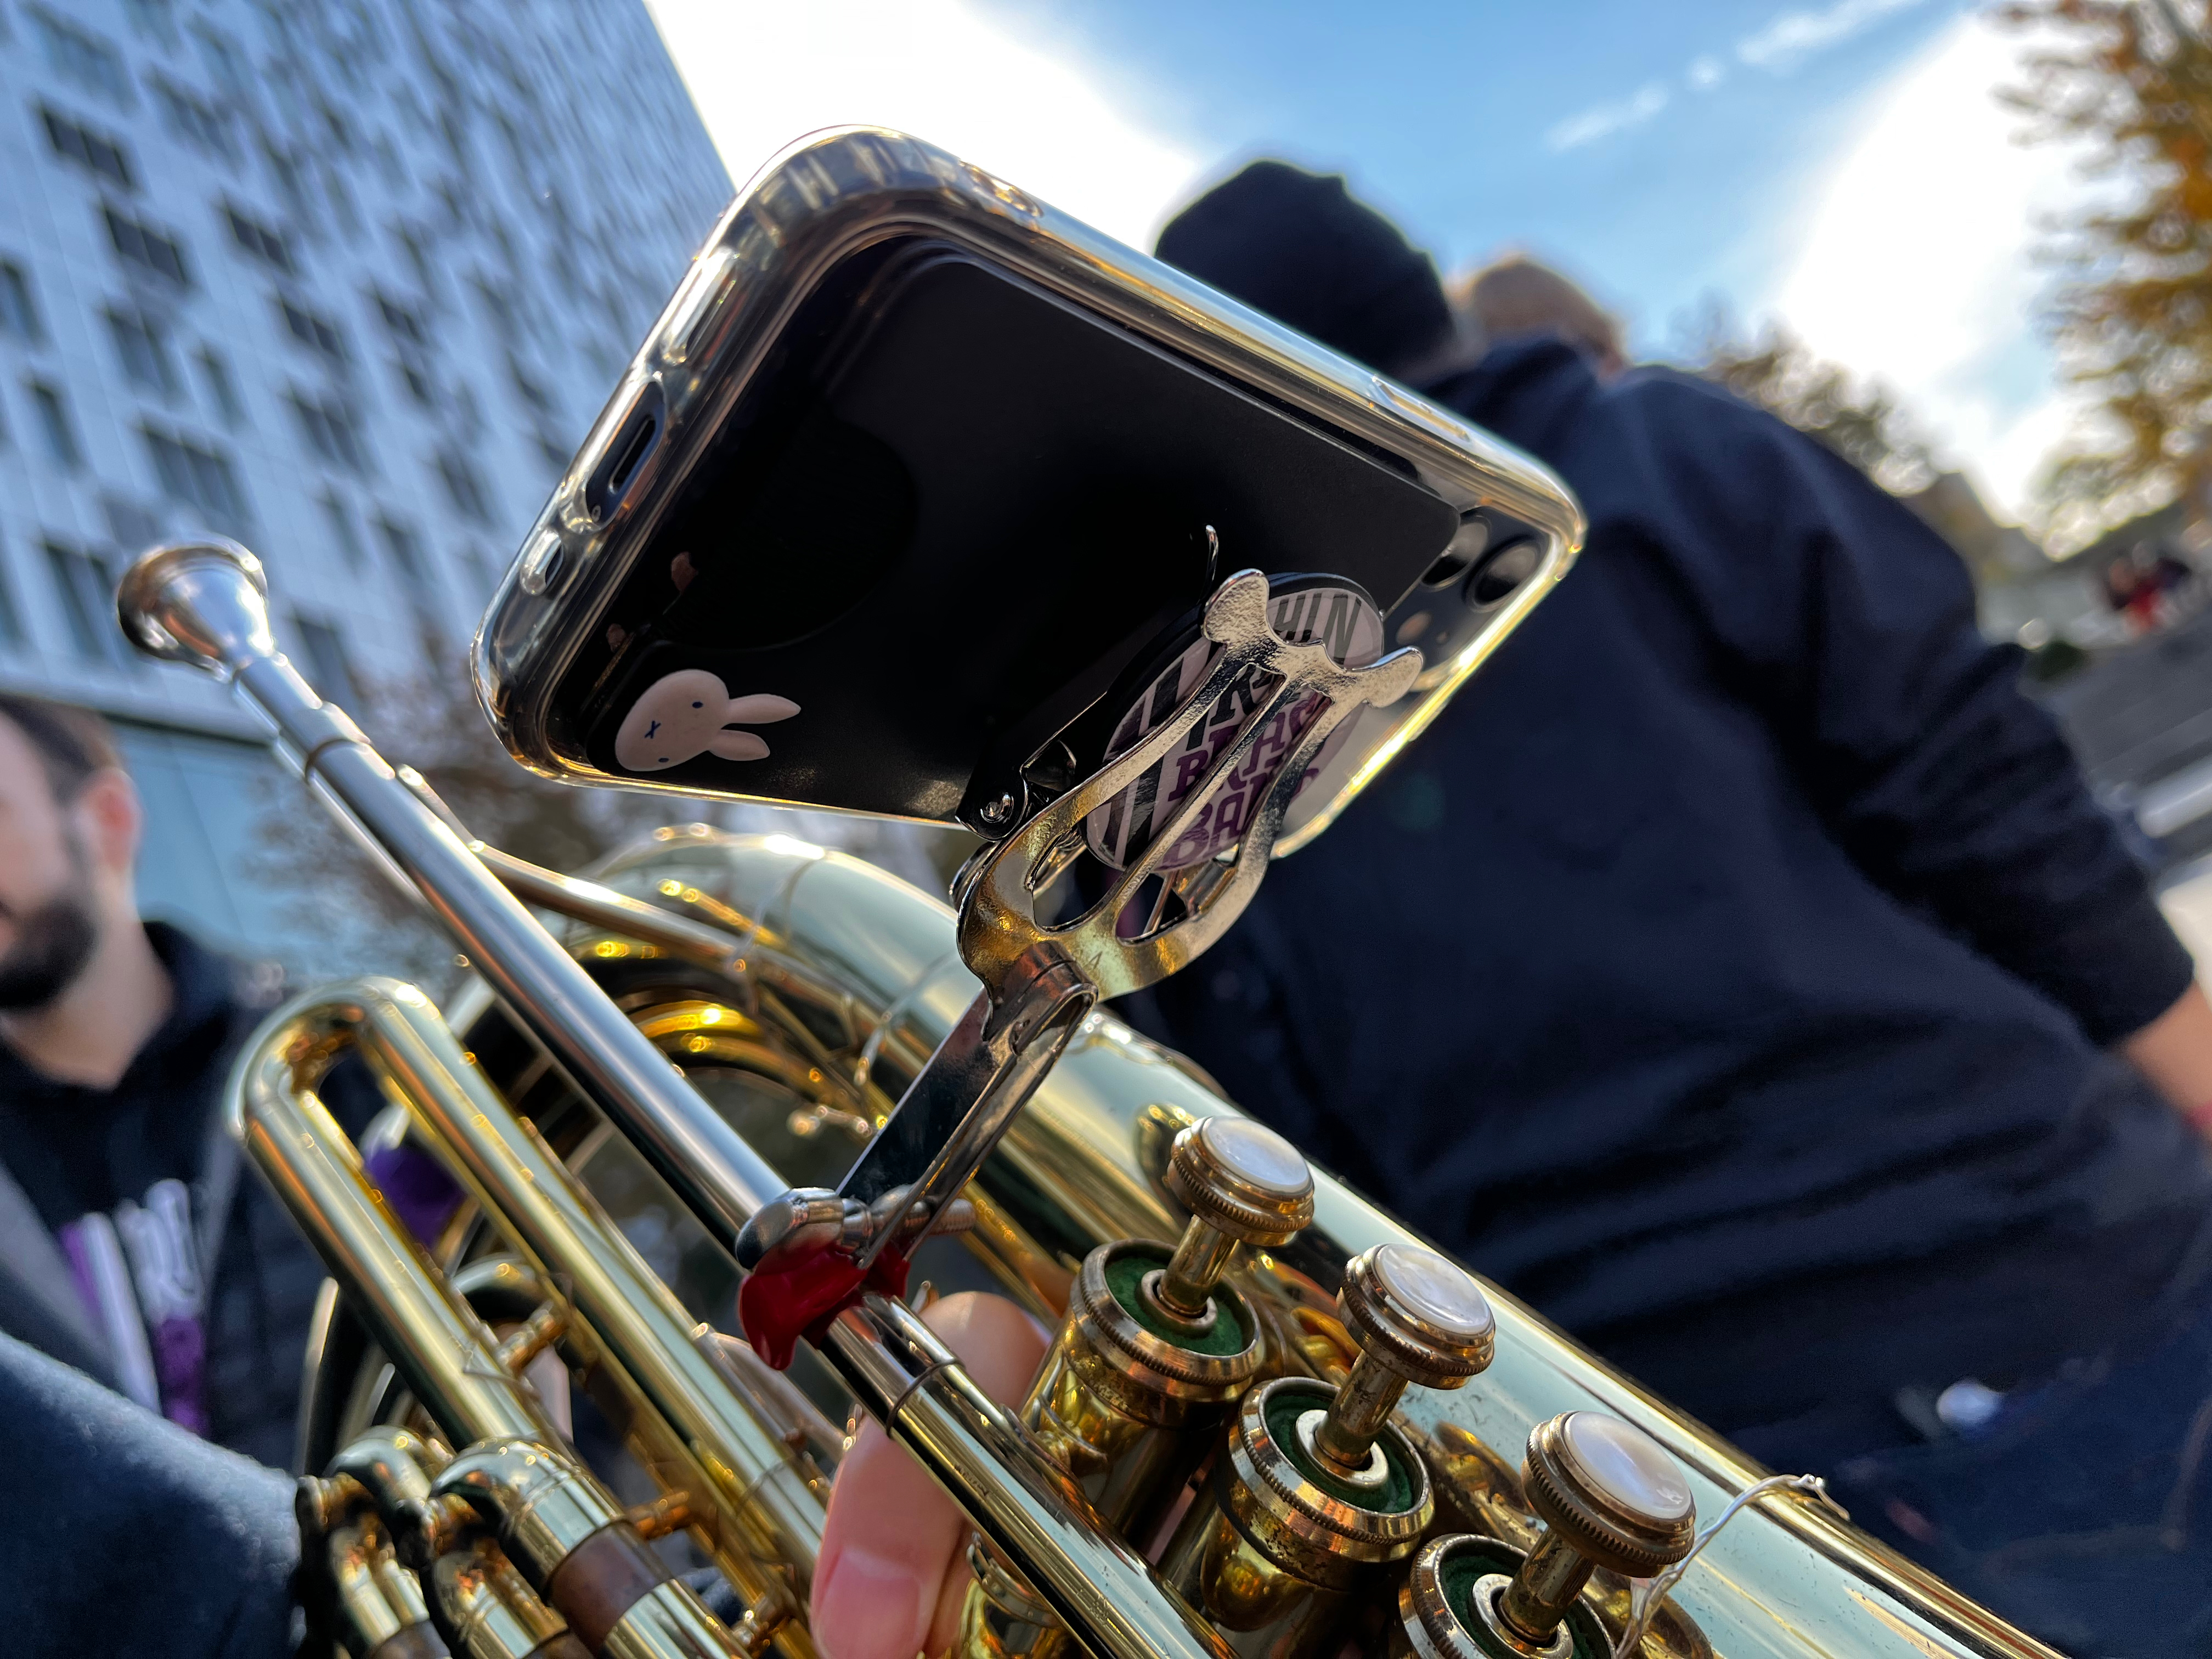
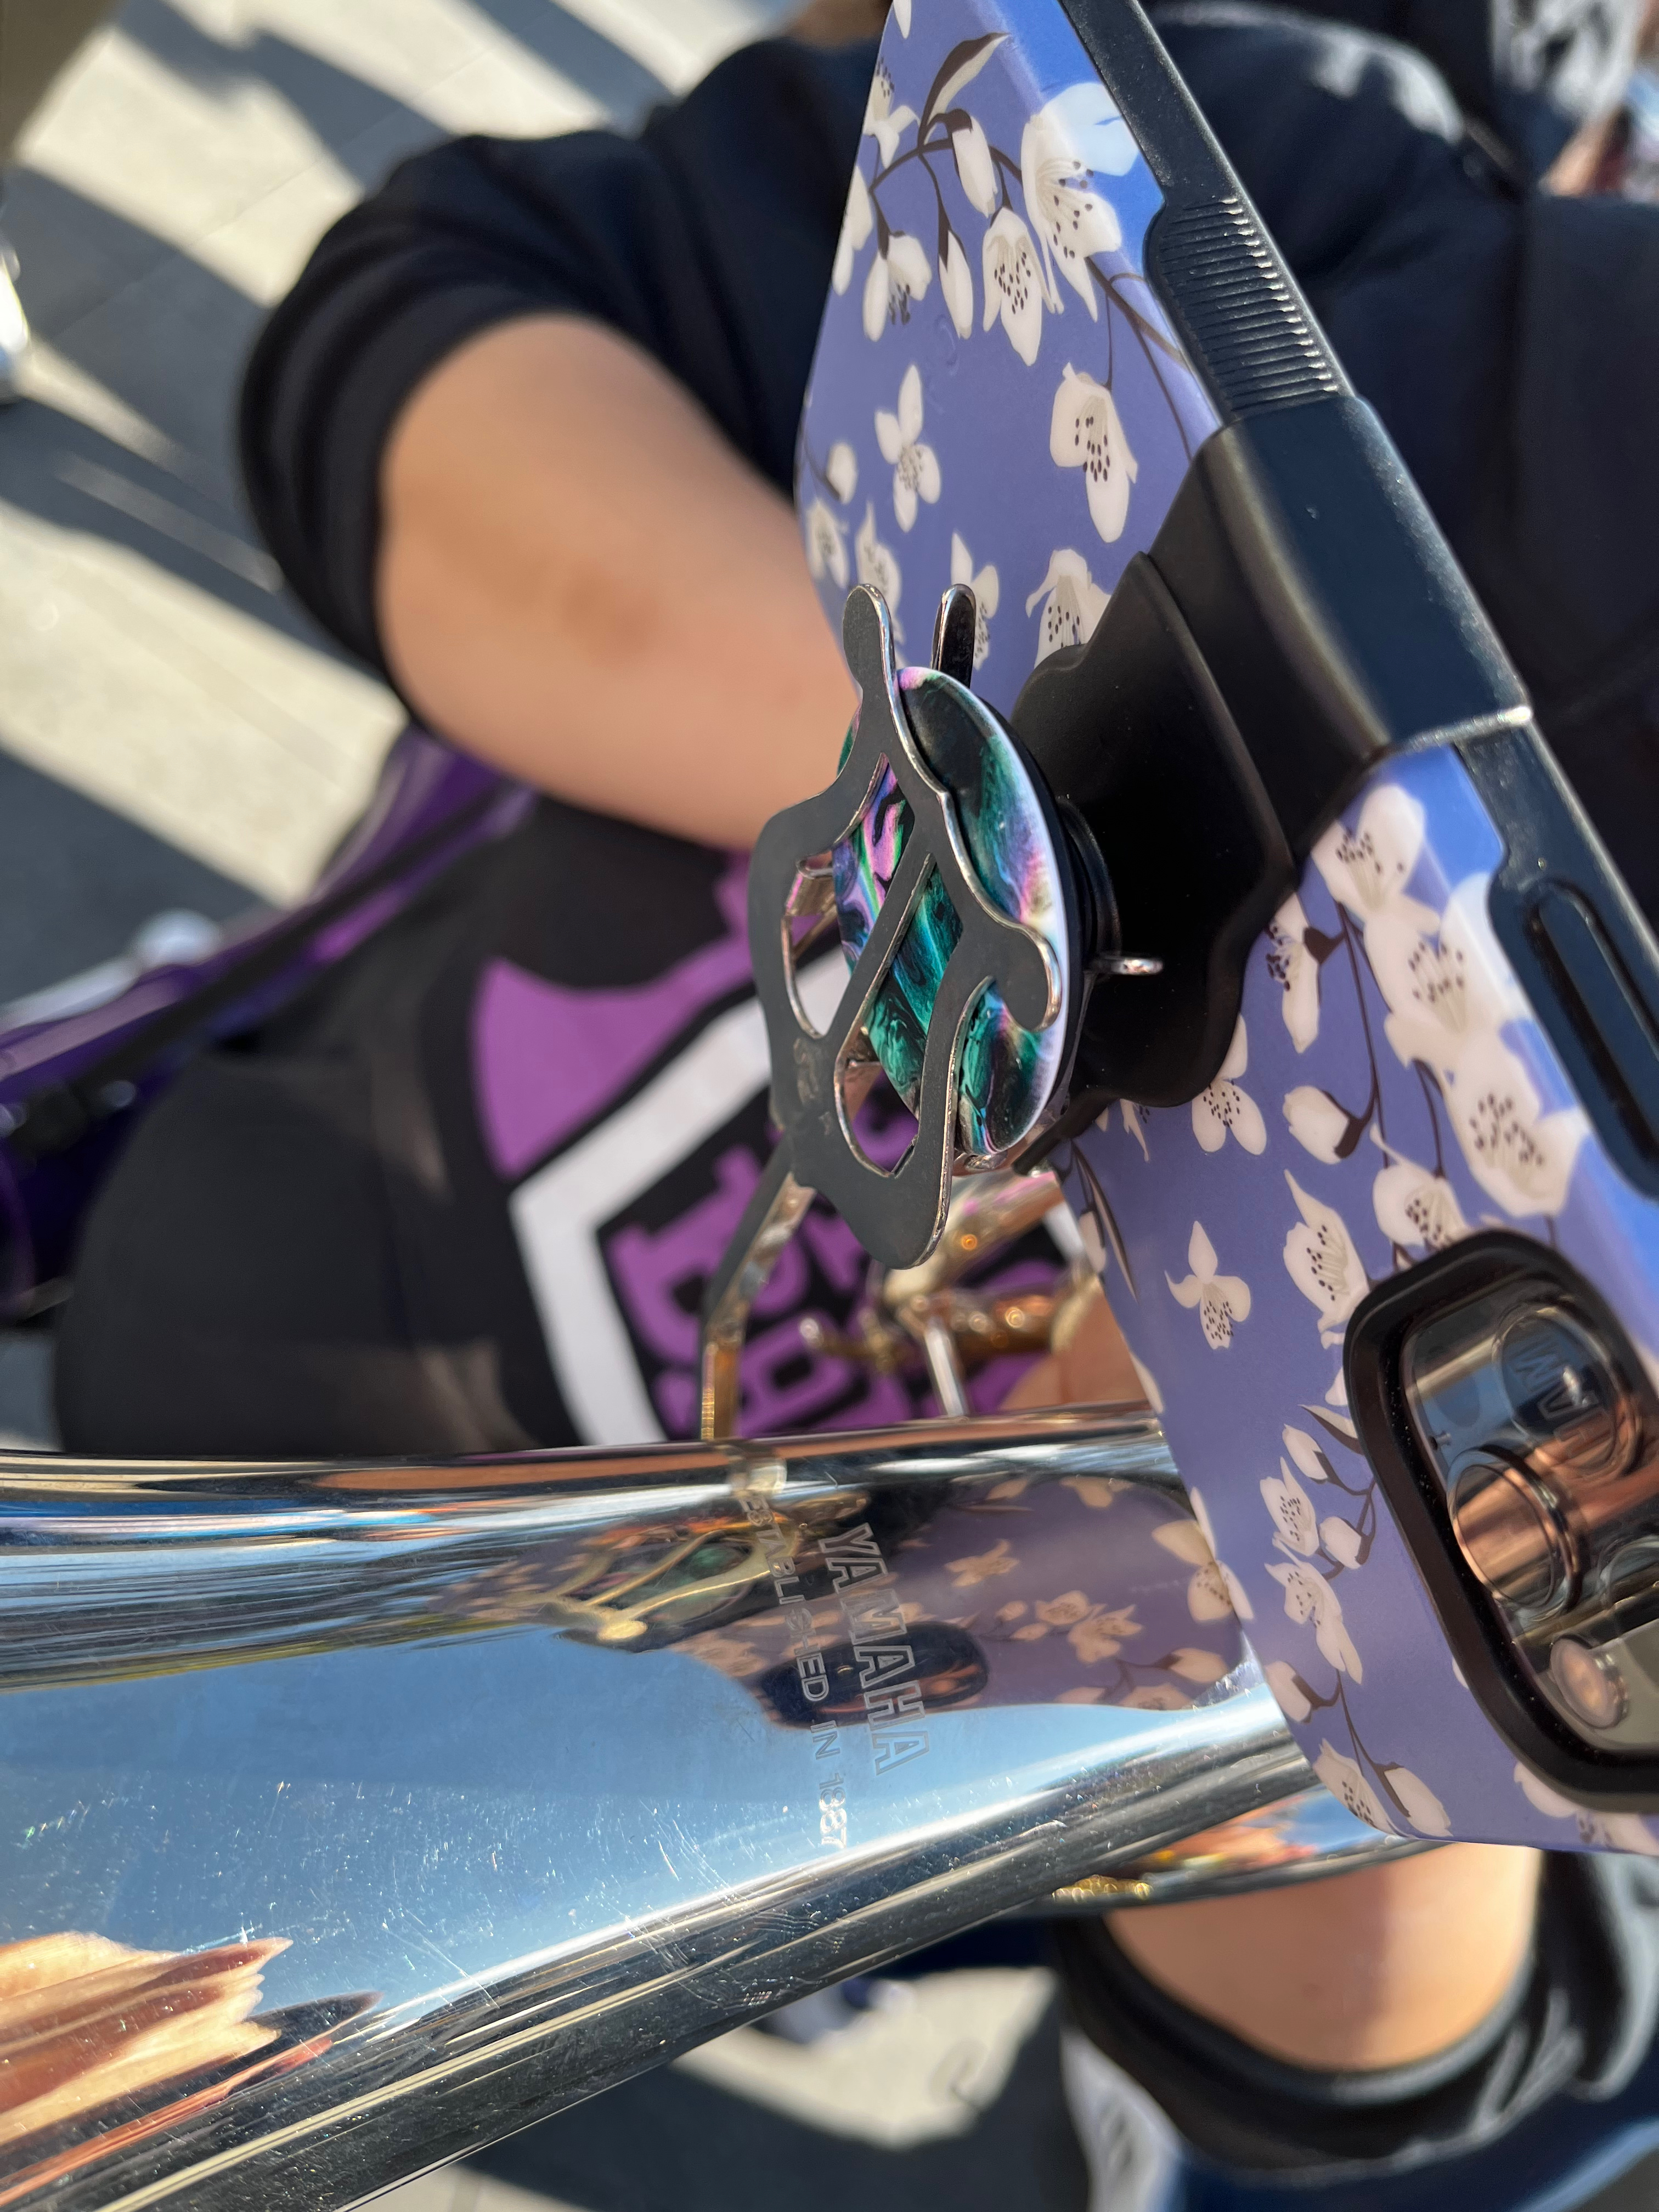
This configuration seems to work well for trumpets, clarinets, many horns.
This makes me so nervous but people do it.
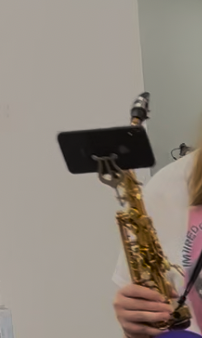

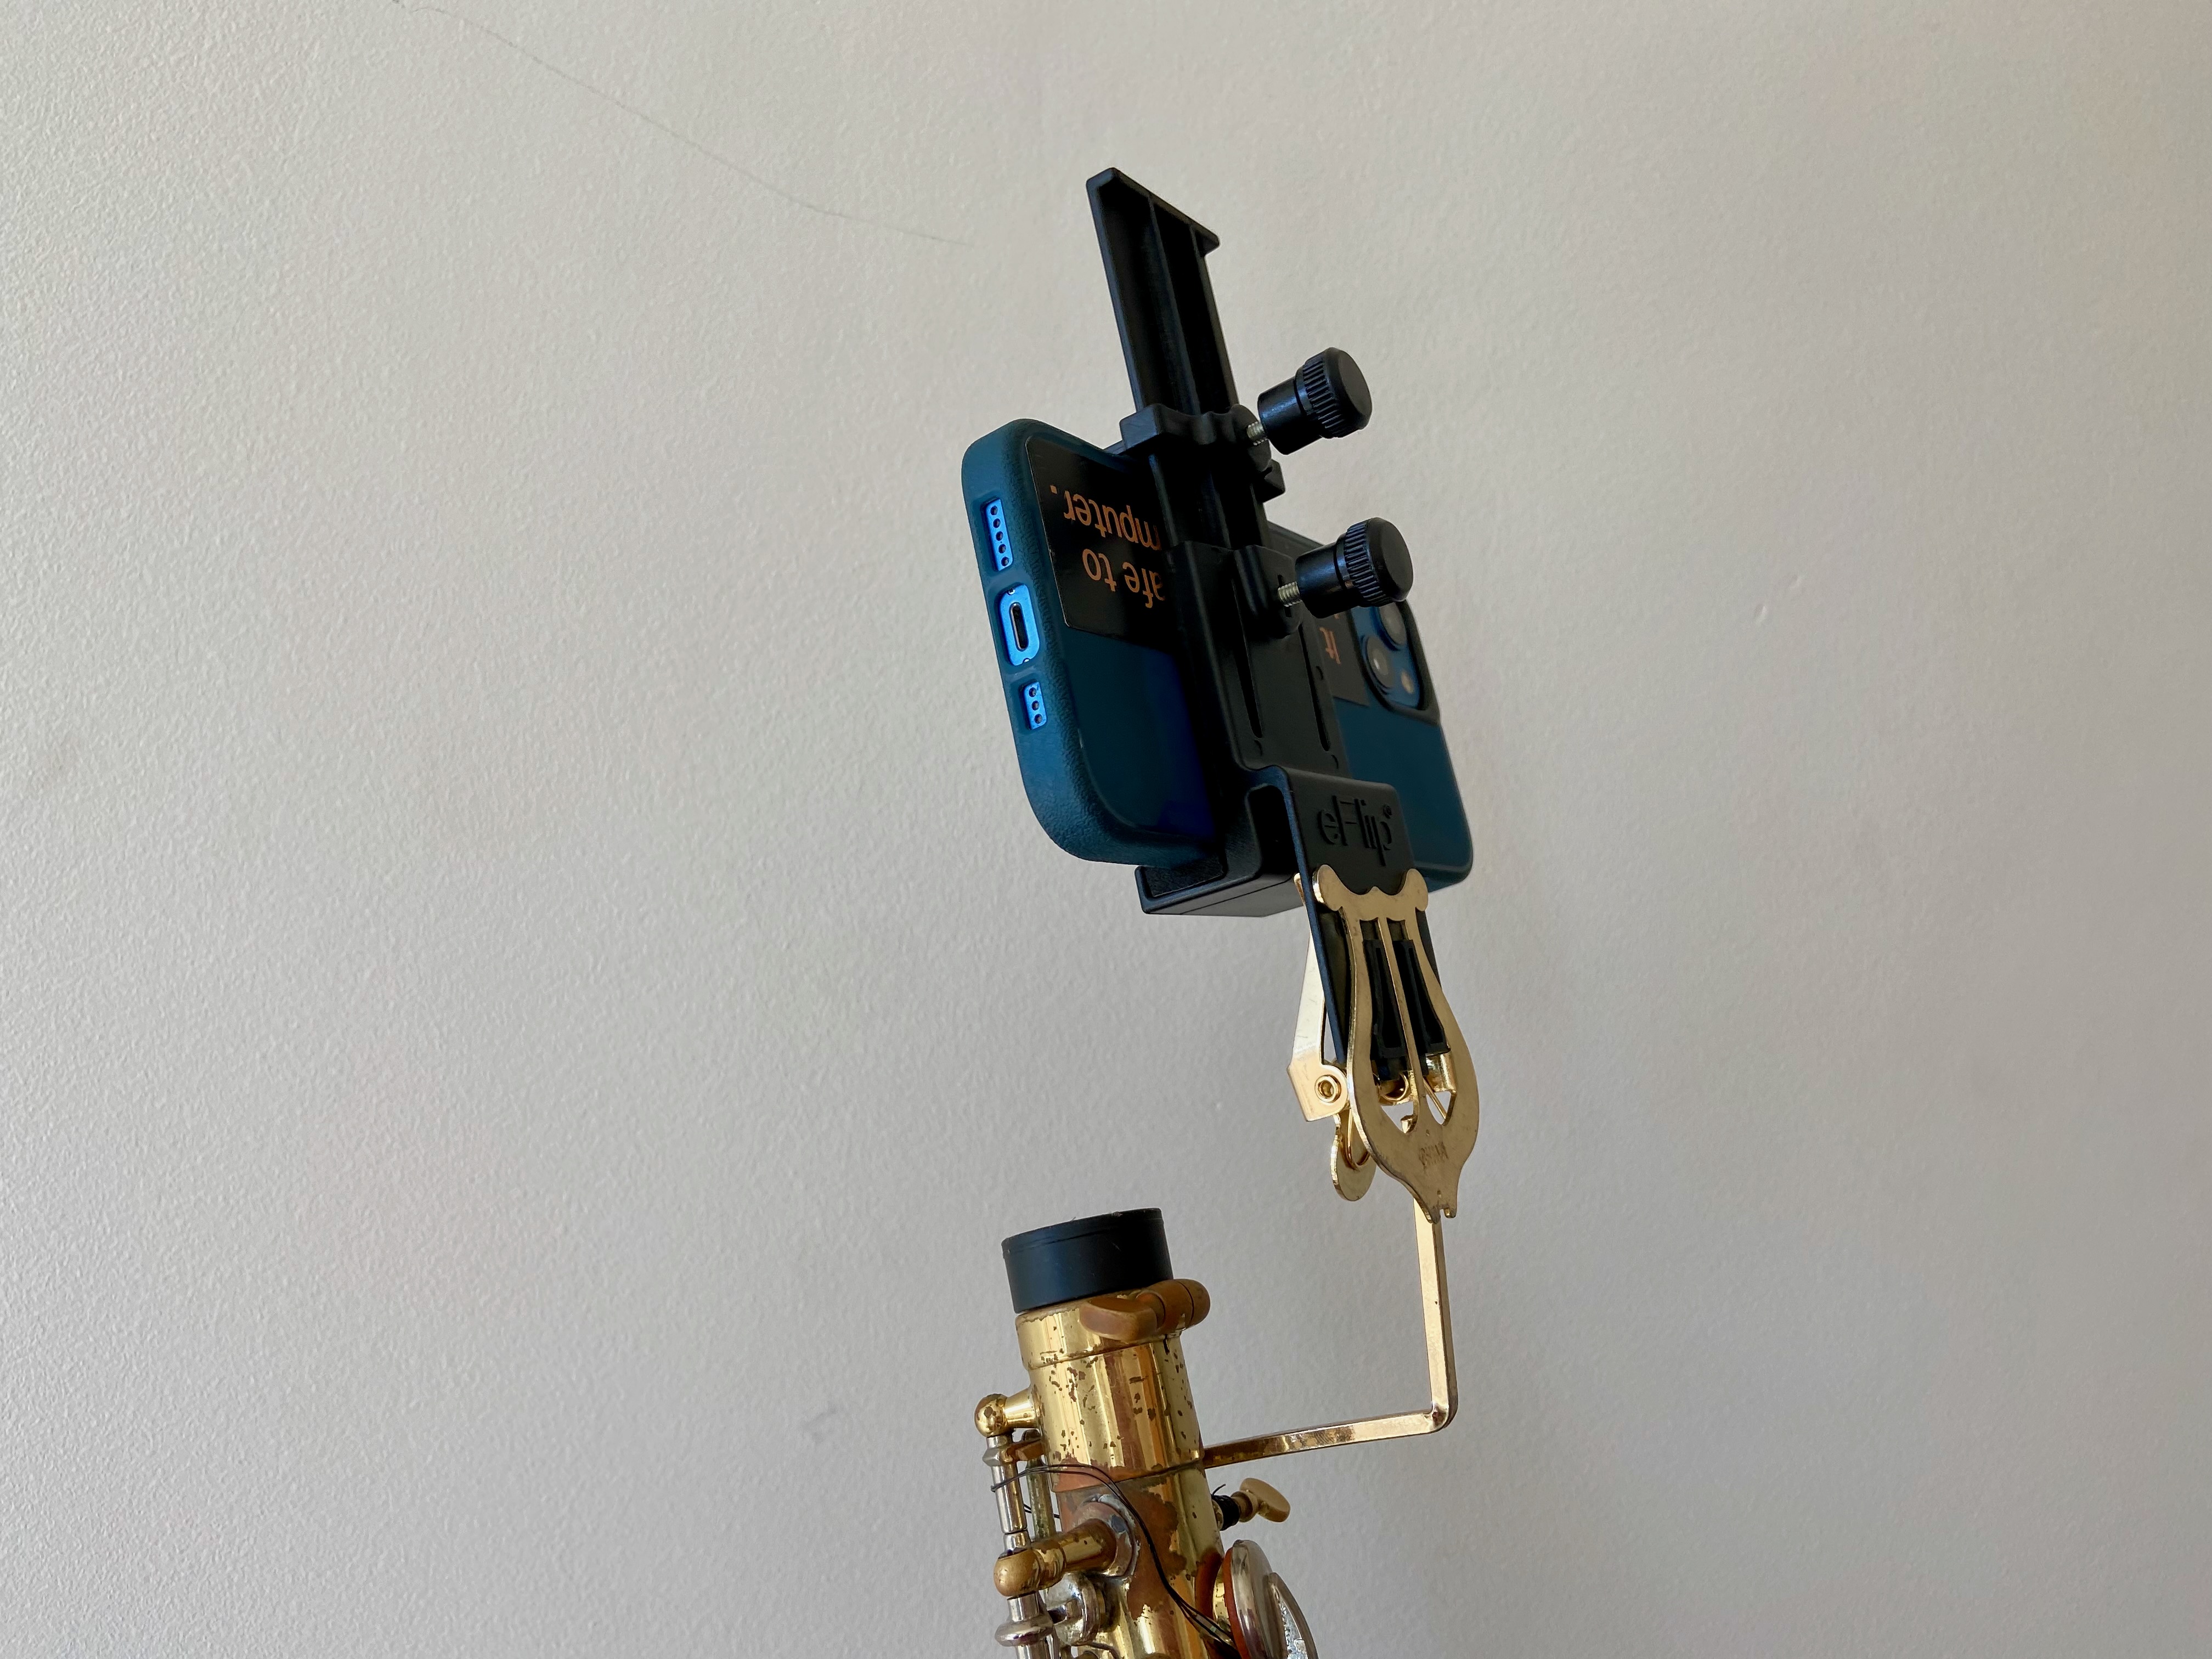
Tonal Innovation makes a product called the “eFlip” in several variations—the eFlip holds your phone and the lyre clips on to the bottom of the eFlip. This is what I personally use on my saxophone and I like it a lot!
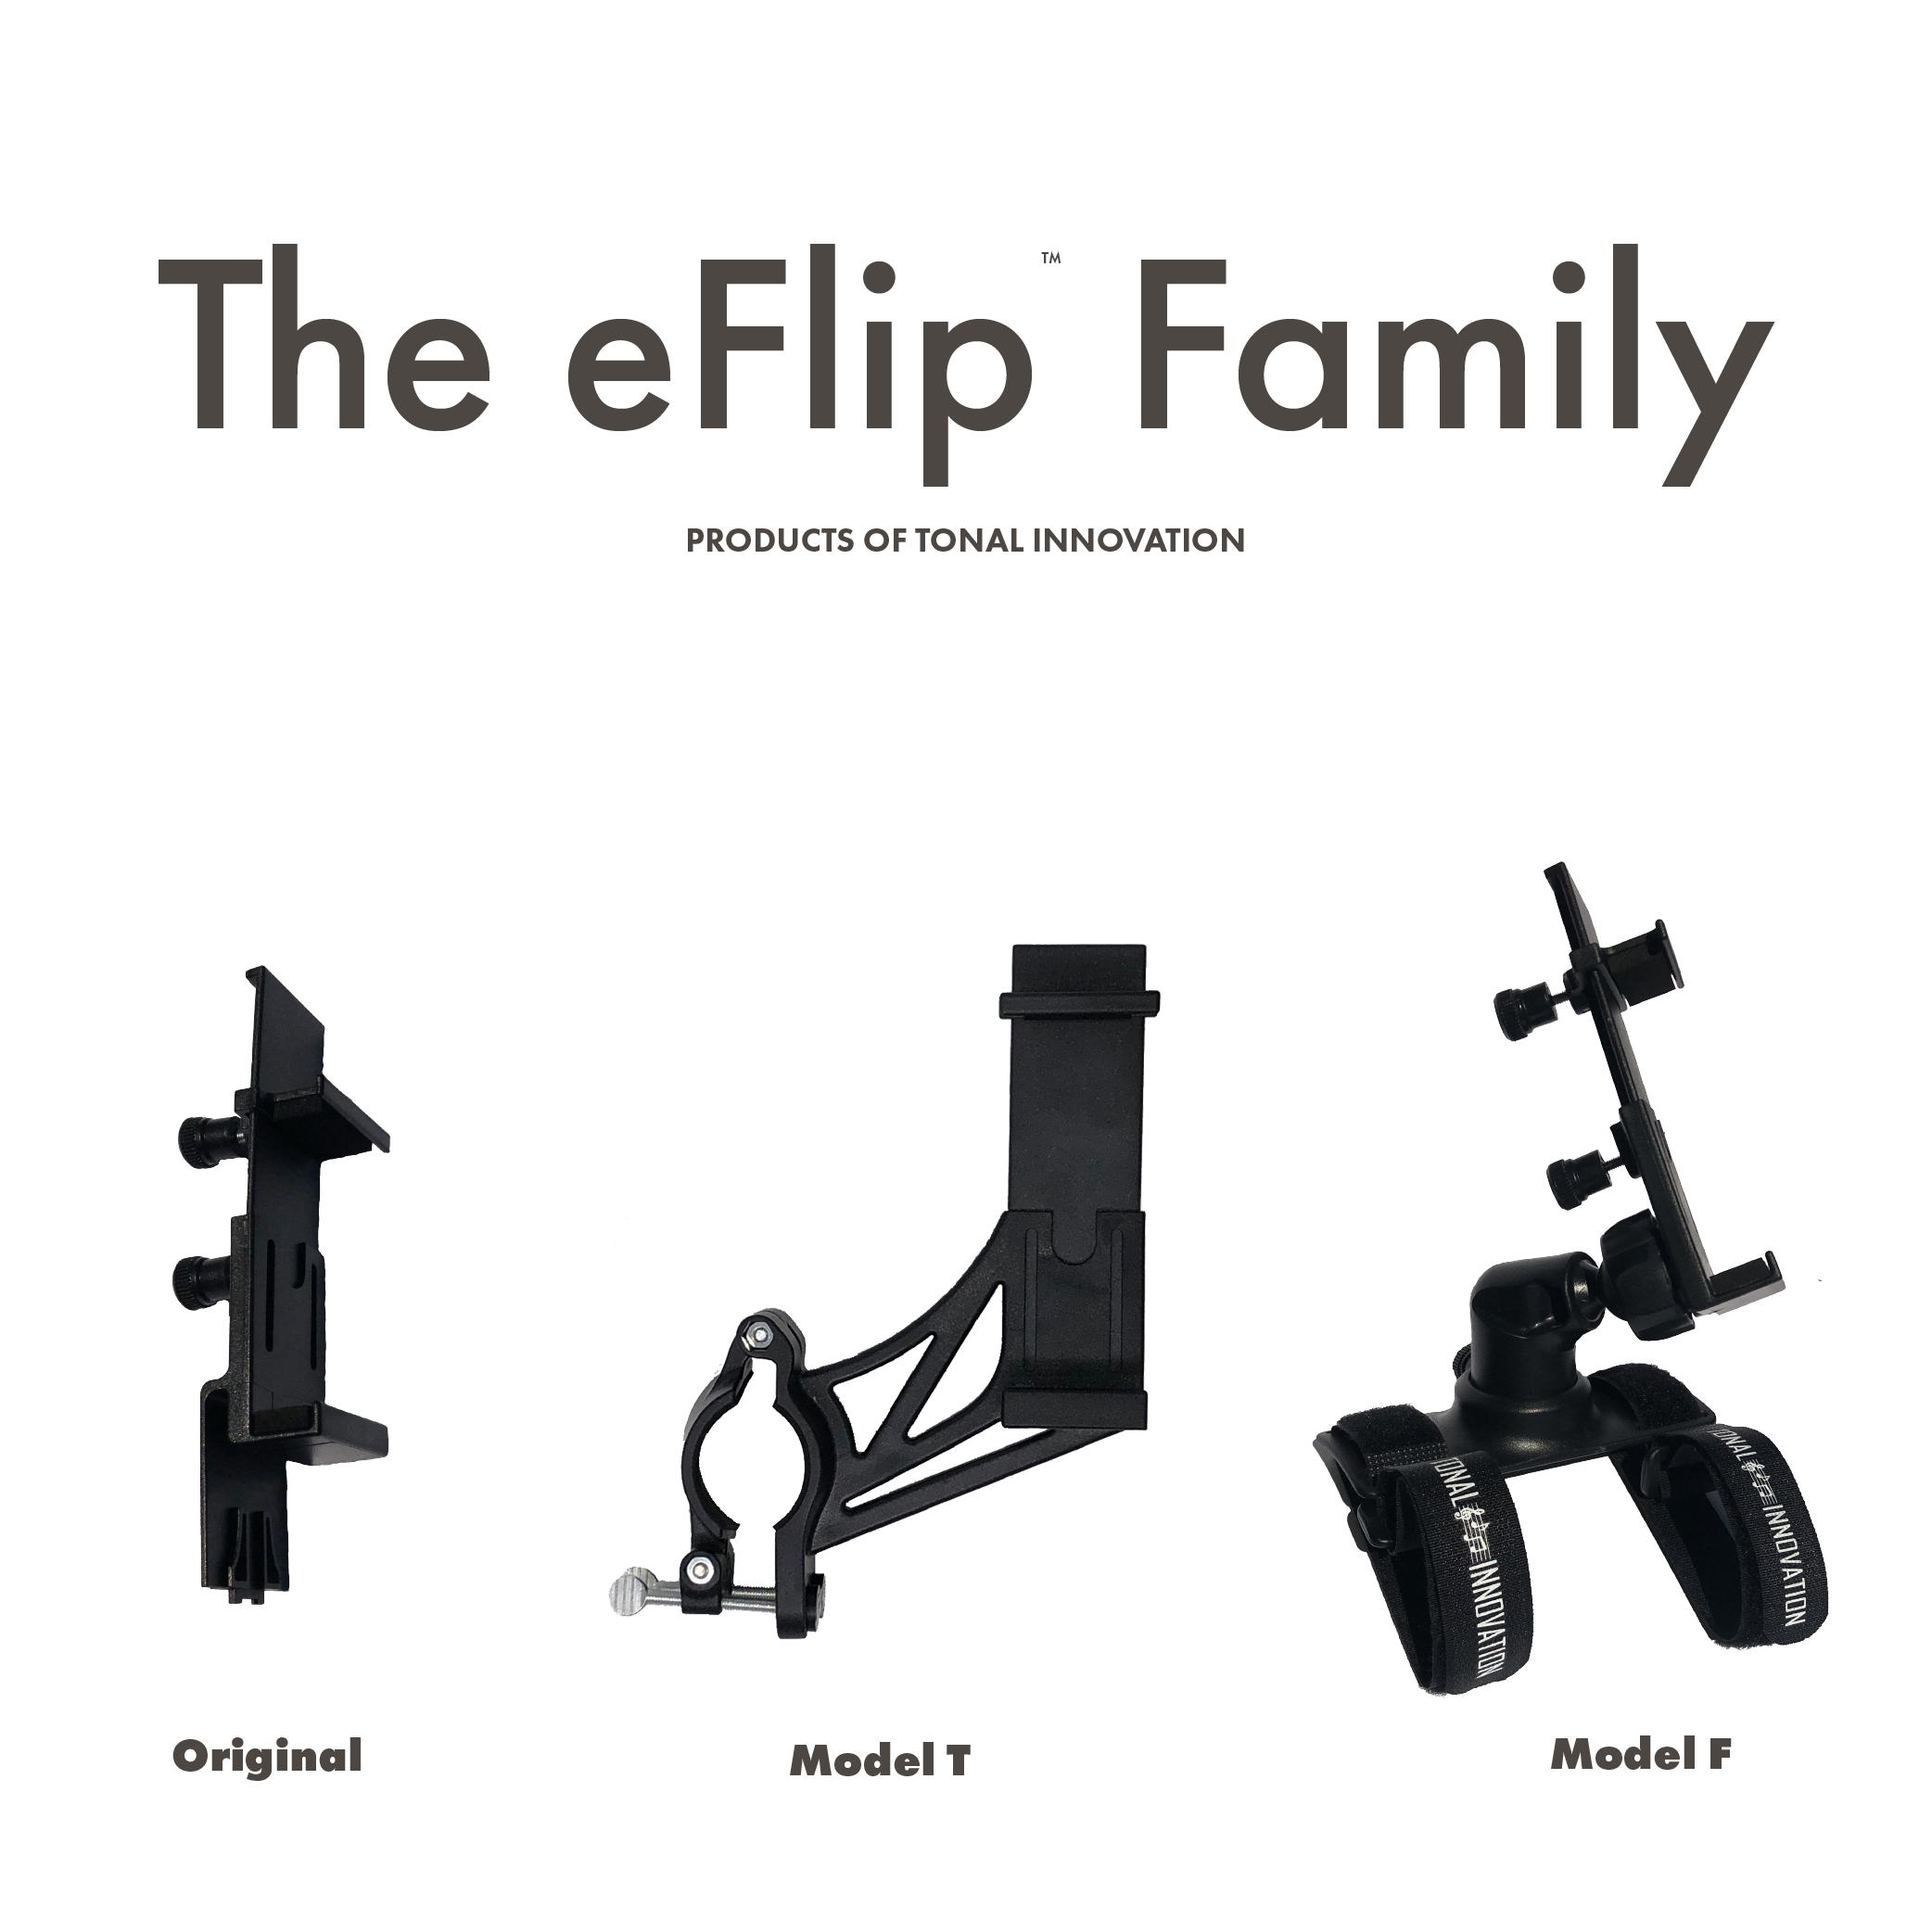
It’s not perfect, I wish I could buy an eFlip permanently fastened to a lyre and I wish it would hold my phone with springs instead of screws. But those would make it more expensive to produce and mechanically complex! EDIT: After additional time with my eFlip I’ve changed my mind on this—despite moderate movement the eFlip has never slipped out of my lyre.
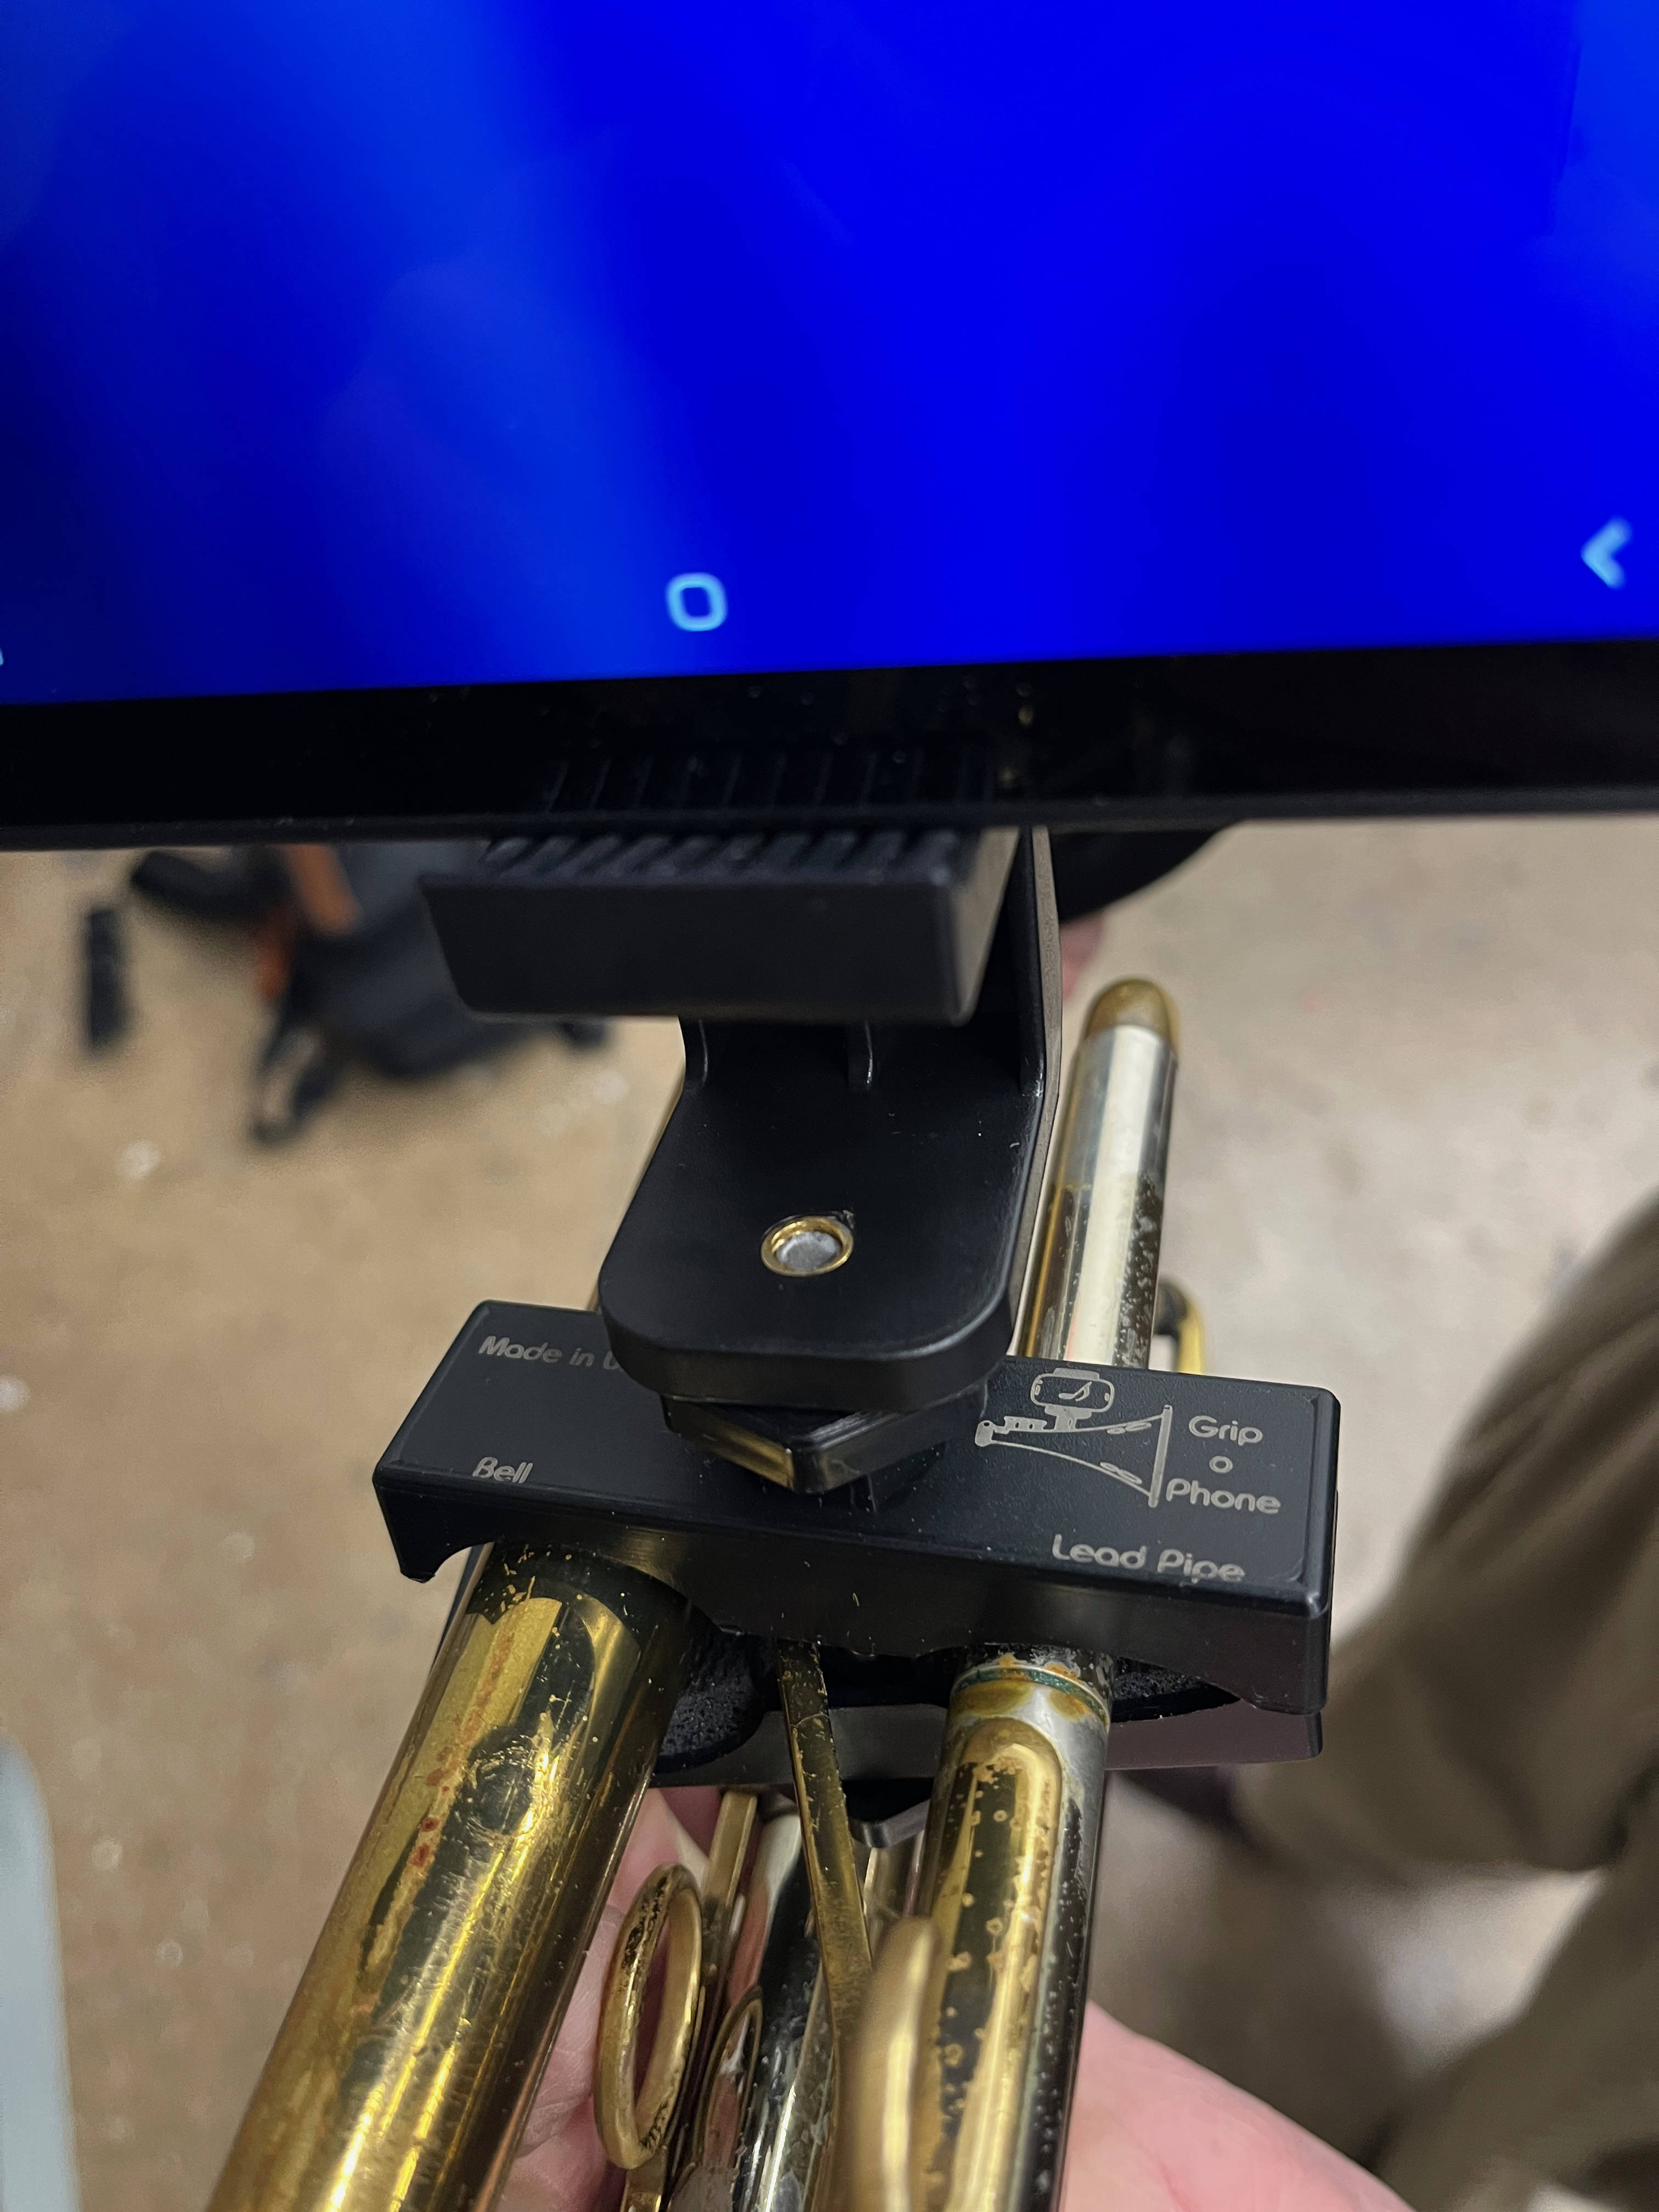
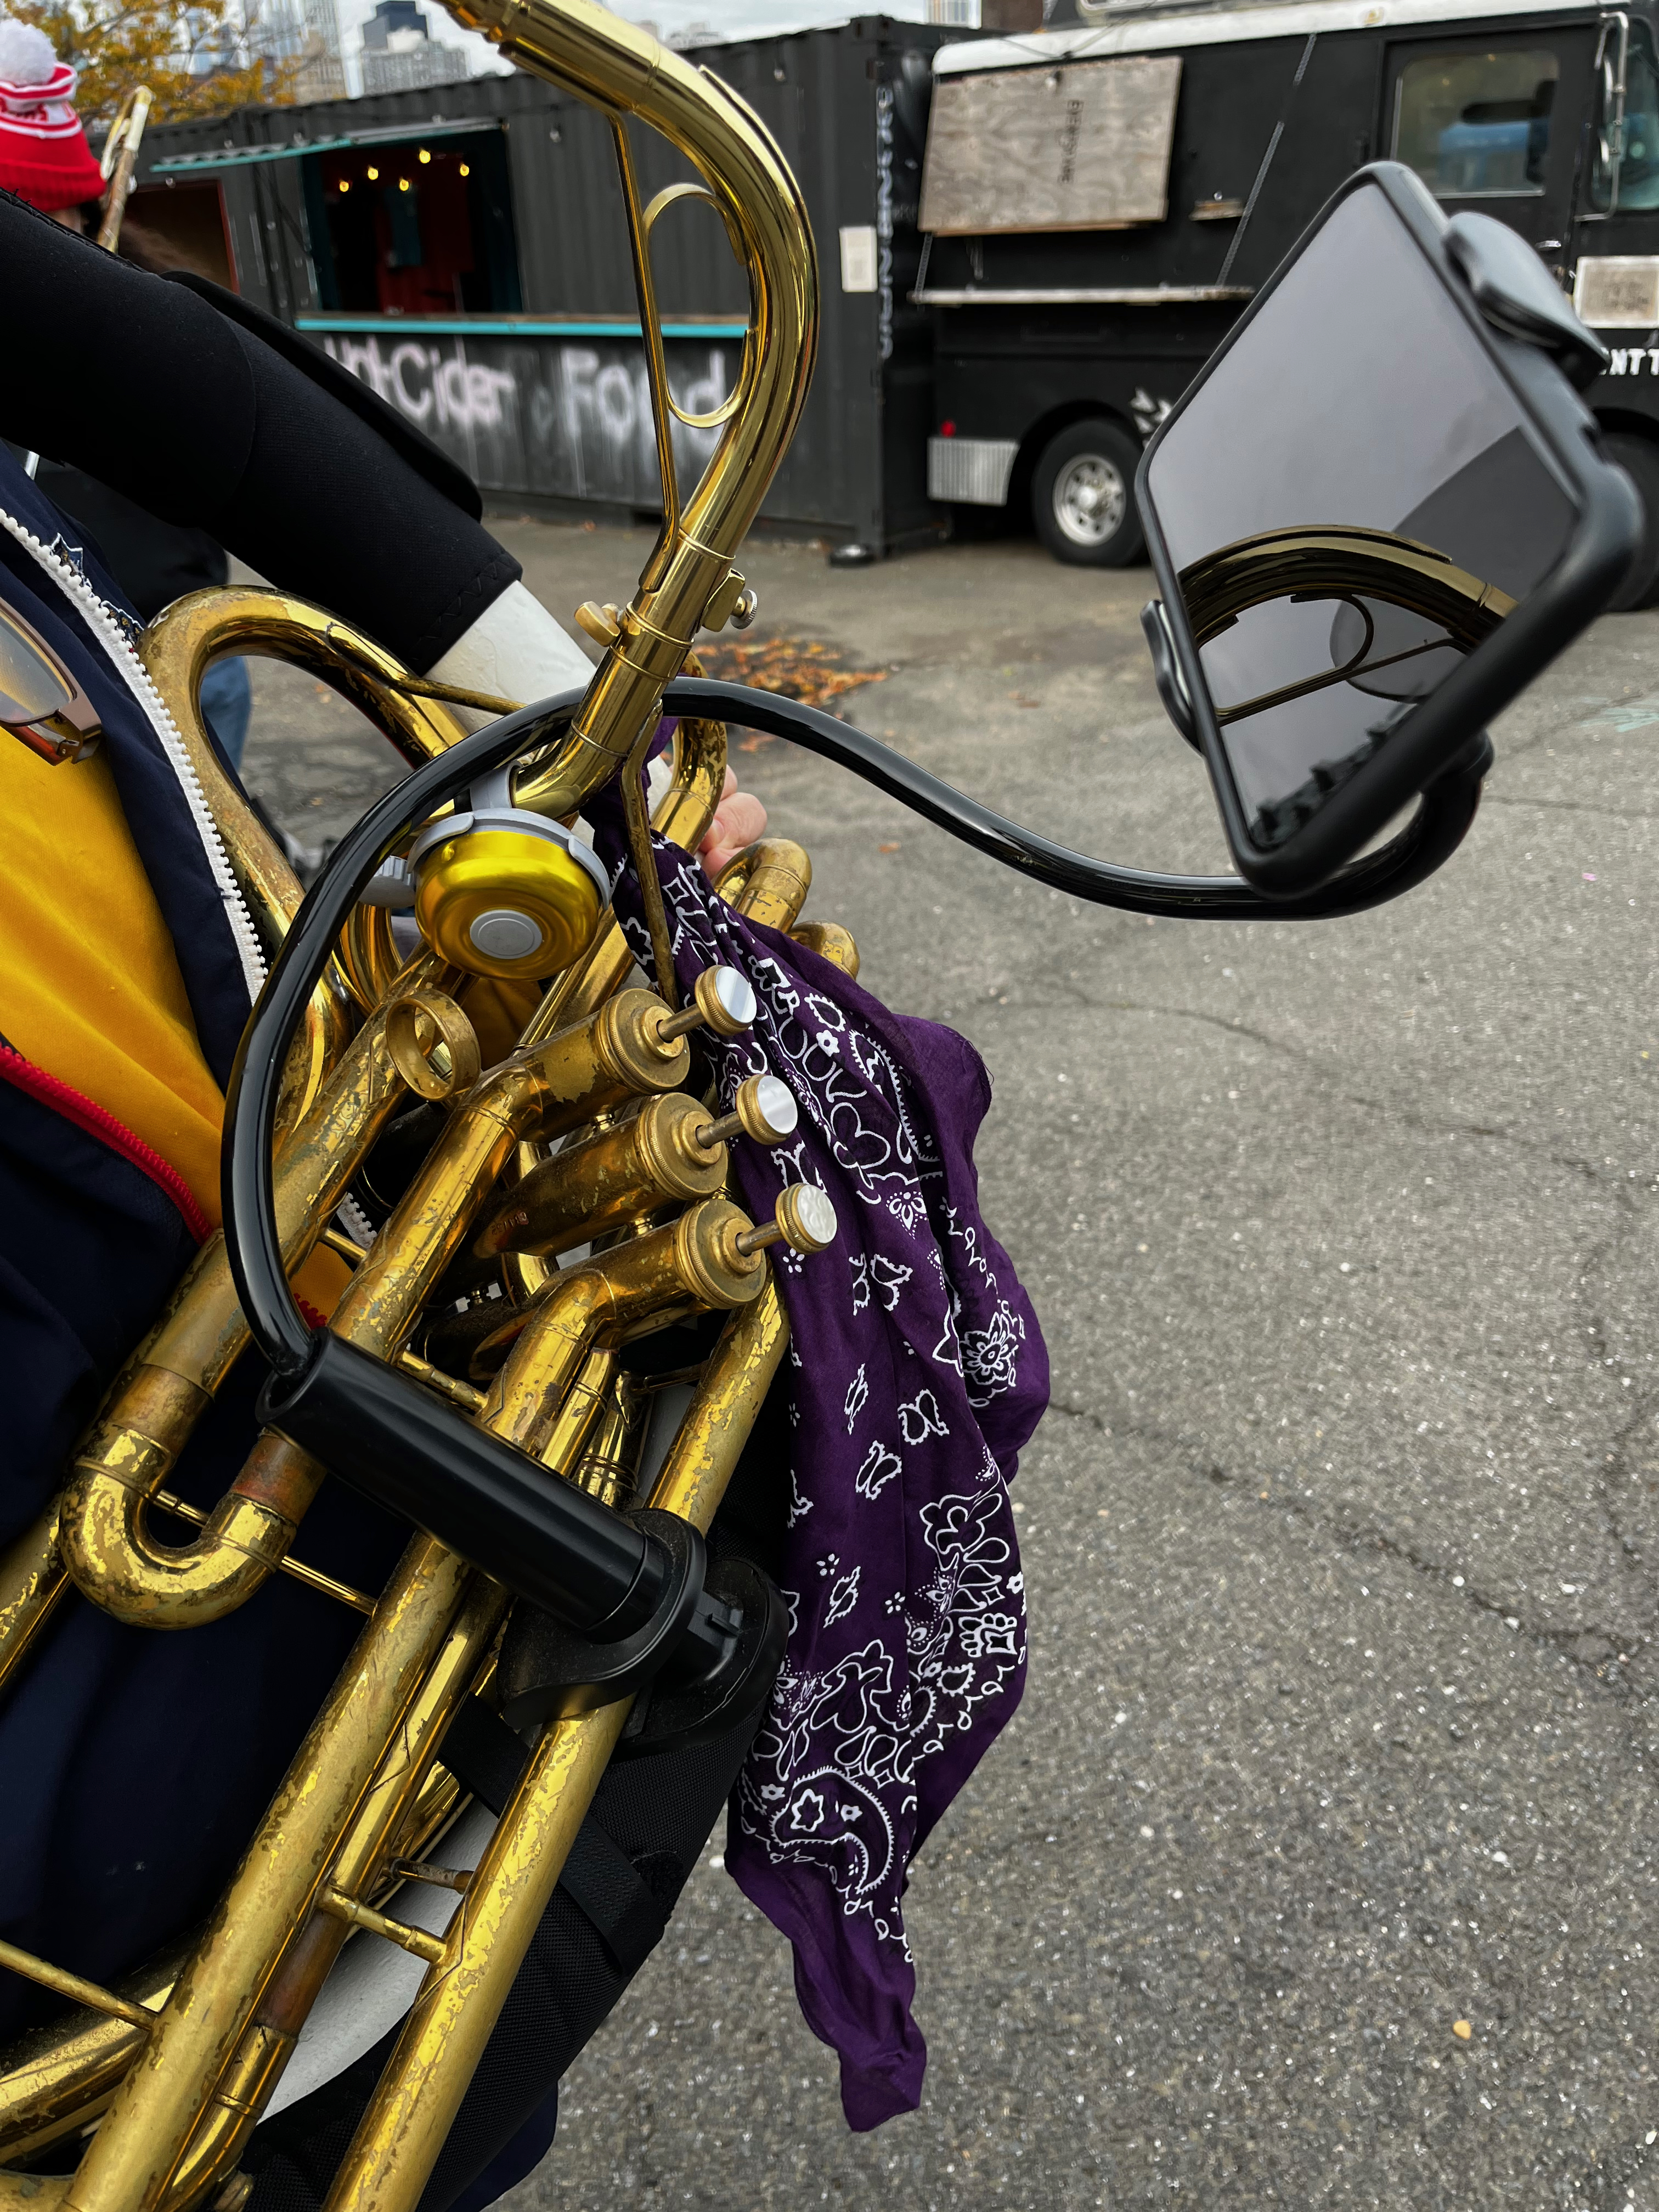
These are less common, here is a brand called “Grip-O-Phone” mounted on a trumpet.
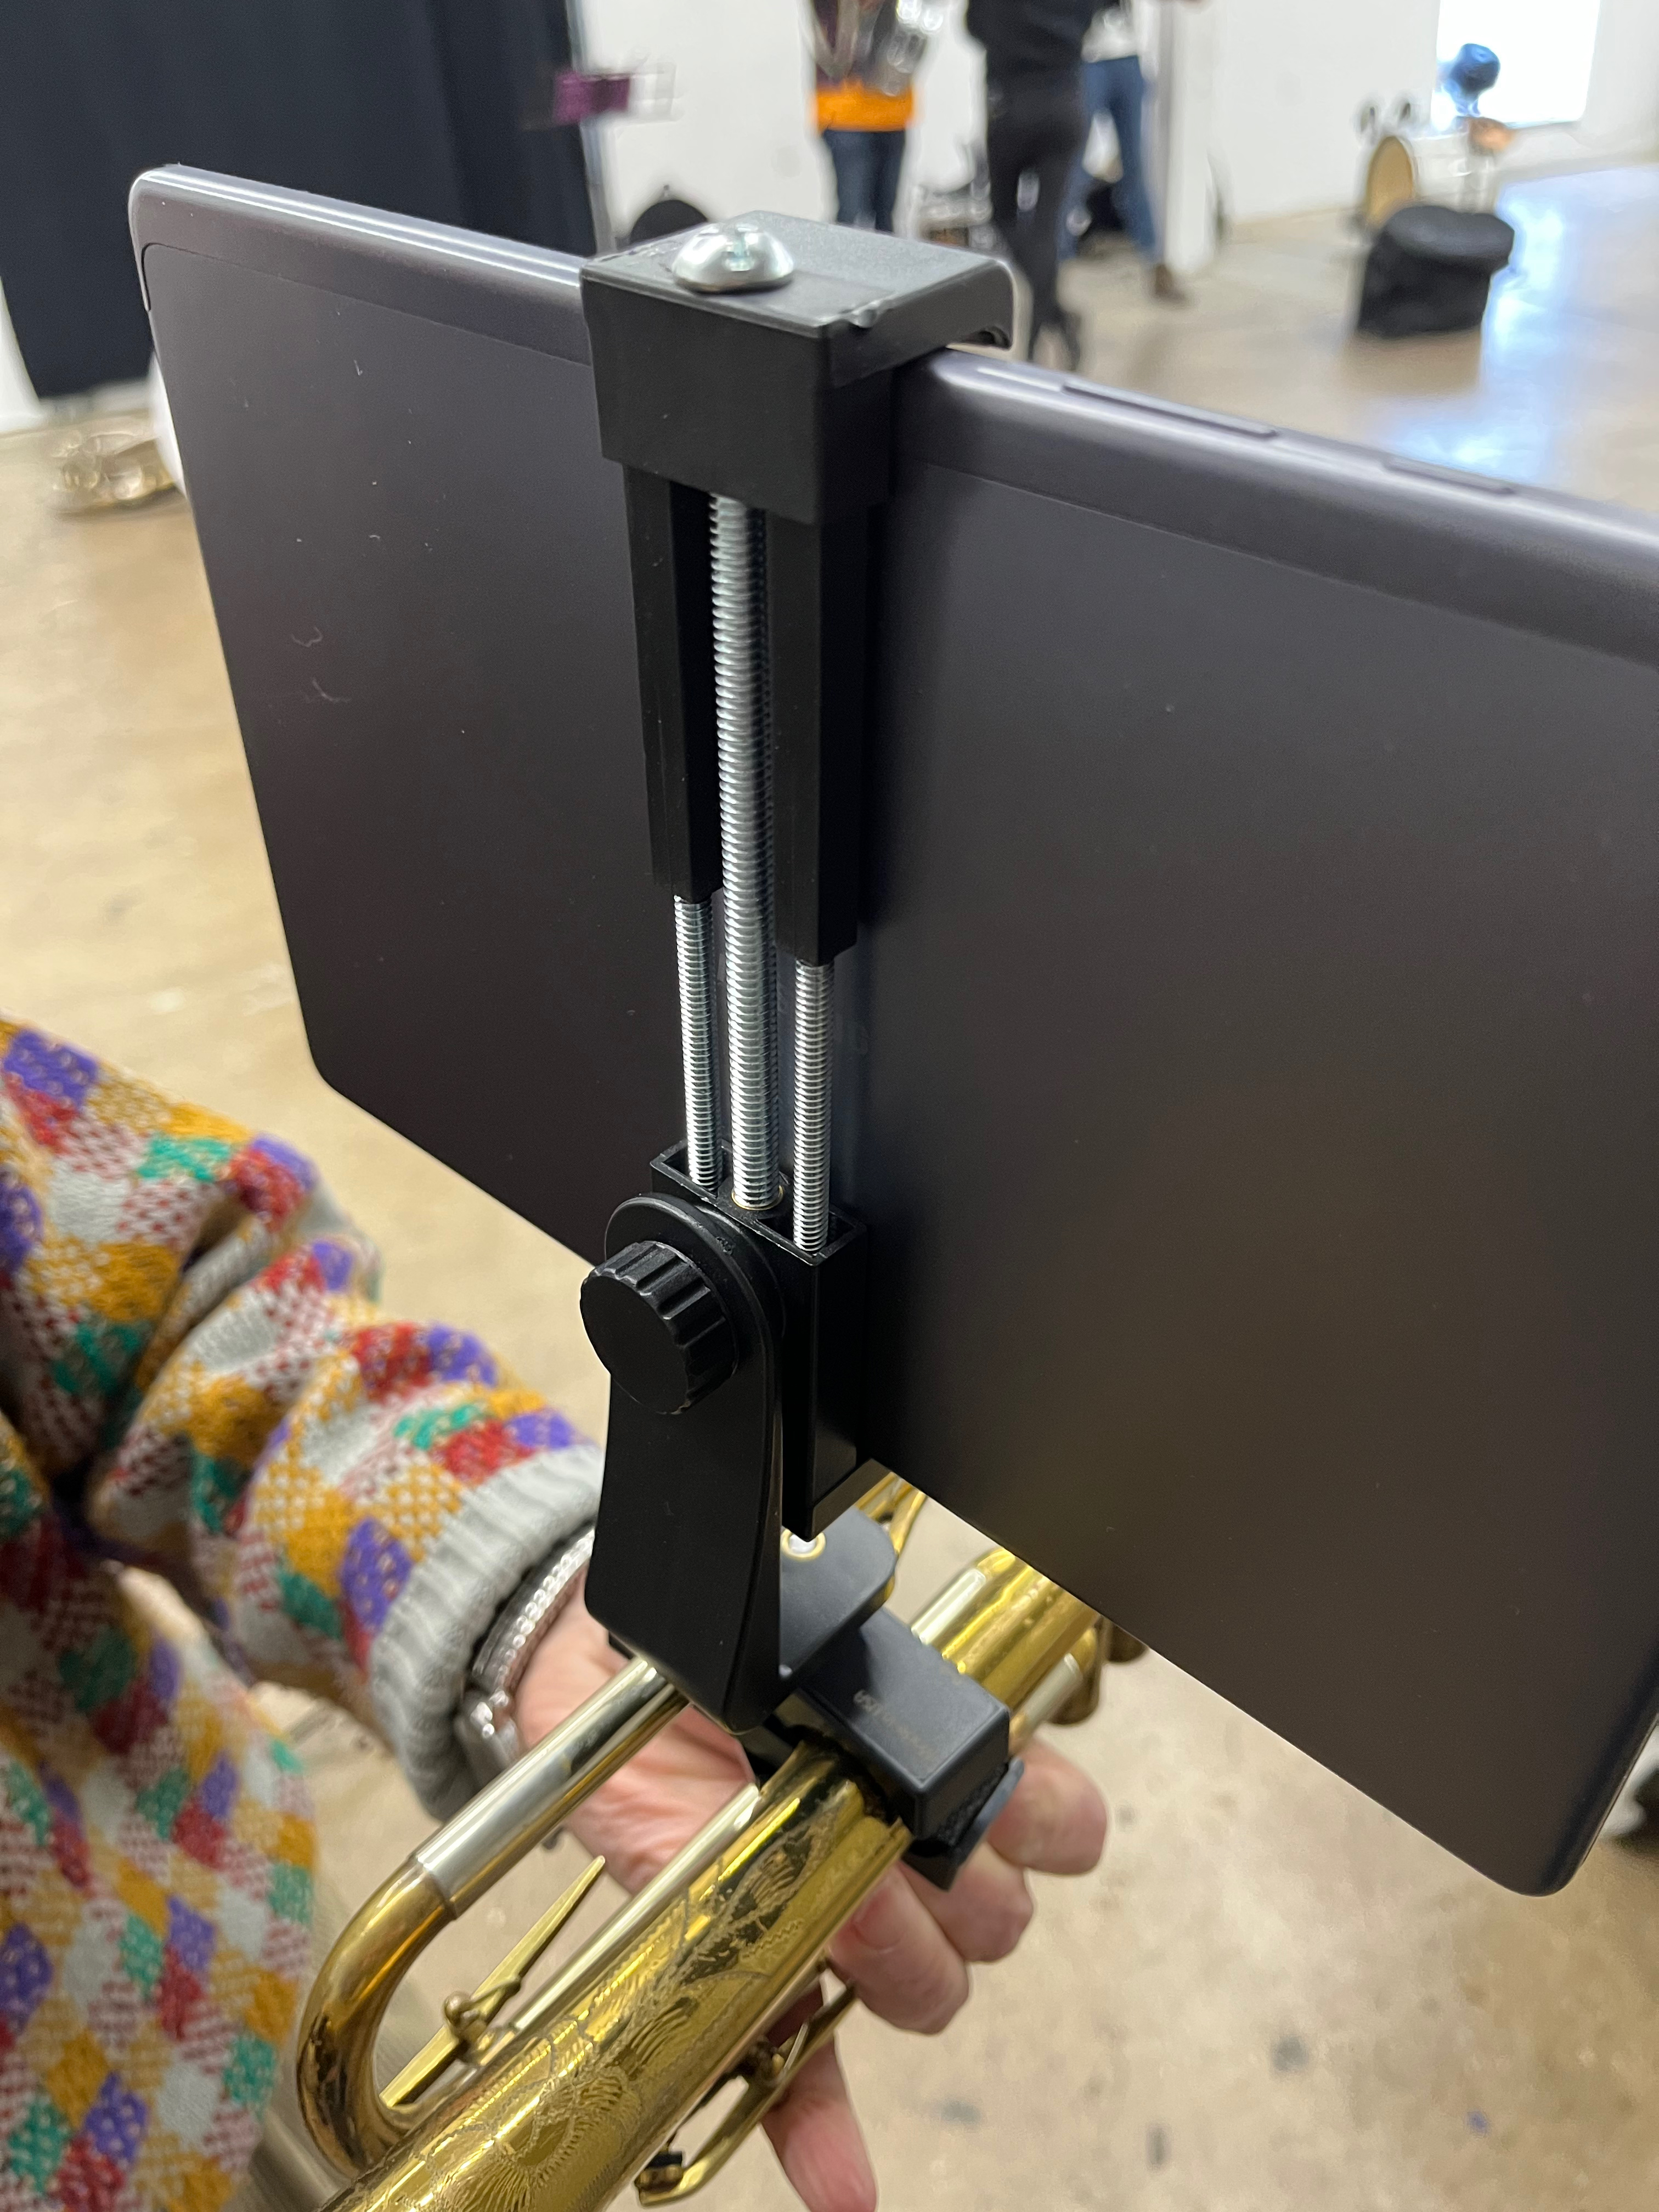
This trumpet player actually modified the original product to add longer threaded rods to hold a small tablet instead of a phone.
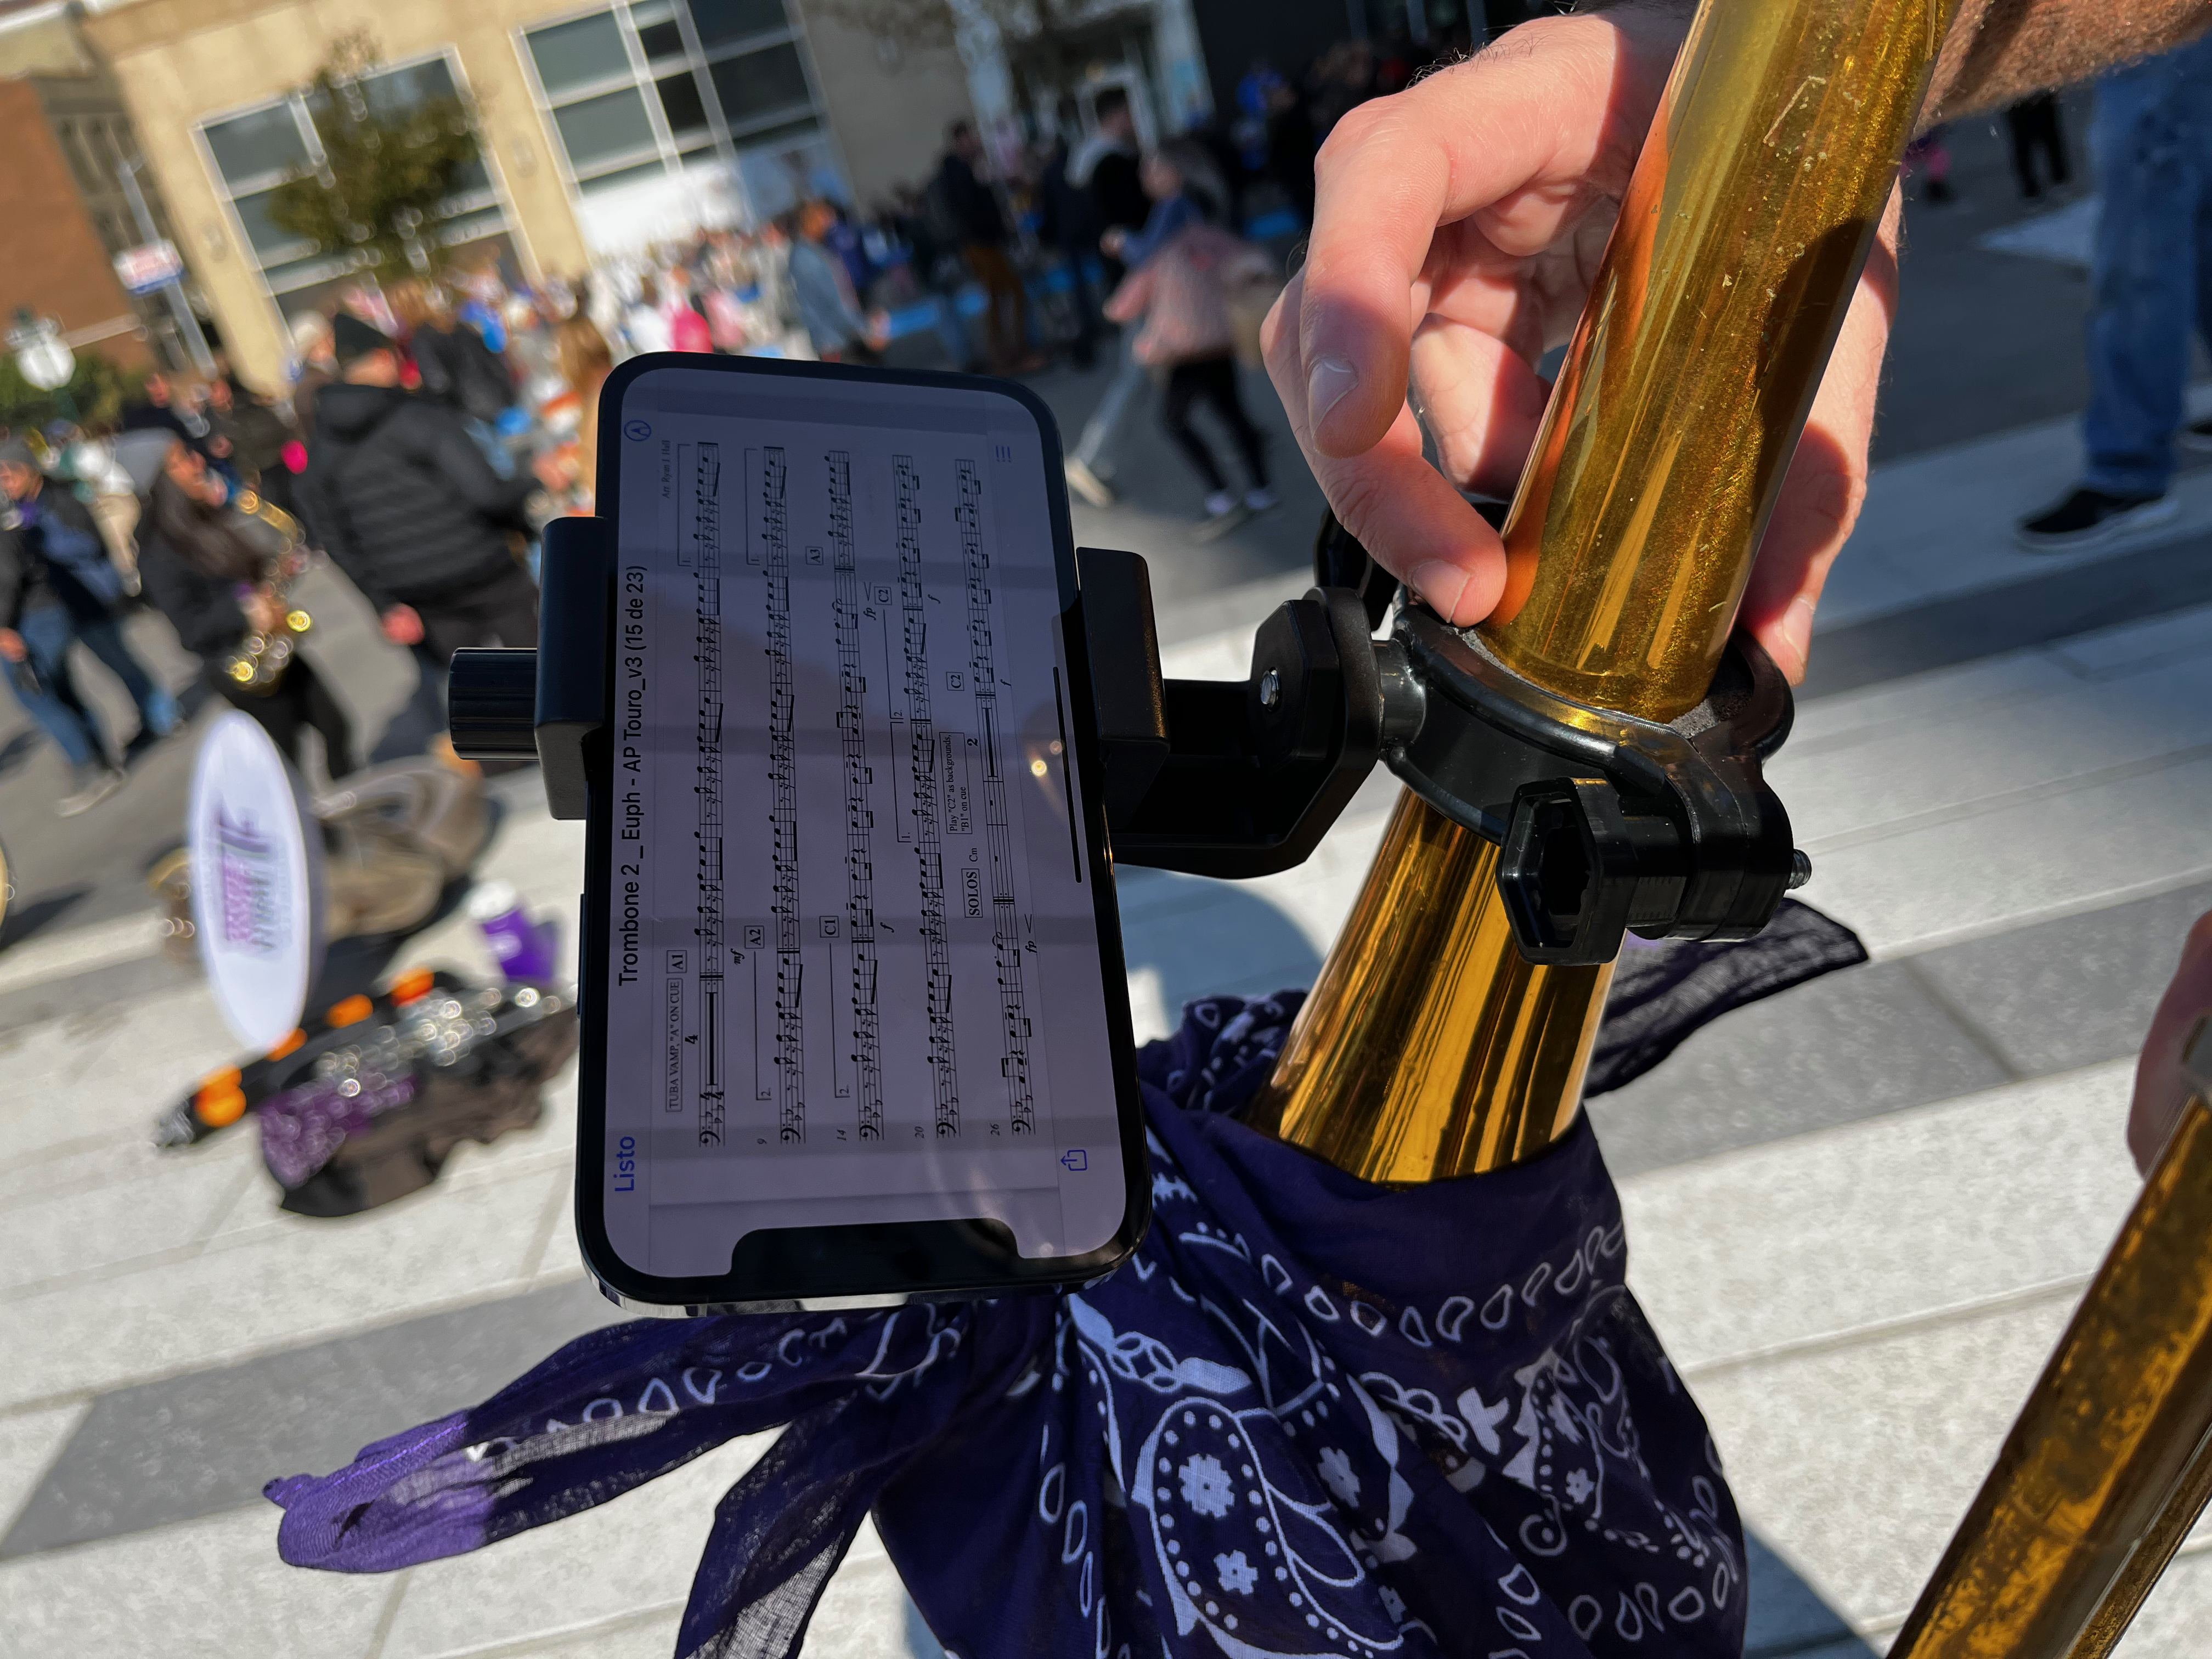
Here is a similar product (brand unknown) holding an iPhone on a trombone:
Sousaphone players seems to like flexible holders. I don’t have much to add about these.
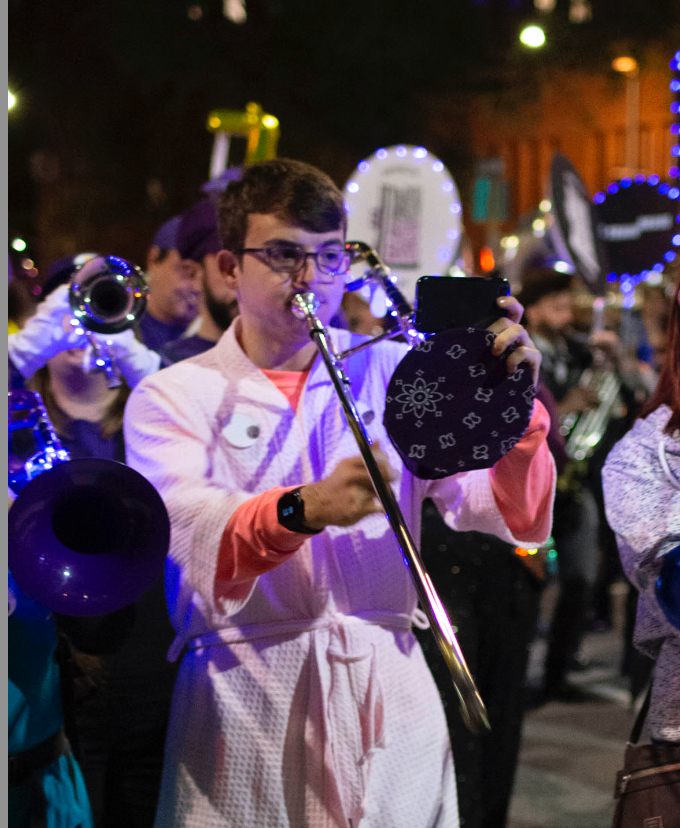
Of course some people just hold their phone in their hand. This seems to work for sousaphones and trombones.
Here are some observations:
It’s worth paying $10 for a sturdier, higher quality product that will last longer and fold down to be more compact.
More expensive stands will have high quality “jaws” that grip the tablet. Cheap jaws are entirely plastic with a spring system. They’re secure but hard to take on and off.

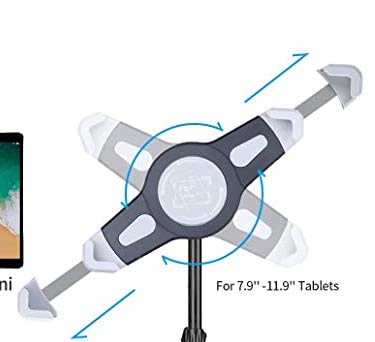
Cheaper stands tend to use large screws on the telescoping pole. Once again these work but more expensive options have a lever arm that you fold open and close which is quicker.
The real failing of the cheap stands is the ball joint at the top that allows you to rotate the tablet around. This tends to be the first part to become loose and while it won’t fail catastrophically it is very annoying when you can’t secure your table at just the right angle.
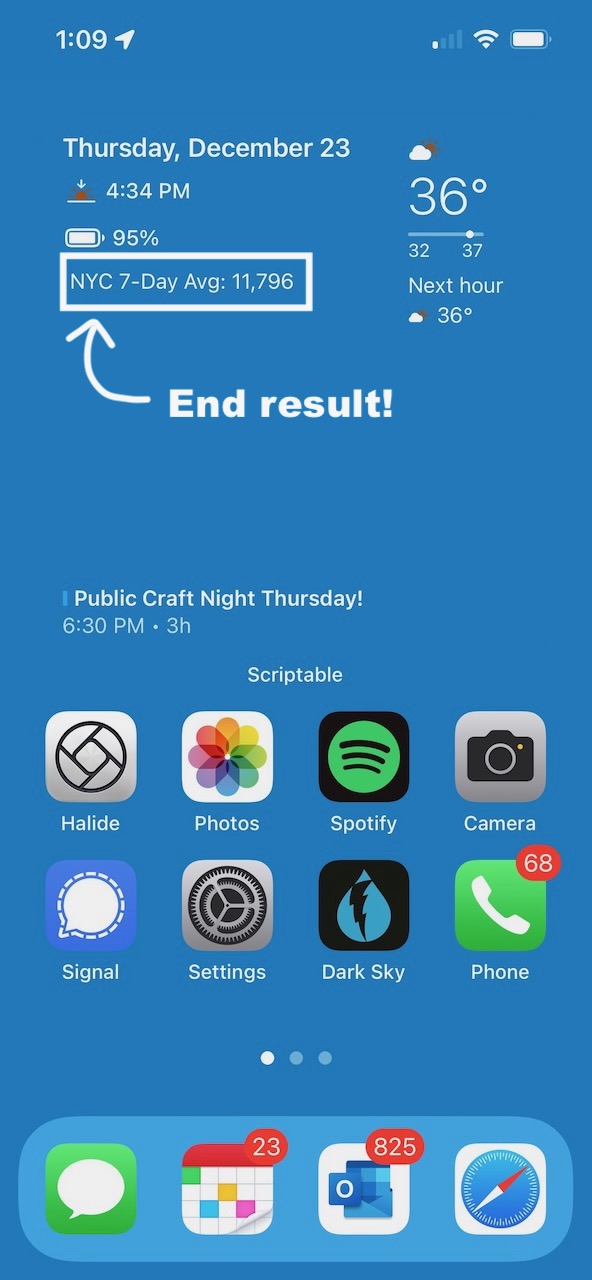
I’ve been using the iOS Scriptable app and the fantastic Weather Cal widget to have an information rich homescreen for a while now. The built-in COVID widget only had data to the country level but I wanted to see the New York Times’ data at the US county level.
OK, so “New York City” isn’t technically a county but the Times makes an exception and groups the boroughs together—call it a hometown bias.
This also serves as a decent example of how to make a custom Weather Cal component that loads, caches, and displays data from a custom API.
The New York Times doesn’t present a REST api but they do publish their data to Github about 3 times a day!
#!/bin/bash
# Live moving averages
curl https://raw.githubusercontent.com/nytimes/covid-19-data/master/rolling-averages/us-counties-recent.csv -o data.csv

# Example of the CSV data:
# date,geoid,county,state,cases,cases_avg,cases_avg_per_100k,deaths,deaths_avg,deaths_avg_per_100k
# 2021-12-21,USA-36998,New York City,New York,17958,10049.14,120.54,33,15.43,0.19

# Data.csv holds the last month of data for every US county sorted in ascending date order.
# I only care about the most recent date so we can search it backwards using tac and grep
tac data.csv | grep -m 1 "New York City" > current_cases_avg.txt

# Grab the 6th column
awk -F "\"*,\"*" '{print $6}' current_cases_avg.txt > current_cases_avg_only.txt

# Copy the text file to my webserver
cp current_cases_avg_only.txt /var/www/FAKE/PATH/current_cases_avg_only.txt
This bash script can live in cron and run every hour.
15 * * * * ~/update.sh >/dev/null 2>&1
In Scriptable, weather-cal.js in the existing custom = {} variable add the following:
  async setupDanielC19() {
    const danielC19Path = code.fm.joinPath(code.fm.libraryDirectory(), "weather-cal-danielC19")
    // getCache(path REQUIRED, minTime OPTIONAL, maxTime OPTIONAL)
    let danielC19Data = code.getCache(danielC19Path, 20, 60)

    if (!danielC19Data || danielC19Data.length == 0 || danielC19Data.cacheExpired)
      try {

		 //
      	 // NOTE: Be sure to put in a real URL here!
      	 //
        let rawRequest = new Request("https://danielbeadle.net/FAKE/PATH/current_cases_avg_only.txt")
        let rawData = await rawRequest.loadString()
        if (!rawData || rawData.length == 0) { throw 0 }

        danielC19Data = Number(rawData)

        // Write Data to cache
        code.fm.writeString(danielC19Path, JSON.stringify(danielC19Data, null, 2))

      } catch (err) {
        danielC19Data = code.getCache(danielC19Path, 20, 60)
      }

    return danielC19Data
  },

  async danielC19(column) {
    if (!this.danielC19Data) {
      danielC19Data = await custom.setupDanielC19()
    }

    // Set up the stack
    let danielC19Stack = code.align(column)
    danielC19Stack.layoutHorizontally()
    danielC19Stack.centerAlignContent()
    danielC19Stack.setPadding(code.padding/2, code.padding*2, code.padding/2, code.padding)

    // Round to an integer and add commas
    const c19rkiLine = code.provideText(`NYC 7-Day Avg: ${Number.parseInt(danielC19Data).toLocaleString('en-US')}`, danielC19Stack)
  },
And finally at the top of weather-cal.js add the new component
const layout = `
  row
    column
      date
      sunset
      battery
      danielC19
      space
      events
`
Three years ago I soldered my first custom-designed PCBs, a set of ESP8266-powered temperature sensors for my apartment!
The original design worked with the ESP8266 modules I had at the time but hasn’t with recent modules (I think I forgot to pull the chip-enable wire high?).
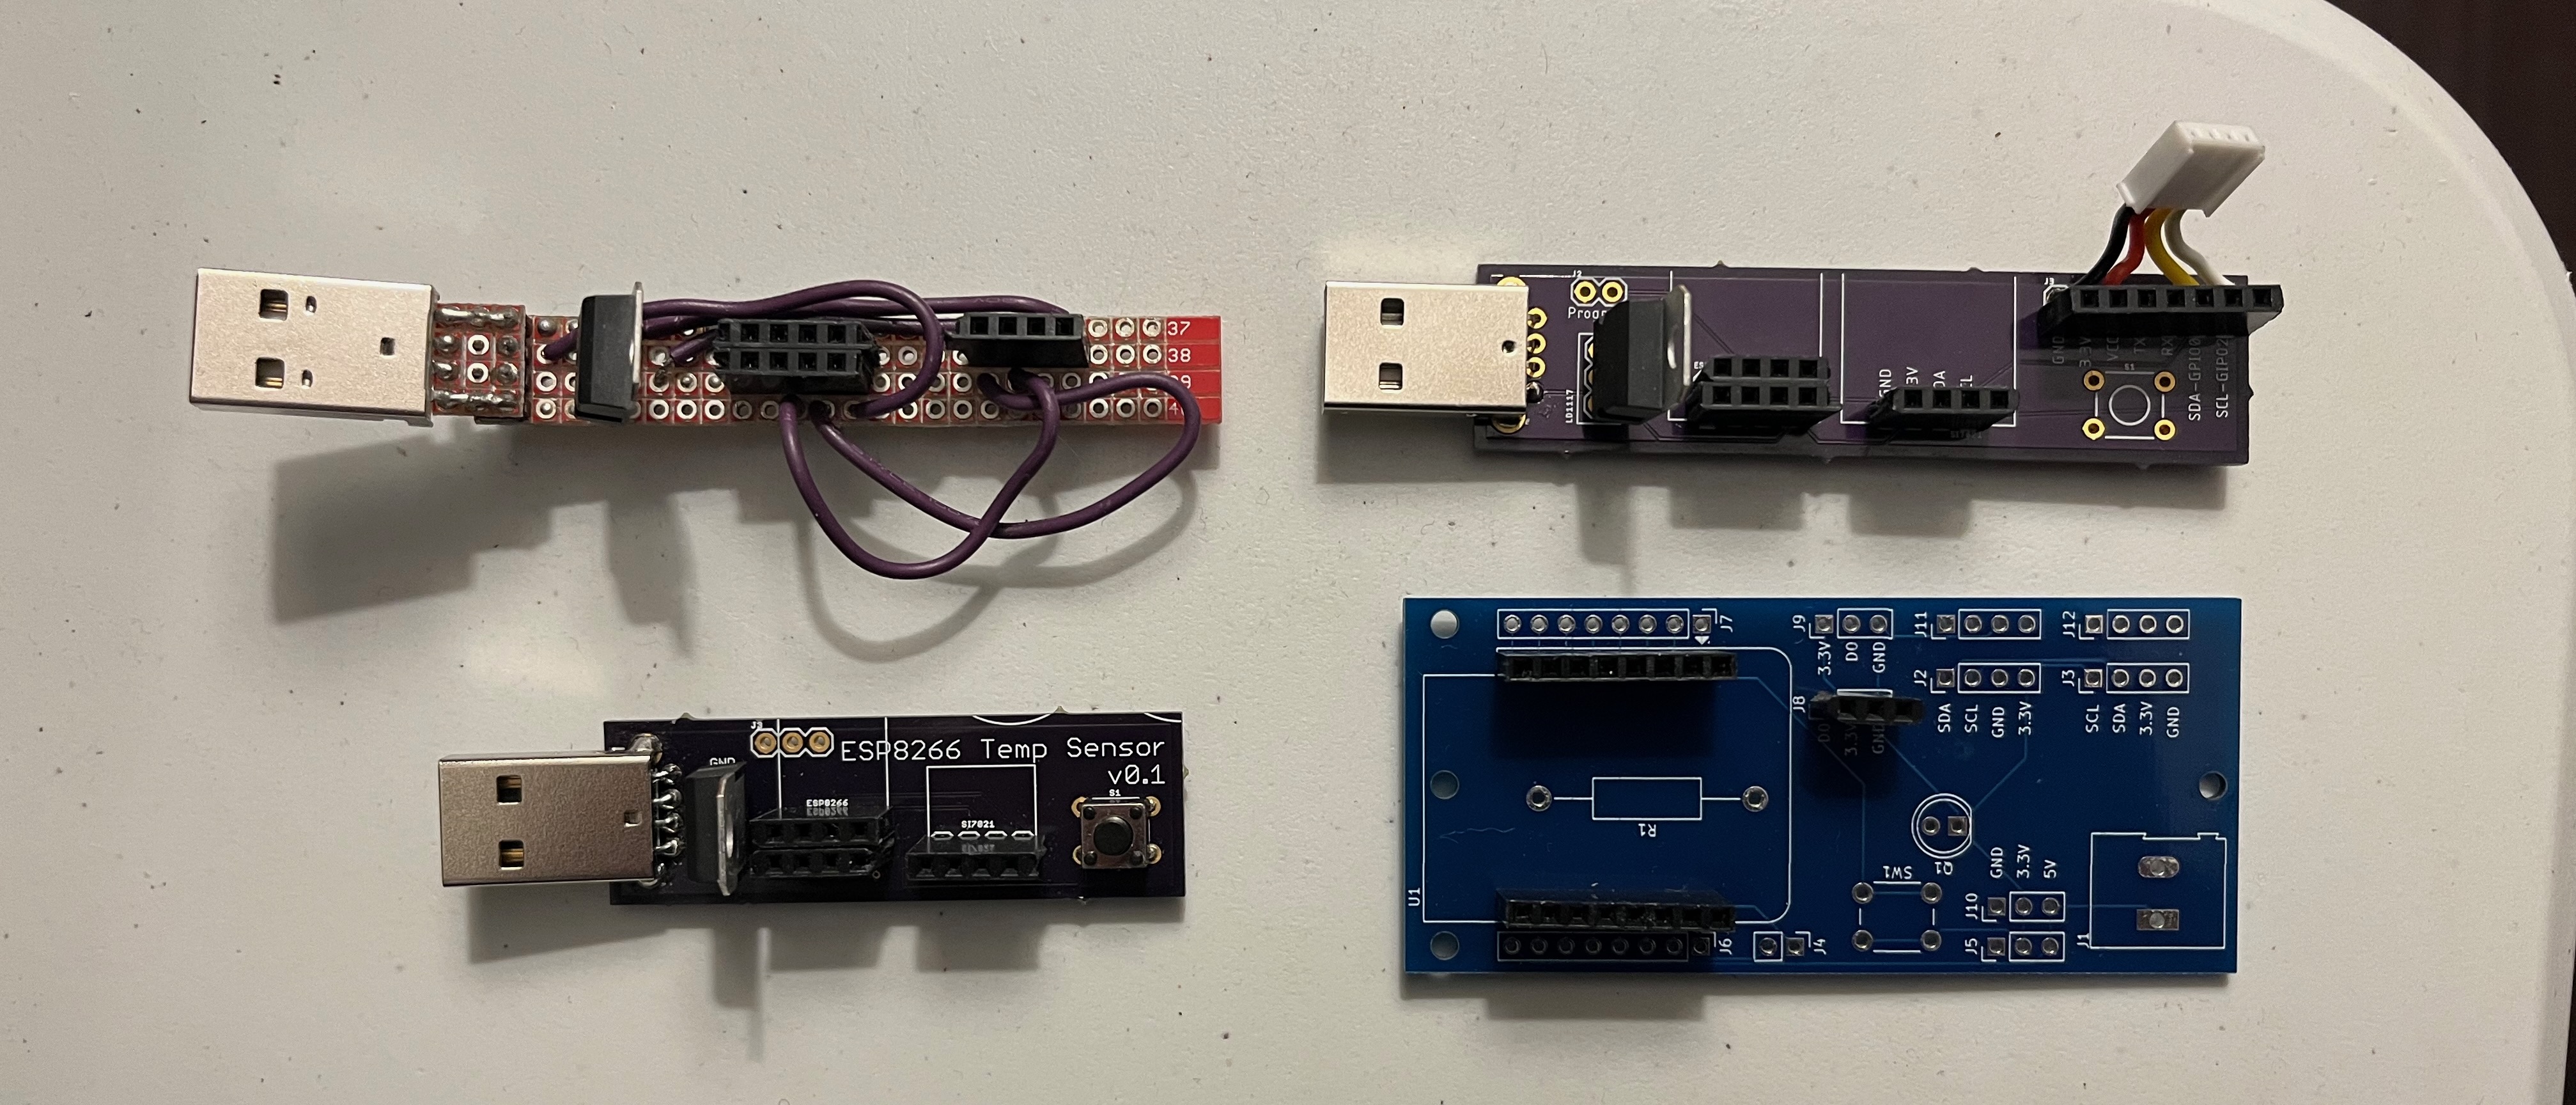
This is a spinoff project of my dedicated, single-purpose temperature sensor boards. Instead of trying to be as cheap and small as possible it is intended to be an easy way to connect I2C sensors to the Wemos D1 Mini and probably to esphome.
Further documentation on github.com/djbeadle/ESP8266-Temperature-Sensor.


Designed in KiCad at NYC Resistor where I first was shown the joy of Esphome (compared to writing your own firmware by!).
First PCB order December, 2021.
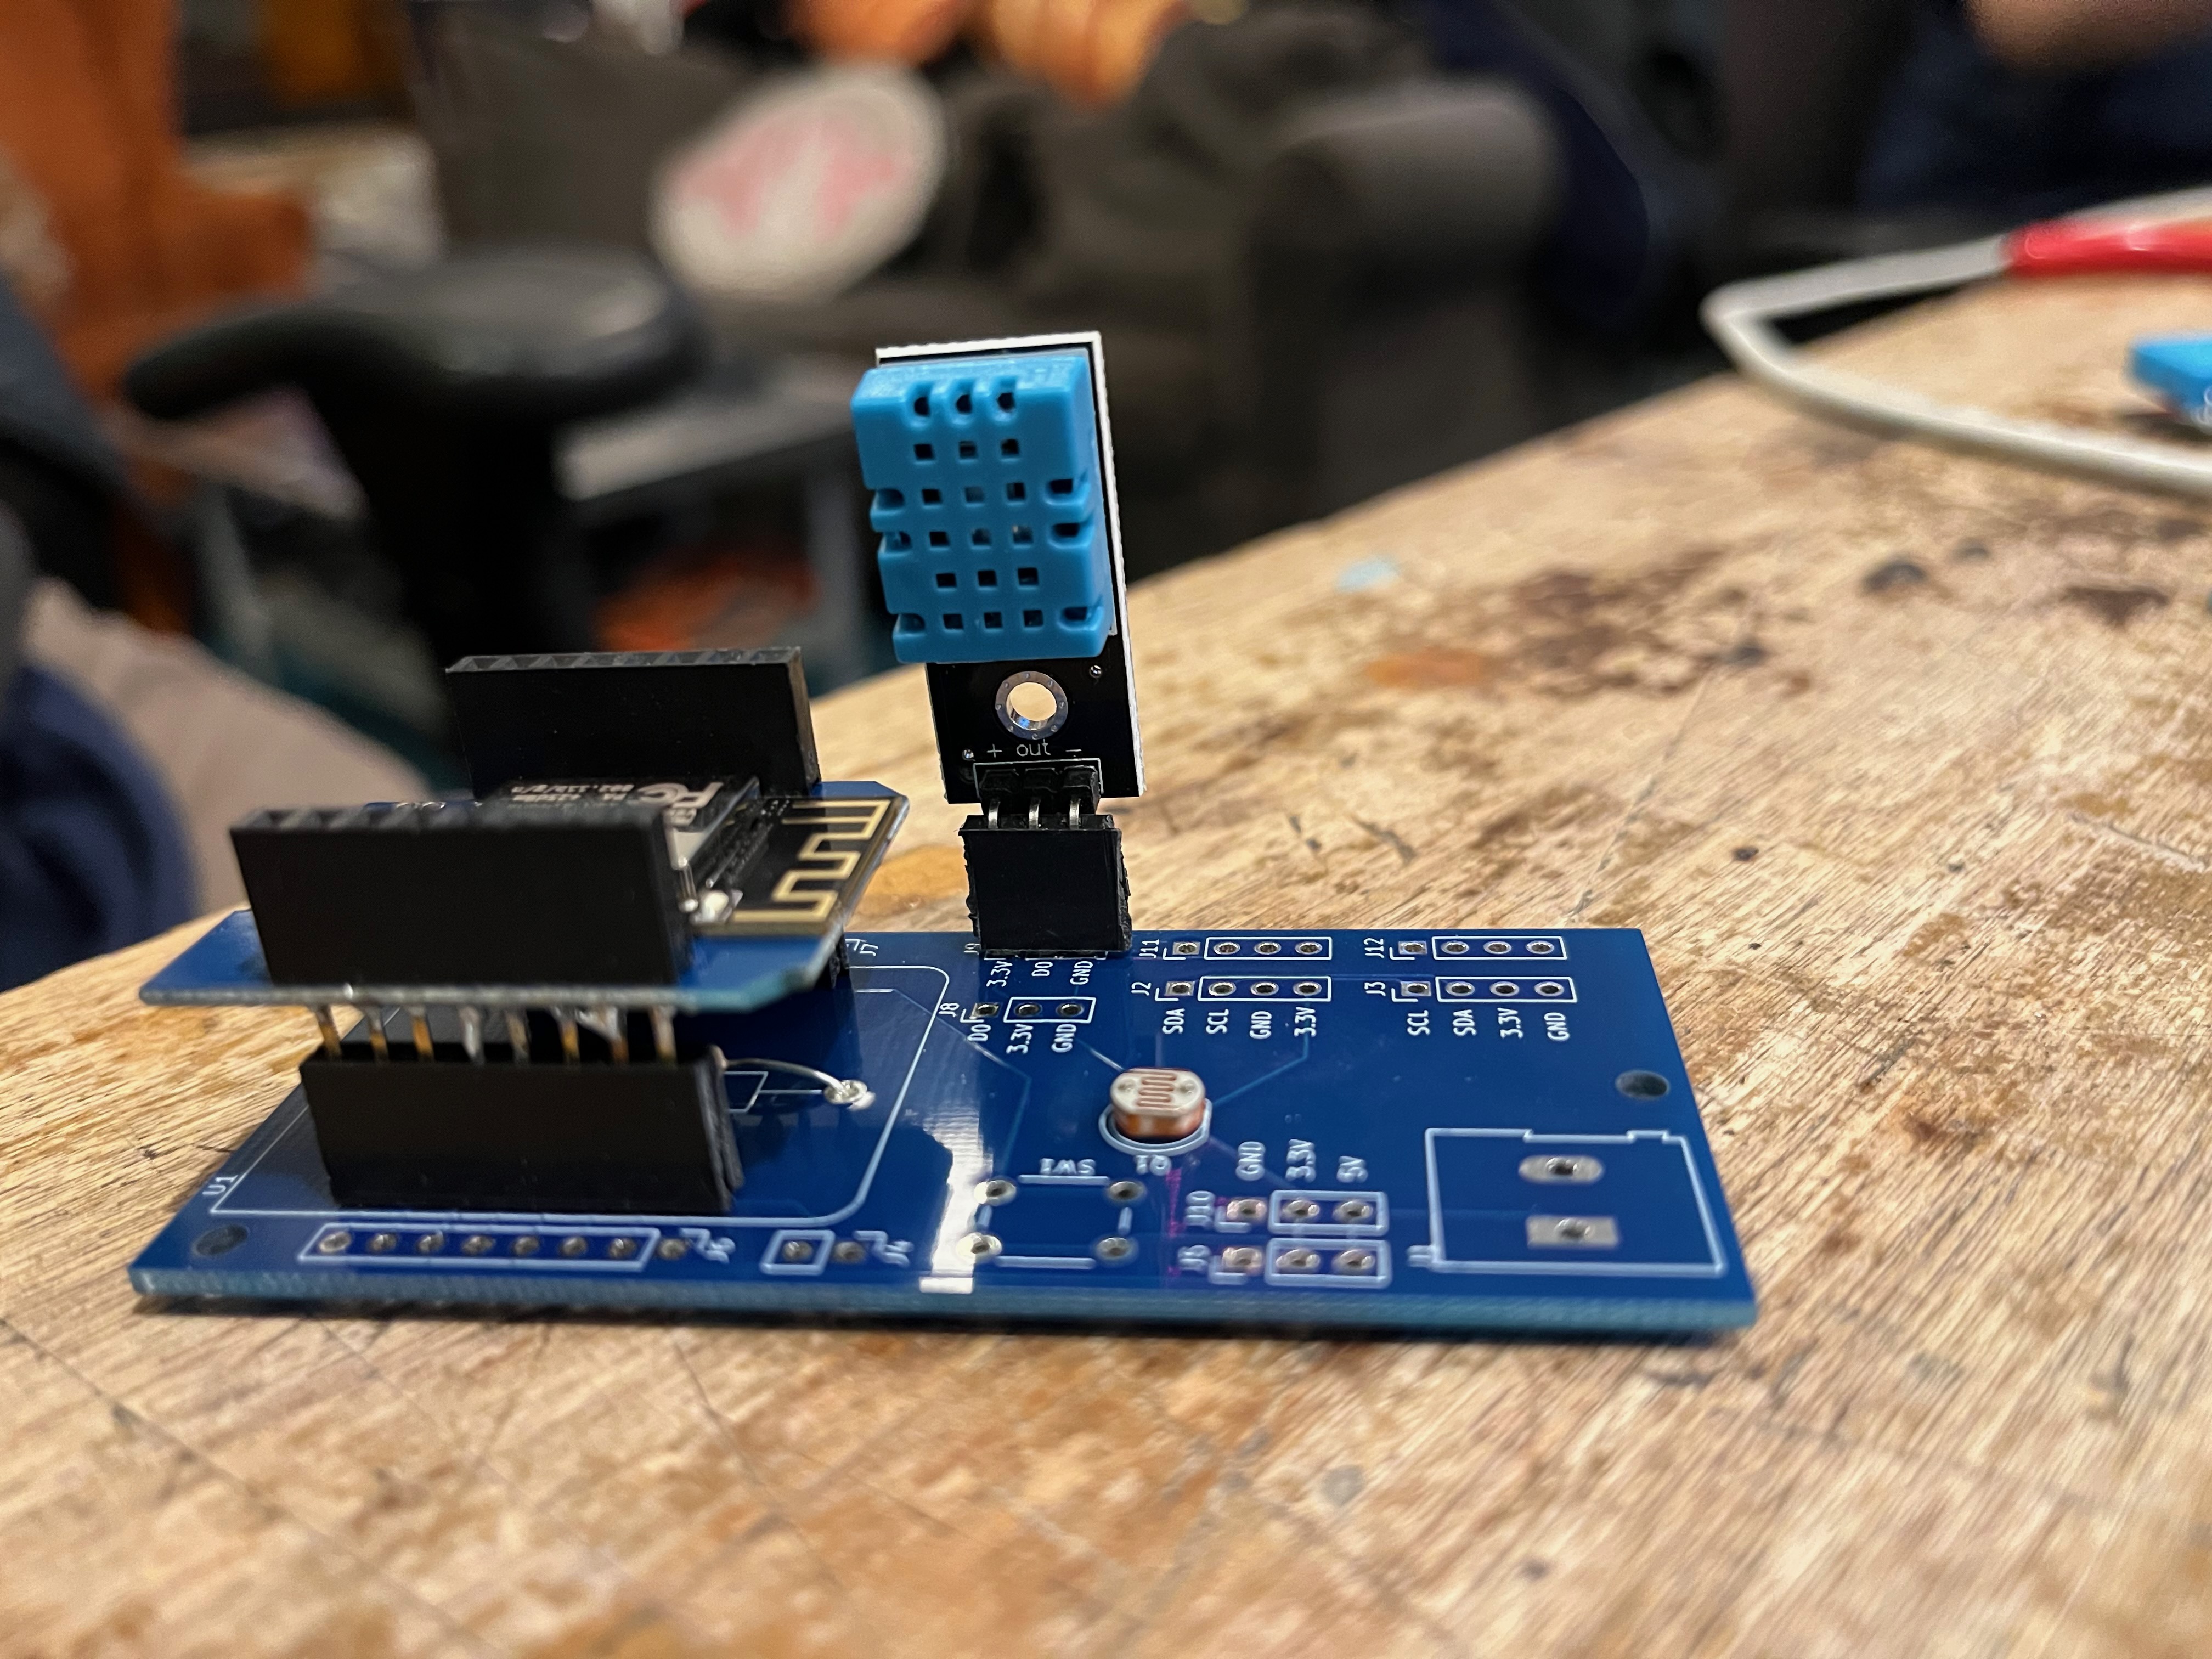
Photo books I have owned / borrowed in no particular order.
9780947322120 Dupain’s Sydney by Jill White
9781884167058 RFK Funeral Train photographs by Paul Fusc
9780999243008 Just Yannis by Harold Evans and Yannis Behrakis
9780525560029 Of Love & War by Lynsey Addario
I also greatly enjoyed her appearance on Radiolab for the episode Sight Unseen.
9781580931465 Subway Memories by by Camilo José Vergara
9780714843087 Red Color News Soldier by Li Zhensheng
Possibily my favorite book on this list so far.
9781426201981 Photo Nomad by David Douglas Duncan
This book is a window in to a world that is completly foreign to me, such as this one:
One hour later—eyes drilling straight into my gizzard—slowly turning my prints—asking had I any snow shots…you know…Santa Claus country…no! How about flying to Boston Monday? I saw that page on Helen and Joe. Have you been in a big plane, TWA’s two-engine job? Take our old company Pontiac - warm clothes - drive through New England shooting whatever you want - BUT - always – remember: leave space for our Merry Christmas to run across the bottom of our next greeting cards.
Cal Eby was editing my pumpkin story when I went to thank him.
My snow shots became Hallmark’s first gift box of photographs.
Many of the captions are completly lost on me but they’re made up for by the photos.
9781633451049 Dorothea Lange Words and Pictures by Dorothea Lange, Sarah Meister
9780500292914 Magnum Contact Sheets by Kristen Lubben
0143128418 It’s What I Do: A Photographer’s Life of Love and War by Lynsey Addario
My first introduction to Lynsey Addario’s work, I ploughed through this book over a weekend senior year of college.
1620405555 Group f.64 by Alinder, Mary Street
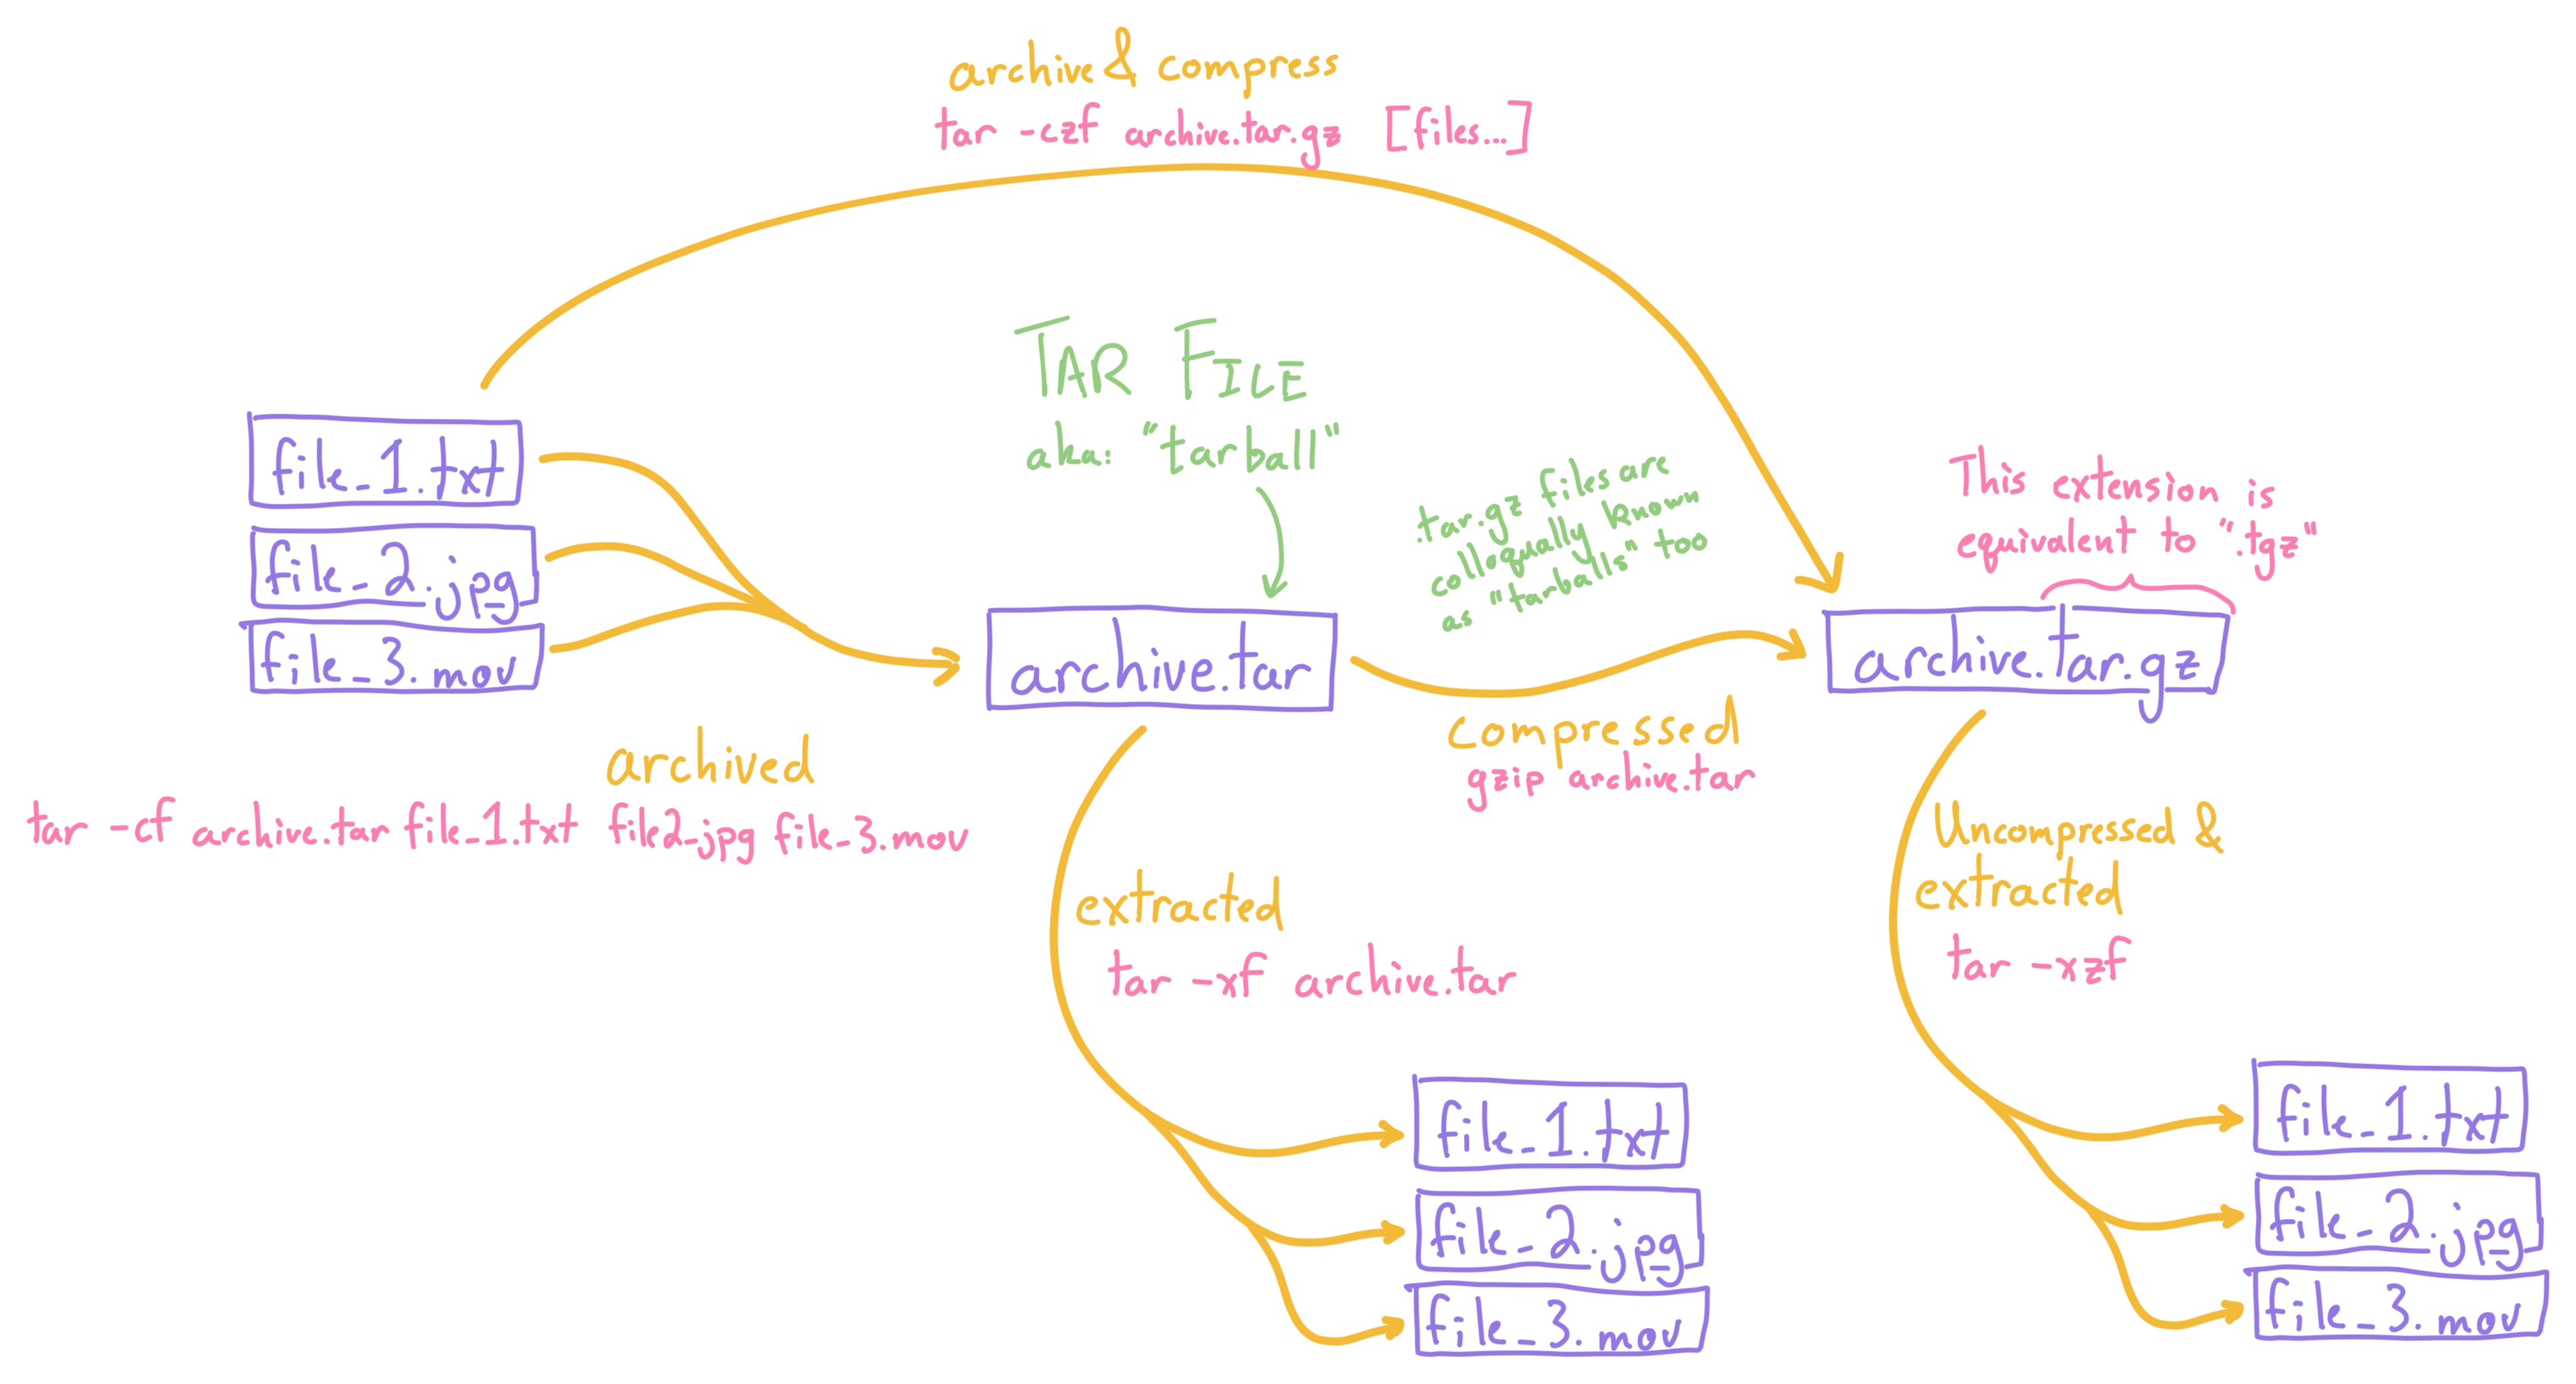
A living document of diagrams and notes on various Unix tools.
“Fun isn’t something one considers when
balancing the universecollecting sea shanties, but this does put a smile on my face”.

I will only link downloads of recordings that are not available for sale new (digitally or physically) anywhere.